
The Twister Block Tutorial is a captivating and beginner-friendly guide for quilters who want to explore a dynamic and versatile block design. This quilt block stands out for its mesmerizing pinwheel effect that looks complex but is surprisingly easy to achieve with the right tools and techniques. Whether you’re new to quilting or have years of experience, this tutorial offers a step-by-step explanation that ensures your quilting journey is enjoyable and successful.
The Twister Block Tutorial uses a clever cutting and piecing method to turn simple squares into intricate-looking twister patterns. It involves a specialized twister tool or template, a bit of planning, and a touch of creativity. The result is a visually striking quilt that appears complicated but is quite manageable to construct.
In this article, we’ll walk you through everything you need to know about this quilting method. We’ll explain how to prepare your fabric, use the twister tool, assemble the blocks, and provide helpful tips for getting professional results. Throughout the guide, we’ll continue to emphasize the keyword Twister Block Tutorial so you stay oriented on your creative mission. Let’s dive in and begin your twister quilting adventure!
1. Understanding the Twister Block Technique
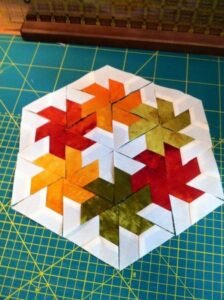
The Twister Block Tutorial begins with an understanding of how the twister block works. Unlike traditional quilt blocks that are cut to their final size before being pieced together, the twister block is first sewn as a grid of squares. Only after the grid is complete is it cut again using a special twister template, creating the swirling pinwheel effect.
This technique may seem counterintuitive at first, but once you see how the squares turn into dynamic spinning shapes, you’ll understand why it’s so popular. It’s a perfect blend of simplicity and illusion, creating depth and motion in your quilt.
You can use charm packs, layer cakes, or cut your own squares for this method. The flexibility allows you to work with scraps or pre-coordinated fabric bundles, depending on your preference. That means the Twister Block Tutorial is ideal for stash-busting or using up leftover fabric from past projects.
One essential tool is the twister template. This acrylic ruler is designed specifically for this technique and ensures that each block is precisely aligned. Using it correctly is key to achieving the neat pinwheel design that defines the twister block.
Color placement is another critical part of the process. Think about how your colors will interact once the blocks are cut and turned. High contrast between fabrics will help your pinwheels stand out, giving your finished quilt more visual impact.
Once you’ve selected your fabrics and laid out your squares, you’re ready to sew them into a large panel before cutting with the template. This phase may seem repetitive, but it’s a necessary step to create the base that will later be transformed into beautiful swirling designs.
2. Cutting and Arranging the Twister Blocks
Once your initial fabric grid is pieced, the next part of the Twister Block Tutorial involves using the twister tool to recut your fabric. This is the step that transforms a simple checkerboard into a quilt full of movement and texture.
Begin by placing the twister ruler on your sewn panel, aligning it with the seams as directed by the tool’s markings. Carefully cut around the template. You’ll end up with slightly smaller squares that already feature angled designs due to the offset placement.
These newly cut squares are then rotated and rearranged to form the twister pattern. It’s fascinating to watch how each turn adds to the overall spinning effect of the quilt. The design evolves quickly once you’ve completed the cutting and rearranging phase.
Be sure to label or keep the blocks in order as you cut, to prevent confusion during reassembly. It’s easy to lose track of direction, especially when the blocks are similar in color or tone.
The reassembly process is straightforward: simply stitch the blocks back together row by row. Because of the secondary seams created during cutting, accuracy is important here. A scant ¼” seam allowance is recommended to keep your blocks aligned.
After sewing all the blocks back together, press your seams carefully to one side or open, depending on your quilting preference. The final layout will now display the full twister illusion, giving your quilt a playful and sophisticated appearance.
3. Finishing Your Twister Quilt Project
Now that your top is assembled, it’s time to move forward in the Twister Block Tutorial with the finishing touches. Start by measuring your quilt top and selecting a suitable backing fabric. You’ll also need batting for the quilt sandwich.
Lay out the backing fabric, batting, and quilt top, smoothing out any wrinkles as you layer. Basting pins or spray adhesive will help hold everything together as you prepare to quilt.
When quilting a twister block quilt, you have a variety of options. Echo quilting around each pinwheel enhances the twister design and adds definition. Alternatively, free-motion quilting adds a whimsical flair and allows you to play with texture.
Binding your quilt is the final step. Choose a binding fabric that complements or contrasts with your quilt top to frame the design. Carefully sew the binding around the edges, either by machine or hand, for a neat and polished finish.
Don’t forget to add a quilt label on the back to mark your project’s name, date, and maker. This adds a personal touch and preserves your quilting history.
Your twister quilt is now complete and ready to be displayed, gifted, or used for cozy moments. The entire Twister Block Tutorial experience has taken you from fabric selection to a fully finished masterpiece.
4. Tips for Customizing Your Twister Quilt
One of the most rewarding aspects of this Twister Block Tutorial is the ability to personalize your quilt. You can play with fabric styles, from bold solids to whimsical prints, depending on the theme or occasion.
Try experimenting with seasonal fabrics to create holiday-themed twister quilts. Halloween prints make for spooky swirling blocks, while Christmas fabrics can bring a festive touch to your home décor.
Consider adjusting the block size. Some twister templates allow for mini or large block variations. This lets you create everything from placemats and table runners to full-sized bed quilts.
Mix and match solid and patterned fabrics for contrast. Solids help define the twister shapes, while patterns add interest and complexity. Use this balance to your advantage when designing your layout.
Add borders or sashing between the twister sections. This creates visual breaks and gives the quilt more structure. It’s also a good way to adjust the final size of your quilt.
Finally, share your work with the quilting community! Post your finished pieces online, join quilt-alongs, or display your quilts at local events. The twister block is always a conversation starter and a point of pride.
Frequently Asked Questions (FAQ)
What is a twister block in quilting?
A twister block is a quilt design made by sewing a grid of squares, then cutting them with a special twister template to create a swirling pinwheel pattern.
Do I need a special tool for the twister block?
Yes, the twister ruler or template is essential. It allows you to align and cut your blocks precisely to form the unique twister effect.
Can I make a twister block quilt without buying fabric packs?
Absolutely! You can cut your own squares from fabric scraps, yardage, or leftover project pieces. It’s a great way to use what you have.
Is the twister block suitable for beginners?
Yes, especially if you follow a Twister Block Tutorial. While it looks complex, the method is easy to follow and very rewarding.
How do I choose fabrics for a twister quilt?
High-contrast fabrics work best to highlight the swirling effect. Consider a mix of prints and solids for variety and definition.
What size quilt can I make with twister blocks?
You can make anything from small wall hangings to large bed quilts. It depends on the initial block size and how many you create.
The Twister Block Tutorial is a fun, creative, and surprisingly simple approach to quilt making. From assembling your fabric squares to cutting and transforming them into swirling pinwheels, each step offers a chance to express your creativity.
We’ve covered the foundational techniques, tips for success, and ways to personalize your quilt. Now it’s your turn to bring your own twister quilt to life!
If you enjoyed this guide, please leave your honest feedback and suggestions below. Your thoughts help others and inspire future tutorials for our wonderful quilting community!