
If you’re looking to elevate your quilting skills with a project that is as meaningful as it is beautiful, this Tutorial: Turning Points will guide you through every step of the process. Whether you’re a beginner eager to learn new techniques or a seasoned quilter searching for your next stunning layout, this article is designed just for you. The idea of turning points in quilting goes beyond the seams—it reflects moments of growth, creativity, and transformation in your craft.
In this Tutorial: Turning Points, we’ll dive into fabric selection, cutting strategies, piecing methods, and finishing touches that will bring this visually captivating quilt to life. You’ll discover not only technical know-how but also design insights that give your quilt a personal and unique flair. With every point and angle, you’ll be mastering precision while embracing creativity.
Throughout this article, we’ll focus on using clear, step-by-step instructions while also introducing creative variations. You’ll walk away with everything you need to confidently start and complete your very own Turning Points quilt project, turning each block into a milestone in your quilting journey.
1. Understanding the Design: What Is the Turning Points Quilt?
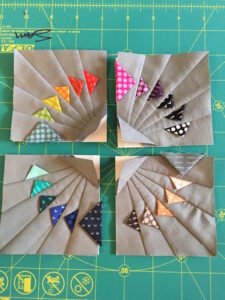
The Turning Points quilt is more than just a pattern—it’s a story told through angular movement, shifting directions, and thoughtful piecing. It features dynamic blocks where triangles and sharp lines meet to form beautiful points, symbolizing change and direction. Each block represents a step, a shift, a decision.
At the heart of the design is contrast—between light and dark, bold and subtle, traditional and modern. This makes it an ideal project for playing with colors and textures. The blocks may appear complex at first, but once broken down into units, the process is both approachable and satisfying.
The turning points within the blocks often use flying geese, half-square triangles, and mirror imaging. These techniques help create that signature directional feel. The result is a quilt that appears to move and evolve as your eye travels across it.
When choosing fabrics, opt for a color palette that enhances the movement—think gradients, high-contrast pairings, or monochrome with accent hues. Using a color wheel can be helpful for creating visual harmony and balance.
The size of each block can be adapted depending on your project goals. You can create a wall hanging with a handful of blocks or go big with a full bedspread featuring dozens. This flexibility makes Tutorial: Turning Points ideal for all levels and occasions.
By starting with a sketch or digital quilt planner, you can map out your own turning point narrative. Whether you’re commemorating a life change or simply experimenting with geometry, this quilt is a thoughtful and expressive endeavor.
2. Preparing Materials and Cutting with Precision
Before diving into sewing, gather your materials thoughtfully. For this Tutorial: Turning Points, you’ll need fabric in at least three different tones or prints: a background, a medium contrast, and a high contrast or focal fabric. Cotton quilting fabric is recommended for its structure and ease of use.
Rotary cutters and self-healing mats are essential tools when it comes to clean, accurate cuts. A 6½-inch square ruler and a long straight-edge ruler will help keep everything aligned properly. Remember: precision during cutting ensures that your points match when piecing.
Start by cutting your background fabric into squares and rectangles based on your block dimensions. Then move on to the contrasting fabrics, making sure to cut a few extras to allow room for trimming and error.
If your block includes half-square triangles (HSTs), mark a diagonal line across the square and sew ¼ inch on both sides before cutting along the line. Press seams open or to one side, based on your preference and how the points will meet.
Label your pieces as you cut to avoid confusion later. Keeping similar shapes grouped together speeds up the piecing process. This is especially helpful when you’re repeating the same block design multiple times.
Cut slowly and double-check measurements before slicing. It’s tempting to rush, but patience here pays off later. This stage builds the foundation for your quilt’s structure, and the better the cut, the crisper your final result.
3. Piecing the Blocks: Turning Fabric into Art
With your pieces ready, it’s time to begin building the Turning Points blocks. Begin by joining triangles to form larger squares or rectangles, using a consistent ¼-inch seam allowance throughout. Accuracy in sewing will help keep the turning points sharp and aligned.
Pin sections before sewing, especially when matching corners or seams. Don’t skip this step—it ensures that your design flows smoothly and your points don’t get lost in the seam. Removing pins just before the needle reaches them helps prevent any fabric shifting.
After sewing, always press your seams. Use a hot iron and apply gentle pressure rather than ironing back and forth. Pressing toward the darker fabric helps reduce shadowing, unless pressing open provides flatter joints.
As your sections come together, lay them out often to check alignment. This allows you to catch mistakes early and adjust as needed. Step back from your work every few blocks to view the overall composition from a distance.
Once blocks are assembled, trim them to the same dimensions. Even a 1/8-inch discrepancy can make a difference when joining rows. Using a square ruler with clear markings helps maintain symmetry and order.
Join your blocks row by row, and then sew the rows together. Always press the row seams in alternating directions or open, depending on your preferred quilting method. The end result should be a seamless visual flow where each turning point guides the next.
4. Finishing Touches: Borders, Quilting, and Binding
Now that your quilt top is complete, it’s time to layer and quilt. Begin by making a quilt sandwich—lay your backing fabric (face down), batting, and the quilt top (face up) on a flat surface. Use basting spray or pins to secure all layers evenly.
Select a quilting method that enhances the movement of the turning points. Straight-line quilting echoes the geometric design beautifully, while free-motion swirls can offer contrast and softness. Match your thread color to either blend or stand out, based on your creative vision.
Quilt from the center outward to avoid puckering and bunching. A walking foot can help keep all layers moving together smoothly. Take your time; quilting is as much a part of the design as the patchwork itself.
Next, trim the edges and prepare your binding strips. Bias binding adds flexibility around corners and curves, while straight grain binding works well for clean lines. Cut 2½-inch-wide strips, join them at the ends, and press in half lengthwise.
Attach the binding to the front of the quilt using a ¼-inch seam, then fold it over to the back and hand stitch or machine stitch to secure. Corners should be neatly mitered for a polished look. This step gives your quilt durability and elegance.
Label your quilt with your name, date, and title if desired. This transforms your project into a true heirloom and marks the completion of your Tutorial: Turning Points journey.
Frequently Asked Questions (FAQ)
What is the meaning behind the Turning Points quilt design?
The design symbolizes moments of change, reflection, and decision-making. It uses sharp angles and directional blocks to create a sense of movement and transition, perfect for commemorating a personal or artistic journey.
Is this pattern suitable for beginners?
Yes! While the design looks complex, it’s made up of basic shapes like triangles and squares. With careful cutting and attention to seam allowances, even newer quilters can successfully complete it.
How can I choose the right color palette for this project?
Consider using a mix of dark, medium, and light tones to create contrast and depth. Gradients, complementary colors, or bold solids work well to enhance the directional flow of the blocks.
What size quilt can I make with this pattern?
The size is highly flexible. You can make a mini quilt with 4–6 blocks, a throw quilt with 12–20 blocks, or even a queen-sized quilt with 36+ blocks. Adjust based on your desired final dimensions.
Do I need special tools to complete this tutorial?
Basic quilting tools such as a rotary cutter, cutting mat, quilting ruler, iron, and sewing machine are all you need. Optional tools like triangle templates or a walking foot can enhance accuracy and ease.
Can I modify the blocks for a more personal touch?
Absolutely. This tutorial encourages creativity! You can alter the size of the triangles, add sashing, rotate blocks, or even incorporate appliqué elements to tell your unique turning point story.
In this complete Tutorial: Turning Points, we explored every element you need to create a stunning, symbolic quilt—from understanding the meaning behind the pattern to cutting, piecing, quilting, and binding. With clear steps and room for personal interpretation, this project empowers quilters of all levels to create something deeply meaningful.
Each turning point stitched into your quilt reflects not only a technical skill but also a creative journey. We hope this tutorial has sparked your inspiration and given you the confidence to bring your quilt to life. If you’ve tried this project or have thoughts on the process, please leave your honest opinion and suggestions—we love hearing from fellow makers!