
Starting a Tulip Quilt Block Tutorial is a wonderful way to bring the elegance of spring into your sewing projects while learning a traditional but highly adaptable quilting technique. This type of block is known for its charming floral shape, making it a favorite among quilters who want to add a soft, welcoming look to their quilts. When studying this Tulip Quilt Block Tutorial, you will notice how versatile and beginner-friendly it is, allowing both newcomers and experienced crafters to enjoy the creative process.
This article aims to guide you step-by-step through the method of building this beautiful block while keeping your project simple, enjoyable, and well-structured. Using this Tulip Quilt Block Tutorial, you will gain a solid understanding of fabric selection, cutting, assembly, pressing, and finishing techniques. All these steps help ensure that your block turns out neat, balanced, and ready for incorporation into quilts, pillows, table runners, or wall hangings.
Before diving into the details, it’s important to mention that this project is ideal for seasonal quilting, especially during spring themes and floral-inspired collections. As you explore this Tulip Quilt Block Tutorial, you’ll see how easy it is to personalize your block by playing with colors, textures, and fabric styles. Whether you prefer bright and cheerful tones or soft pastel hues, the tulip block adapts effortlessly to your creative vision.
Understanding the Basics of the Tulip Quilt Block
The Tulip Quilt Block Tutorial usually begins with an overview of the block’s basic structure. This type of block typically consists of simple geometric shapes, such as squares, rectangles, and half-square triangles, arranged in a way that forms the recognizable tulip shape. The combination of these shapes makes the block surprisingly easy to construct, even if you are still building your quilting skills.
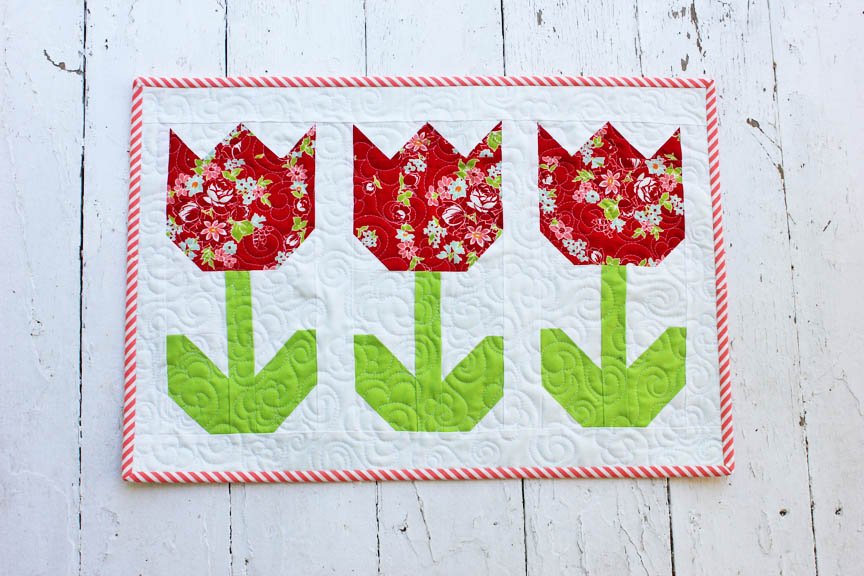
When starting your first block, selecting the right fabric is one of the most exciting steps. You can highlight your tulip by choosing two contrasting fabrics: one for the flower and one for the background. The contrast helps the design stand out more clearly, which is especially important if you are following this Tulip Quilt Block Tutorial to build an entire quilt.
Another important aspect involves accurate cutting. Clean, precise cuts help ensure that each piece aligns perfectly during assembly. Many quilters prefer to use a rotary cutter and a cutting mat, as they provide better control and consistency. This contributes significantly to the overall look of your finished tulip block.
Once your pieces are cut, it’s time to start assembling the units. Like most quilt blocks, this tulip block is built in stages, forming smaller units that later come together into the final block. Taking your time with this part helps maintain sharp points and balanced proportions in your block.
Pressing your seams correctly is another essential step explained in this Tulip Quilt Block Tutorial. Pressing toward the darker fabric or following the seam-nesting technique will help your block lay flat and look professionally finished. Good pressing practices can make a big difference in the accuracy and appearance of your final project.
By understanding these core concepts, you create a strong foundation before moving on to the advanced steps of building your tulip block.
How to Cut and Prepare Your Fabrics
Before you begin sewing, the cutting phase is crucial to guarantee that your tulip block comes together smoothly. Many quilters appreciate the simplicity of the cutting instructions in a Tulip Quilt Block Tutorial, as the shapes required are very straightforward. Even beginners can achieve great results by following the correct measurements and cutting guidelines.
Start by choosing the fabric for the tulip petals. You can use solid colors or patterned fabrics, depending on the look you want to achieve. Bright reds, pinks, yellows, and purples are popular choices since they resemble real tulips, but feel free to experiment with bolder or unexpected shades. Following the guidance of the Tulip Quilt Block Tutorial, your creativity plays a key role in making your project unique.
Next, prepare the fabric for the stem and leaves. Typically, shades of green work best for these parts, and using fabrics with subtle textures can add a natural look to the design. Accurate cutting ensures each piece fits together as intended, which helps you build confidence as you work through the steps.
After gathering your fabrics, iron them thoroughly to remove wrinkles or creases. This helps ensure that your cuts are precise and that the fabric layers lay flat on your cutting mat. Many quilters find that preparing the fabric carefully at the beginning saves time and prevents mistakes later in the process.
Then, follow the specific measurements usually listed in the Tulip Quilt Block Tutorial. Using a ruler to hold the fabric steady, cut each shape slowly and consistently. It’s always a good idea to double-check your measurements before making the first cut. This extra step prevents unnecessary fabric waste and ensures the overall accuracy of the block.
Lastly, organize your cut pieces in a way that makes the next steps easier. Keep each unit grouped together, such as petals, leaves, and background pieces. This ensures a smooth workflow and helps maintain focus as you progress.
Assembling the Tulip Quilt Block Step by Step
Now that your pieces are ready, you can begin assembling your tulip block. Many crafters enjoy this part of the process because it allows them to see the physical structure of the tulip take shape. The Tulip Quilt Block Tutorial helps break down the sewing process into manageable steps, making it easy to follow.
Start by sewing the petal pieces together. Depending on the pattern version you’re using, these petals may be formed using half-square triangles or simple squares sewn together. Keep your seams consistent and use a quarter-inch seam allowance, which is the standard measurement in most quilting projects.
After constructing the petals, focus on the stem and leaf units. These are typically made from rectangles and squares, and sometimes half-square triangles. Make sure each piece is aligned properly before stitching to keep your block symmetrical. The more accurate your seams, the cleaner your finished tulip will appear.
Once the smaller units are completed, begin connecting them to form the upper part of the tulip. Press the seams according to the instructions in the Tulip Quilt Block Tutorial. Proper pressing ensures that the block lays flat and that there are no bulky intersections that could distort the shape.
As you continue sewing the units together, take your time to ensure alignment. Pin your pieces if necessary to prevent shifting while sewing. These small details help produce a polished final result and are especially important if you plan to assemble multiple tulip blocks into a larger quilt.
Next, complete the stem and bottom units of your block. These are typically straightforward to sew and help frame the tulip shape. Maintain your quarter-inch seam allowance throughout the project to ensure consistency across all your blocks.
After assembling the final units, give your block a final press. Admire the clean lines, symmetrical petals, and balanced design. Following the steps outlined in this Tulip Quilt Block Tutorial ensures that your block comes together beautifully.
Finishing, Using, and Personalizing Your Tulip Block
Completing your tulip block is exciting, but exploring how to use and personalize it is even more enjoyable. This Tulip Quilt Block Tutorial encourages creativity and allows you to adapt the block to fit many different quilting projects.
One popular way to use your tulip block is by creating an entire quilt composed of multiple tulip blocks. This produces a charming, floral-themed quilt perfect for spring or summer décor. You can alternate colors, mix patterns, or arrange the tulips in rows for a garden-like layout.
Another idea is to turn the tulip block into a pillow cover. With just one or two blocks, you can create a seasonal accent piece for your living room or bedroom. This allows you to display your quilting skills without committing to a full-size quilt.
Adding borders is another fun way to personalize your tulip block. Borders can frame the design beautifully and help increase the overall size of the block. Choose coordinating or contrasting fabrics to make the tulip stand out even more.
Sashing is also a great technique for quilters who want to space their blocks evenly. This method adds structure and balance to your quilt layout. Many quilters appreciate how sashing enhances the appearance of floral blocks by giving them room to “breathe.”
You can also experiment with quilting stitches after assembling your quilt top. Free-motion quilting, straight-line quilting, or decorative stitches can enhance the shape of the tulip and add texture to the overall design. This step is where your creativity truly shines.
Finally, consider gifting tulip projects to friends or family. Handmade quilting items carry emotional value and serve as meaningful, personalized gifts that last for years.
Tulip Quilt Block Tutorial
1. What is the difficulty level of the Tulip Quilt Block?
The tulip block is generally considered a beginner-friendly block thanks to its simple structure of squares, rectangles, and half-square triangles.
2. What fabrics work best for the tulip petals?
Bright or pastel fabrics work beautifully. Solids or small-scale prints help the tulip shape stand out clearly.
3. Can I make this block in different sizes?
Yes, the Tulip Quilt Block Tutorial is easy to resize. Just adjust your measurements proportionally.
4. Do I need special tools to make this block?
A rotary cutter, quilting ruler, and cutting mat are helpful but not required. However, they greatly improve accuracy.
5. How can I keep my seams accurate?
Using a quarter-inch foot on your sewing machine and sewing slowly can help maintain consistent seam allowances.
6. Can I combine this block with other floral blocks?
Absolutely! The tulip block pairs well with other spring-themed quilt blocks.
7. Are there shortcuts for making multiple blocks?
Batch cutting and chain piecing help speed up the process if you’re making several blocks for a full quilt.
8. Can I make the tulip block entirely from scraps?
Yes! This block is scrap-friendly and works well with leftover fabrics.
9. How can I add texture to my tulip quilt?
Use decorative quilting stitches or free-motion quilting to enhance the shape of the petals and leaves.
10. What can I make with just one tulip block?
Pillows, mini quilts, tote bags, table toppers, and wall hangings are great single-block projects.
PATTERN HERE
This Tulip Quilt Block Tutorial has shown you how to prepare your fabric, cut precise pieces, assemble the units, and personalize your final project. With simple techniques and a flexible design, this block is perfect for beginners and experienced quilters alike. I hope this guide inspires you to create beautiful tulip-themed projects and explore your creativity through quilting. Please leave your sincere opinion and any suggestions to help improve future tutorials!