
If you are passionate about quilting, this Sunflower Quilt Block tutorial is the perfect project to bring brightness, creativity, and joy into your craft. The sunflower has always been a symbol of happiness, warmth, and positivity, making it a timeless design for quilt lovers. Whether you are a beginner just starting to explore quilting techniques or an experienced quilter looking for a fresh idea, this guide will give you step-by-step inspiration to create a block that stands out beautifully.
A Sunflower Quilt Block is more than just a piece of fabric art; it is a statement of style, nature, and handmade tradition. The sunflower’s golden petals and circular center are naturally suited for patchwork, allowing quilters to experiment with colors, textures, and stitching methods. By following this tutorial, you will not only learn how to assemble the block but also discover tips on choosing fabrics, arranging patterns, and finishing details that make your quilt truly special.
This article will guide you through essential aspects such as fabric preparation, cutting, piecing, and stitching, all while keeping the focus on a clean and enjoyable process. We will also highlight creative variations, so you can personalize your Sunflower Quilt Block tutorial experience. By the end, you will feel confident in designing a block that glows like sunshine in any quilt project.
Choosing Fabrics for a Sunflower Quilt Block
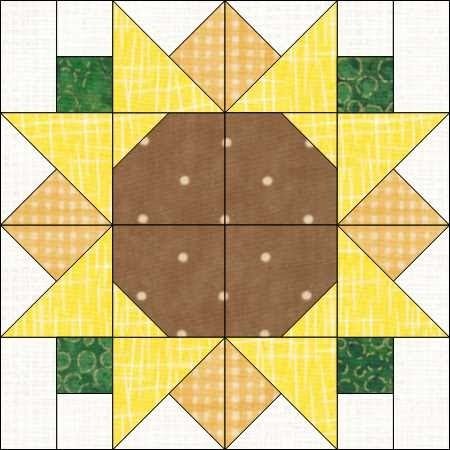
The first and perhaps most exciting step in this Sunflower Quilt Block tutorial is selecting the right fabrics. The sunflower’s beauty comes alive when you combine bright yellows, warm golds, deep browns, and fresh greens. Each color choice plays an important role in creating a realistic and vibrant block that reflects the sunflower’s charm.
When selecting fabrics, consider using different shades of yellow to give your petals depth and dimension. Mixing prints and solids can add a layer of texture that makes your quilt more dynamic. Fabrics with subtle patterns such as dots, swirls, or floral prints often enhance the natural look of the sunflower without overwhelming the design.
The center of the sunflower traditionally uses brown or black fabrics. For extra creativity, you can select darker prints with hints of gold or tan to create a more textured effect. This small detail can make a big difference in how realistic and eye-catching your block appears.
For the leaves and background, greens and neutral tones are the best options. Light-colored backgrounds allow the petals to stand out, while darker tones can create a striking contrast. The key is balance: you want your sunflower to remain the focal point.
Fabric quality also matters. High-quality cotton is often recommended because it is easy to cut, sew, and press, giving your project a polished finish. If you enjoy experimenting, you may also consider mixing in linen or batik fabrics for unique results.
Finally, remember that quilting is a personal journey. There is no strict rule about which colors to use. Feel free to let your creativity lead you and select fabrics that make your Sunflower Quilt Block tutorial project reflect your unique style.
Cutting and Preparing Your Quilt Pieces
Once you have chosen your fabrics, the next step in this Sunflower Quilt Block tutorial is cutting and preparing the pieces. Accuracy during this stage is crucial, as it ensures your block will align neatly when pieced together.
Start by ironing all your fabrics to remove wrinkles and make them easier to cut. Pressing your fabric properly helps maintain sharp lines, which translates to clean edges when assembling your block. This step may seem simple, but it has a big impact on the final result.
Use a rotary cutter, cutting mat, and quilting ruler for precise measurements. These tools allow you to create accurate pieces that fit together seamlessly. Quilting is a craft of precision, and even small errors can affect the overall look of your block.
For the sunflower petals, cut elongated diamond or triangle shapes depending on the pattern you choose. Consistency is essential, so double-check your measurements to keep each petal uniform. Having identical shapes makes assembly smoother and prevents gaps in the design.
The sunflower center is usually a circular or octagonal piece. You can achieve this by tracing a template and cutting carefully with scissors. Templates are also helpful for petal shapes, especially if you are creating multiple blocks for a larger quilt.
Background and leaf pieces should be cut last to ensure they complement the proportions of the petals and center. By carefully preparing each piece, you set a strong foundation for the rest of your Sunflower Quilt Block tutorial process.
Piecing and Assembling the Sunflower Quilt Block
With your fabric pieces ready, the next stage in this Sunflower Quilt Block tutorial is piecing and assembling the block. This is where your sunflower begins to take shape, and patience will reward you with a stunning design.
Start by arranging all the pieces on a flat surface before sewing. This dry layout gives you a clear picture of how the block will look once assembled. It also allows you to make adjustments, such as rearranging petal colors for better balance.
Begin stitching the sunflower petals together first. Work in small sections, usually groups of two or three petals, and then combine them to form a half-circle or full-circle arrangement. Press each seam as you go to keep the block neat and flat.
Once the petals are complete, add the sunflower center. Depending on your pattern, you may applique the center onto the petals or piece it in as a separate section. Both techniques work well, so choose the one that feels most comfortable for your skill level.
Next, attach the background pieces. These usually frame the sunflower and create a square block shape. Pay close attention to alignment to ensure your sunflower remains centered within the block.
Finally, press the entire block thoroughly. Pressing not only flattens seams but also gives your quilt block a polished, professional appearance. By following these steps, your Sunflower Quilt Block tutorial will produce a design that radiates warmth and precision.
Adding Finishing Touches and Creative Variations
Once your block is assembled, this Sunflower Quilt Block tutorial encourages you to explore finishing touches and creative variations that make your project truly personal. This is where your creativity shines, turning a simple design into a one-of-a-kind masterpiece.
Consider adding embroidery details around the sunflower center. Simple stitches can mimic the seeds of a real sunflower, giving your quilt block an extra layer of texture and charm. Hand-stitching also adds a unique handmade quality that enhances the overall aesthetic.
You can also play with fabric choices beyond the traditional yellows and browns. For example, experiment with red, orange, or even pastel petals for a whimsical twist. Artistic freedom is one of quilting’s greatest joys, and your block should reflect your personality.
Borders are another creative option. Adding a thin border of complementary fabric around the block can make the sunflower stand out even more. This technique is especially effective when combining multiple blocks into a larger quilt.
Quilting patterns themselves can be part of the design. Try using free-motion quilting or decorative stitching to create swirls, leaves, or rays that echo the sunflower theme. This enhances both the visual appeal and the tactile experience of the quilt.
If you are making multiple blocks, consider arranging them into larger quilt layouts. A series of sunflowers across a quilt top creates a stunning field-like effect that fills the room with warmth.
The finishing touches you choose define your quilt’s final impact. Whether you keep it traditional or venture into bold variations, this Sunflower Quilt Block tutorial gives you the foundation to create something beautiful and personal.
About Sunflower Quilt Block Tutorial
What is the easiest way to make a Sunflower Quilt Block?
The easiest method is to use templates for petals and center shapes, ensuring consistency and accuracy. Beginners may find applique methods simpler than piecing.
Can I make a Sunflower Quilt Block without a sewing machine?
Yes, you can hand-stitch the pieces, though it requires more time and patience. Hand sewing also adds a traditional and personal touch to your quilt.
What size should a Sunflower Quilt Block be?
The size depends on your project. Common sizes range from 8 inches to 12 inches per block, but you can adjust based on the quilt design.
How do I choose the right fabrics?
Opt for high-quality cotton fabrics in bright yellows, warm browns, and greens. Mixing solids with subtle prints adds depth and texture to the sunflower.
Is the Sunflower Quilt Block suitable for beginners?
Yes, this block can be adapted for all skill levels. Beginners may prefer simpler petal arrangements, while advanced quilters can try intricate piecing techniques.
How can I make my quilt block more unique?
Experiment with fabric colors, add embroidery details, use decorative quilting stitches, or arrange multiple blocks into creative layouts.
In this Sunflower Quilt Block tutorial, we explored every step of creating a vibrant and cheerful quilt design, from choosing fabrics and cutting pieces to assembling, finishing, and adding creative variations. With the sunflower’s natural beauty as inspiration, this project offers both beginners and advanced quilters the chance to create something meaningful and eye-catching.
Now it’s your turn to bring sunshine into your quilting projects. What do you think of this tutorial? Share your honest opinion and suggestions—I’d love to hear your feedback and ideas for future quilting inspirations.