
The Spinning Star Quilt Block Tutorial is one of the most engaging and satisfying projects for quilters who want to add movement and elegance to their creations. This design, with its dynamic swirling pattern, brings a sense of energy and flow to any quilt. Whether you’re a beginner eager to learn or an experienced quilter looking for a new twist, the Spinning Star Quilt Block Tutorial provides a beautiful and rewarding challenge.
Creating a spinning star block involves a blend of precision, color balance, and creative layout. It’s not just about stitching pieces together—it’s about crafting a visual effect that seems to spin right off the fabric. This style of block is a perfect addition to quilts for all occasions, from seasonal throws to treasured heirloom pieces. It stands out while blending seamlessly into both traditional and modern quilts.
In this article, we’ll walk through a step-by-step Spinning Star Quilt Block Tutorial, exploring cutting techniques, assembly methods, color planning, and tips to avoid common mistakes. We’ll also discuss the best fabric choices and tools to use for professional results. Whether you’re sewing by hand or machine, you’ll find practical guidance in every step.
Understanding the Spinning Star Block Design
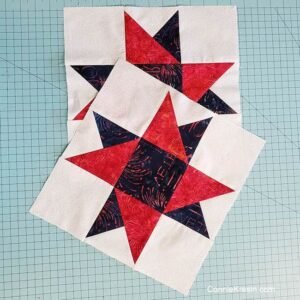
The Spinning Star Quilt Block Tutorial begins by appreciating the visual composition of the block. At its core, the spinning star is made up of multiple half-square triangles (HSTs) arranged to create a rotating motion. This illusion of spin is what gives the block its name and charm.
Each triangle must be cut and sewn with care. Even a slight misalignment can throw off the pattern. But with careful measurements and a steady hand, the result is stunning. The block usually fits into a standard 12″ x 12″ layout, but it can be scaled to meet your specific design needs.
Choosing the right fabrics is crucial. High-contrast fabrics help define the “spin” effect, while gradient or tone-on-tone choices create a softer, more subtle swirl. You might consider using solids for clarity or prints to add texture and personality to your block.
Color placement is another key element. Typically, a Spinning Star Quilt Block will alternate between light and dark fabrics to emphasize rotation. The star’s tips should be consistent in tone, drawing the eye toward the center and out to the points.
When preparing your fabric pieces, always starch lightly and press well before cutting. This ensures crisp lines and prevents distortion. Accuracy in this step sets the tone for a successful final block.
Finally, remember to label your fabric pieces before sewing. Keeping track of the direction each triangle needs to face will save time and reduce mistakes later on in the process.
Step-by-Step Cutting and Preparation
Before diving into sewing, it’s important to prepare all your materials with precision. For the Spinning Star Quilt Block Tutorial, you’ll need a rotary cutter, a quilting ruler, a self-healing mat, and good quality cotton fabric.
Start by cutting your fabric into squares. You’ll need at least two colors—one for the star points and one for the background. For a 12″ block, cutting 3.5″ squares will give you enough room for seam allowances and trimming.
Next, use the two-at-a-time method for making half-square triangles. Place one light and one dark square right sides together, draw a diagonal line from corner to corner, and sew 1/4″ on each side of the line. Then cut along the drawn line to produce two HSTs.
After sewing, press your HSTs open. Press seams toward the darker fabric to reduce show-through and bulk. Take time here; a flat block will make assembling the final layout much easier.
Now, trim each HST to the desired finished size. A standard block might call for 2.5″ finished HSTs, so trim accordingly. This step helps create perfect points when assembling your star.
Lay out your trimmed blocks in the spinning star configuration. This is where the magic starts. You’ll see the pinwheel pattern forming—just make sure each triangle faces the correct direction.
Once you’re satisfied with the layout, stack rows and label them. That way, you’ll keep everything organized as you move on to sewing the final block together.
Assembling the Spinning Star Quilt Block
Now that your pieces are prepared, it’s time to assemble the block. Begin by sewing the half-square triangles together in rows. Use a 1/4″ seam allowance and be consistent throughout the project.
As you sew, press each seam after joining a pair of blocks. Some quilters prefer to press seams open for less bulk, while others press to the side. Either method works—just be consistent for alignment later on.
After assembling the rows, sew the rows together in sequence. This step forms the full spinning star block. Double-check that your seams align so that the star points remain sharp and clean.
If necessary, square up your block after sewing. A well-aligned block will measure exactly 12.5″ unfinished (for a 12″ finished block). Use your quilting ruler and trim carefully.
For added accuracy, use pins or clips to match intersections when sewing rows. This small step makes a big difference in the final appearance of the star pattern.
Once finished, press the entire block one final time. Admire your work! You’ve just completed a beautiful Spinning Star Quilt Block, ready to be joined into a quilt or displayed on its own.
Creative Ideas and Variations
One of the joys of the Spinning Star Quilt Block Tutorial is its versatility. You can customize this design in countless ways to make it your own. Let’s explore a few creative directions you can take.
First, try using ombré fabrics to create a fade effect in the spinning motion. This brings a modern, artistic touch to a classic design. Place the darkest fabrics at the tips or the center to create visual depth.
Another idea is to incorporate fussy cutting. Choose fabric prints that have specific images or motifs and place them in the center of your block or at each point of the star. This adds a personal, playful detail.
You can also scale the block size to suit different projects. Make smaller blocks for a table runner or baby quilt, or go big for a dramatic wall hanging. The spinning star looks impressive at any scale.
Try using more than two fabric colors. A triadic color scheme, for instance, adds complexity and movement. Just be sure to maintain contrast between your star points and the background.
For holiday-themed quilts, the spinning star works beautifully with festive colors like red, green, or gold. Try metallic fabrics or batiks for an extra shimmer in your holiday projects.
Lastly, consider combining spinning star blocks with other quilt block patterns. A sampler quilt featuring a spinning star adds variety and visual interest, showcasing your growing quilting skills.
Common Mistakes and How to Avoid Them
Even experienced quilters sometimes encounter issues when making the Spinning Star Quilt Block. Knowing common pitfalls can help you avoid them and save time.
The most frequent mistake is mismatched seams. This usually happens when blocks aren’t trimmed to the same size. Always take time to square up your HSTs before assembling the layout.
Another issue is directional errors. With so many triangle units, it’s easy to rotate one the wrong way. Always lay out the entire block before sewing and double-check orientation.
Stretching fabric while pressing is also a problem. Handle your fabric gently, especially on the bias edges of triangles, which are prone to distortion. Use a pressing motion, not a sliding one.
Using dull rotary blades can lead to frayed or uneven cuts. Keep your cutting tools sharp and clean for the best results. Precision cutting ensures clean seams and sharp points.
Inaccurate seam allowances are another trouble spot. Invest in a 1/4″ presser foot and test your seam width on scrap fabric. Consistency in seams creates blocks that fit together beautifully.
Finally, rushing through the project can cause small errors to snowball. Take your time, enjoy the process, and appreciate each step. Quilting is as much about the journey as the result.
– Spinning Star Quilt Block Tutorial
What size is a standard Spinning Star Quilt Block?
Most quilters make this block in a 12″ x 12″ finished size. However, it can be scaled up or down depending on your project needs.
Is this block suitable for beginners?
Yes! The Spinning Star Quilt Block Tutorial is beginner-friendly, especially if you already know how to make half-square triangles. Just take your time with layout and pressing.
What fabrics work best for this block?
High-contrast quilting cottons are ideal. Solids, tone-on-tones, and small-scale prints work well for emphasizing the spinning motion.
Can I sew this block by hand?
Absolutely. While it’s faster by machine, hand sewing allows for great accuracy and is a relaxing option for slow stitching enthusiasts.
How do I avoid bulky seams?
Trim your HSTs and press seams open or alternate directions in each row to distribute bulk. This helps the block lie flat when finished.
How many blocks do I need for a full quilt?
It depends on your quilt size. A queen-size quilt might require 49 blocks (7×7 layout), while a baby quilt could use just 9. Plan your layout ahead.
This Spinning Star Quilt Block Tutorial has guided you through every step of creating one of the most visually dynamic quilt blocks in modern quilting. From cutting and assembling to choosing fabrics and avoiding common mistakes, you now have the tools and tips to confidently craft your own spinning star block.
We hope this tutorial has inspired you to try new techniques, explore color combinations, and bring your own creativity into each project. Quilting is more than sewing—it’s storytelling, art, and tradition all in one.
If you enjoyed this guide or have any questions, please leave a sincere opinion below. We welcome your suggestions, feedback, and ideas for future tutorials. Happy quilting!