
The Sawtooth Star Block Tutorial is one of the most beloved guides for quilters who enjoy creating traditional and timeless quilt designs. This classic block pattern has been around for generations, and it remains a favorite because of its versatility, elegance, and ability to adapt to both modern and vintage styles. Whether you are new to quilting or already experienced, learning how to make a Sawtooth Star block can open endless creative possibilities.
The Sawtooth Star Block is made with simple shapes like squares and triangles, yet the finished design looks beautifully intricate. Its balanced symmetry gives quilts a polished look, making it suitable for everything from wall hangings to full-size bed quilts. The star shape immediately stands out, catching the eye with bold points and a clean design. For many quilters, it is often the first star block they ever learn, and it remains one of the most rewarding to sew.
In this Sawtooth Star Block Tutorial, we’ll explore how to construct the block step by step, highlight variations you can try, and provide helpful tips for achieving sharp points and smooth seams. We will also cover fabric choices, color combinations, and practical techniques to ensure your quilting project turns out beautifully. By the end of this tutorial, you’ll feel confident making your own Sawtooth Star blocks and incorporating them into creative quilt projects.
Understanding the Sawtooth Star Block
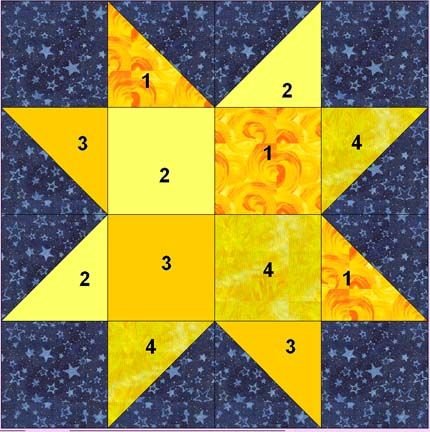
The Sawtooth Star Block is traditionally built from one large center square, four flying geese units forming the star points, and four smaller corner squares. This simple construction makes it approachable, even for beginners, while still being visually impressive.
Each component of the block plays an important role. The center square is the focal point, often made from a contrasting fabric to draw attention. The flying geese units are essential for creating the star’s sharp points, and the corner squares add balance, framing the design perfectly. Mastering these parts ensures your star will look crisp and symmetrical.
One of the reasons quilters love this block is its adaptability. You can use bold prints in the center for a dramatic look or keep it subtle with solids for a more traditional style. The star can be made in any size depending on your quilt’s design, which makes it suitable for small projects like table runners as well as large quilts.
When working on this Sawtooth Star Block Tutorial, accuracy is key. Measuring carefully, cutting cleanly, and pressing seams as you go will help your block come together neatly. Because this pattern relies heavily on straight seams and angles, small mistakes in cutting or sewing can make the points uneven. Patience and precision are essential.
Another valuable aspect of this block is how it teaches quilting fundamentals. By sewing flying geese, working with quarter-inch seams, and arranging the block’s layout, you practice essential skills that will benefit all your future quilting projects. It’s not just about finishing a star; it’s about learning to sew more confidently.
For beginners, the Sawtooth Star block is both a challenge and an achievement. For experienced quilters, it is a timeless design that can be reimagined again and again. Its simplicity, combined with its striking look, is what makes it such a staple in the quilting world.
Step-by-Step Construction Guide
To start your Sawtooth Star Block Tutorial, gather your materials. You’ll need fabric in at least two contrasting colors, a rotary cutter, a quilting ruler, and a sewing machine with a quarter-inch foot. Having an iron and pressing board nearby is also important to keep your seams flat.
The first step is cutting your pieces. You’ll need one square for the center, four smaller squares for the corners, and eight smaller triangles to form the flying geese. Precision at this stage will set the tone for the entire block, so double-check your measurements before cutting.
Next, create the flying geese units. These are made by sewing two small triangles to opposite sides of a larger rectangle or square. Press the seams carefully so that the points remain sharp. Once you have four flying geese units, arrange them around the center square to form the star shape.
Now it’s time to sew the rows together. Start with the top row: a corner square, a flying geese unit, and another corner square. Do the same for the bottom row. The middle row is the center square with two flying geese units on each side. Sew these rows together, being mindful of alignment so the star points meet neatly.
Pressing is a step that should never be skipped. Each time you join pieces, press the seam allowance to one side to reduce bulk. This ensures your block lays flat and the final star looks sharp and even.
Once all rows are assembled, sew them together carefully. Congratulations—you’ve completed your first Sawtooth Star Block! Repeat the process as many times as needed to create multiple blocks for a larger quilt.
Creative Variations of the Sawtooth Star
One of the joys of quilting is making each project uniquely yours, and the Sawtooth Star Block Tutorial lends itself beautifully to creativity. You can explore many variations simply by changing fabrics, colors, or center square designs.
A popular variation is using a patterned fabric in the center square. This creates a striking focal point and can tie together the colors of the surrounding fabrics. Floral prints, novelty fabrics, or bold geometrics work especially well in this role.
Another creative approach is to make the star points in scrappy fabrics. Instead of using one solid color, mix different fabrics for the flying geese units. This adds texture and charm, especially if you enjoy a traditional, farmhouse-style quilt.
You can also experiment with background fabrics. While many quilters use plain white or cream, switching to dark backgrounds such as navy or black can make the star pop dramatically. This modern twist brings new life to a traditional block.
For advanced quilters, adding borders or secondary patterns within the star creates even more depth. Small patchwork squares or half-square triangles inside the center square can make your star look complex and eye-catching.
Lastly, varying the size of your stars can bring extra interest to your quilt layout. Mix large and small stars across your quilt for a dynamic, playful effect. The possibilities are endless when working with this classic block.
Tips for Perfecting Your Sawtooth Star Block
Even though the Sawtooth Star Block Tutorial is beginner-friendly, there are a few tips that can help make your blocks more precise and polished. Paying attention to these details will improve your quilting results significantly.
First, always use a sharp rotary cutter and ruler for cutting your fabric. Clean, straight cuts ensure that your pieces fit together perfectly. Even slight inaccuracies can throw off the entire block.
Second, focus on maintaining a consistent quarter-inch seam allowance. This is the standard in quilting, and it keeps all the pieces aligned correctly. Using a quarter-inch presser foot can make this much easier.
Third, don’t rush pressing. Gently press your seams instead of ironing them back and forth. This prevents fabric distortion and helps your seams stay accurate. Remember: pressing is as important as sewing.
Another tip is to square up your flying geese units before assembling the block. Trimming them to the exact size ensures your star points align correctly. This small step makes a big difference in the final look.
Additionally, lay out all your pieces before sewing. This lets you preview the block and catch any mistakes in fabric placement. It also helps you see how the colors and patterns work together before committing.
Finally, practice patience. Mistakes happen, especially when learning. Don’t hesitate to use a seam ripper if something looks off. Taking the time to correct errors will leave you with a block you’re proud of.
about the Sawtooth Star Block Tutorial
What size is a standard Sawtooth Star Block?
Most traditional Sawtooth Star blocks finish at 12 inches square, but you can scale the measurements to create smaller or larger versions depending on your project.
Why are my star points not sharp?
Blunt star points usually happen when the seam allowance is too wide or when pieces are cut inaccurately. Check your measurements and ensure you are sewing with a true quarter-inch seam.
Can I make a Sawtooth Star without flying geese units?
Yes, you can construct the block using half-square triangles instead, but flying geese are the most common method because they use fewer seams and reduce bulk.
What fabrics work best for this block?
High-contrast fabrics work beautifully for the star because they make the design stand out. Solids, small prints, or bold patterns can all be used effectively.
Is the Sawtooth Star Block good for beginners?
Absolutely. It’s a beginner-friendly block that teaches important quilting techniques while still producing an impressive design.
How can I use the Sawtooth Star in a quilt?
You can make a quilt entirely from Sawtooth Star blocks, combine it with other star designs, or use it as a feature block in a sampler quilt.
The Sawtooth Star Block Tutorial is more than just a guide—it’s an invitation to explore your creativity through quilting. By learning how to construct this timeless block, experimenting with variations, and applying useful tips, you can create stunning projects that reflect your style.
Now that you’ve seen how versatile and rewarding the Sawtooth Star can be, why not give it a try in your next quilting project? I’d love to hear your honest opinion about this tutorial and any suggestions you might have to make it even better. What variation of the Sawtooth Star will you try first?