
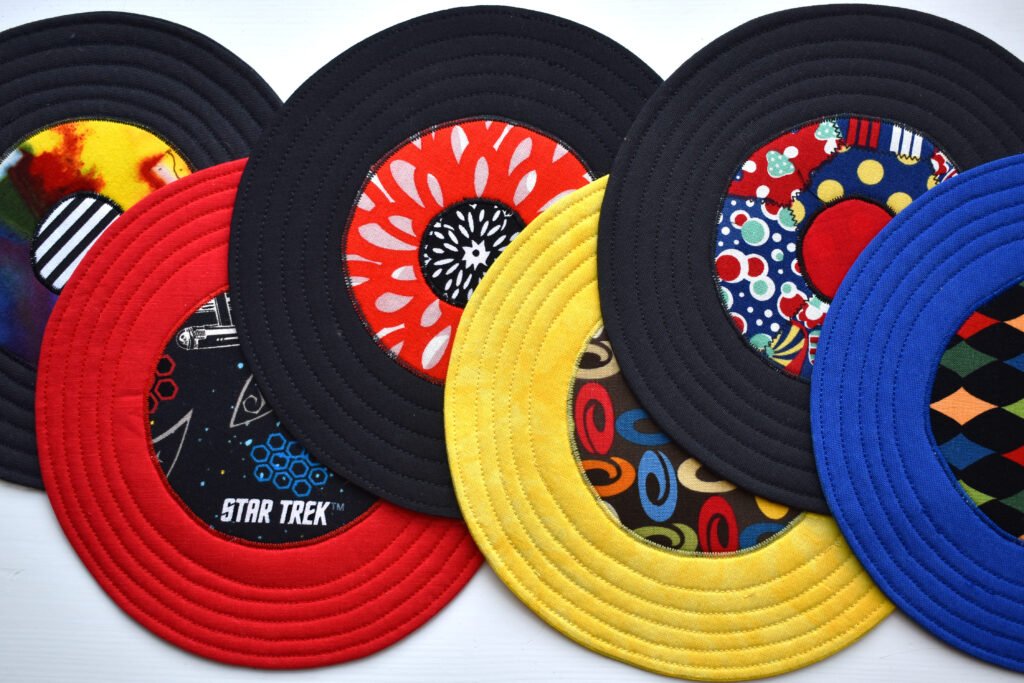
Record Coaster Sewing Tutorial If you’re looking for a fun and creative way to add a touch of retro charm to your home, this Record Coaster Sewing Tutorial is exactly what you need. Inspired by the vintage aesthetic of old vinyl records, these coasters are not only eye-catching but also practical, making them a perfect DIY gift or a stylish addition to your coffee table. Whether you’re an experienced sewer or just beginning, this project is simple enough for anyone to enjoy while learning new sewing techniques.
The Record Coaster Sewing Tutorial combines the joy of crafting with a functional purpose. It allows you to upcycle leftover fabric and experiment with circular sewing, all while creating something that will spark conversations with your guests. The best part is that this project doesn’t require a lot of materials—just basic sewing tools, some fabric, and your creativity.
By following this step-by-step guide, you’ll learn how to design, cut, and sew your own record-shaped fabric coasters. The process is straightforward, making it perfect for weekend crafting sessions or creative afternoons. Let’s dive into this exciting sewing project that merges nostalgia and handmade art in the best way possible.
Materials Needed for the Record Coaster Sewing Tutorial
Before you start your Record Coaster Sewing Tutorial, it’s important to gather all the materials you’ll need. Having everything organized will make your sewing process smoother and more enjoyable.
First, you will need fabric scraps in different colors. Ideally, choose black or dark fabric for the “record” base to imitate vinyl, and colorful pieces for the “label” in the center. Cotton or felt works best because they are easy to cut and sew.
Next, prepare some fusible interfacing to add stiffness and durability to your coasters. This helps the fabric hold its shape, preventing it from curling or wrinkling over time. A lightweight interfacing is usually enough for this small project.
You’ll also need a pair of fabric scissors, a sewing machine (or a needle if you prefer hand stitching), pins, and thread that matches or contrasts your fabric. A circular template, such as a bowl or plate, will help you trace the perfect record shape.
For the center label of your record coaster, small round fabric pieces in bright colors—like red, yellow, or blue—work beautifully. These give the coaster that authentic retro look, reminiscent of classic vinyl records.
Finally, make sure you have an iron and ironing board handy to press the seams and apply the interfacing correctly. Keeping your fabric smooth will help you achieve professional-looking results.
Once you’ve gathered all these materials, you’re ready to move on to the exciting part—cutting and assembling your coasters!
Step-by-Step Instructions for Sewing Your Record Coasters
Now that you have your materials, let’s start the Record Coaster Sewing Tutorial with simple and clear steps. The key to success here is patience and precision.
Begin by tracing your circular template onto your black or dark fabric. You’ll need two circles for each coaster—one for the front and one for the back. Cut out as many circles as you plan to make coasters.
Next, trace and cut smaller circles for the “record label.” These should be about one-third the size of the main coaster circle. Pick bright fabrics that contrast nicely with the dark background to mimic the colorful centers of vintage vinyl records.
Iron the fusible interfacing onto the back side of each main fabric circle. This will give your coasters a firm, professional feel. Follow the manufacturer’s instructions for heat settings to avoid damaging your fabric.
Pin the smaller label circle in the center of one of your main circles. Then, sew it in place using a straight or zigzag stitch, depending on your preference. This small detail gives the coaster a realistic record appearance.
Next, place the front and back circles together with the right sides facing each other. Sew around the edges, leaving a small gap for turning. After sewing, carefully turn the coaster right side out and press it flat.
Finally, topstitch around the edge of the coaster to close the opening and add a finishing touch. You can even stitch circular lines inside the coaster to mimic the grooves of a real record—this small detail truly completes the look!
Tips for Perfecting Your Record Coaster Sewing Project
To make your Record Coaster Sewing Tutorial results stand out, it helps to follow some expert sewing tips. Even small improvements in technique can elevate your project’s final appearance.
Always press your fabric before and during sewing. This keeps your seams crisp and ensures that the pieces fit together perfectly. Ironing between steps may feel tedious, but it truly makes a difference in the final quality.
If you’re new to circular sewing, take it slow. Sewing perfect circles takes a bit of practice, so guide the fabric gently without pulling. Use a small stitch length for smoother curves and neater edges.
Experiment with decorative stitches on your sewing machine to add texture and personality to your coasters. A simple zigzag stitch can give them a more dynamic and handcrafted feel.
When selecting fabric colors, think about the mood you want to create. For a vintage look, stick with classic black, red, and beige combinations. For a modern twist, try neon or pastel tones. The beauty of the Record Coaster Sewing Tutorial is that it allows full creative freedom.
If you plan to give these coasters as gifts, consider making matching sets and wrapping them beautifully. Handmade gifts like these show thoughtfulness and creativity, making them cherished keepsakes.
Lastly, always check that your coasters are flat and even before finishing. A quick press with the iron will set the stitches and smooth any small imperfections, leaving your project looking store-bought.
Creative Variations and Ideas for Your Record Coasters
Once you’ve mastered the Record Coaster Sewing Tutorial, you can start experimenting with creative variations. This project offers endless possibilities for personalization and style.
One fun idea is to add embroidery details to the label section of your coasters. You could stitch words like “Rock & Roll,” “Jazz,” or even personalize them with initials. Hand embroidery adds charm and makes each piece unique.
Another variation is to use vinyl fabric for a glossy, authentic look. While it’s a bit trickier to sew than cotton, it gives your coasters an impressive shine that truly resembles real records.
You can also turn these coasters into wall art or table decorations. Simply enlarge the pattern to create bigger circles, and you’ll have retro-themed placemats or wall hangings perfect for a music lover’s space.
For eco-friendly crafters, consider using recycled fabric scraps from old clothes or leftover sewing projects. Not only will you save money, but you’ll also help reduce fabric waste while creating something beautiful.
To make your coasters more functional, you can add a layer of heat-resistant batting between the fabric layers. This way, they’ll protect your surfaces from hot mugs or dishes while maintaining their cool design.
Finally, don’t be afraid to mix materials—combine felt, denim, or cork backing for added texture and stability. The more you play with materials, the more unique and creative your Record Coaster Sewing Tutorial results will be.
About Record Coaster Sewing Tutorial
1. What type of fabric is best for making record coasters?
Cotton and felt are the most popular options because they are easy to sew and hold their shape well. Felt is especially good if you want a soft, durable finish without needing interfacing.
2. Can I hand-sew the coasters if I don’t have a sewing machine?
Yes! You can complete the Record Coaster Sewing Tutorial entirely by hand. Use small, even stitches and strong thread to ensure your coasters are durable and neatly finished.
3. How can I make the coasters look more like real records?
Try sewing circular stitch lines on the surface to imitate the grooves of vinyl. You can also use glossy fabric or even fabric paint to add realistic details.
4. Are these coasters washable?
Yes, they can be washed gently by hand or on a delicate cycle. Avoid using bleach or high heat when drying to keep their shape and colors intact.
5. Can I use this tutorial to make larger record-themed items?
Absolutely! The Record Coaster Sewing Tutorial can be scaled up to create placemats, wall décor, or even themed table covers. The technique remains the same—just adjust your measurements accordingly.
6. What’s the best way to gift handmade record coasters?
Bundle them in a small fabric pouch or tie them with a ribbon. Including a handwritten note explaining that they’re handmade adds a personal touch that people truly appreciate.
The Record Coaster Sewing Tutorial is a delightful project that blends creativity, functionality, and nostalgia. With just a few simple materials and some basic sewing techniques, you can craft beautiful coasters that protect your tables while adding a fun retro vibe to your home décor.
We’ve explored everything from choosing the right materials to adding personal touches that make your project unique. Whether you’re making them for yourself or as a thoughtful handmade gift, this tutorial offers endless room for creativity and customization.
What do you think about this Record Coaster Sewing Tutorial? Have you tried making your own version, or do you have ideas to improve the design? Share your honest opinion and suggestions—I’d love to hear your creative thoughts!