
The Pinwheel Quilt Block Pattern is one of the most beloved and recognizable quilt block designs in the quilting world. With its playful spinning shape and timeless charm, this block has been a favorite of quilters for generations. Whether you’re a beginner looking for an easy project or an experienced quilter seeking a fresh twist on a classic, the Pinwheel Quilt Block Pattern offers endless possibilities for creativity.
At first glance, the Pinwheel Quilt Block may seem simple, but its visual impact is anything but. Made using half-square triangles, this block delivers movement, dimension, and a dynamic sense of energy to any quilt. Best of all, it works beautifully with various fabric prints and color schemes, making it ideal for stash-busting and fabric play.
In this tutorial, we’ll guide you step-by-step through everything you need to know about creating the Pinwheel Quilt Block Pattern, from materials and cutting instructions to assembly tips and layout ideas. Whether you’re making a baby quilt, table runner, or a full-sized patchwork masterpiece, this guide will help you bring your vision to life.
1. Understanding the Pinwheel Quilt Block Structure
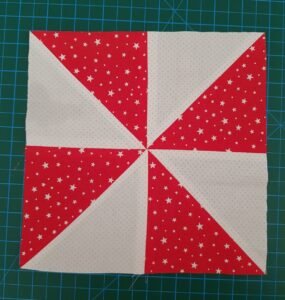
The Pinwheel Quilt Block is traditionally made up of four half-square triangles (HSTs) arranged to create a spinning wheel design. This block is usually square and can be made in various sizes depending on your project.
To begin, it’s essential to understand the basic geometry of the block. Each HST is formed by joining two right-angled triangles made from squares of contrasting fabrics. When you rotate and arrange these HSTs, they create the signature pinwheel shape.
This structure allows for many creative interpretations. You can use solids for a bold, graphic look or mix florals and prints for a more playful effect. Regardless of your style, mastering the Pinwheel Quilt Block Pattern opens the door to endless design opportunities.
Another benefit of this block is its simplicity. Even beginner quilters can master the Pinwheel Quilt Block Pattern with a little practice. The key lies in accurate cutting, careful piecing, and pressing seams consistently.
Finally, the size of your block will depend on the size of your HSTs. Common finished sizes include 6”, 8”, and 12” blocks, but you can scale up or down as needed. Let’s move into materials and preparation to get started on your first pinwheel.
2. Materials, Tools, and Fabric Selection
To create a beautiful Pinwheel Quilt Block Pattern, you need a few essential materials and tools. The great news is that most quilters already have these supplies on hand.
Start with high-quality quilting cotton for best results. Choose two contrasting fabrics—this contrast is what makes the pinwheel shape stand out. Solids, polka dots, stripes, or florals all work well depending on your desired look.
You’ll also need a rotary cutter, self-healing cutting mat, quilting ruler, sewing machine, iron, and thread. Accurate cutting is crucial when working with HSTs, so a sharp rotary blade and a clear ruler are your best allies.
When selecting fabrics, consider the overall color palette of your project. Do you want a bold modern aesthetic, or are you leaning toward vintage charm? Use the Pinwheel Quilt Block Pattern to reflect your vision and personality.
Pre-washing your fabrics is optional but recommended if you’re concerned about shrinkage or color bleeding. Once washed, iron your fabric to ensure smooth, accurate cuts.
For thread, use a neutral cotton thread that blends with both fabrics. You can also experiment with decorative stitching once you’re confident in your piecing skills.
Lastly, remember to gather pins or clips to keep pieces aligned and a seam ripper—just in case. Quilting is a journey, and even the best quilters make adjustments along the way.
3. Step-by-Step Instructions to Create the Block
Now it’s time to make your Pinwheel Quilt Block Pattern come to life. Follow these simple steps to assemble a beautiful and precise block.
Begin by cutting two equal-sized squares from your chosen fabrics. For a 6” finished block, start with 4” squares. Place one square of each fabric right sides together.
Next, draw a diagonal line from one corner to the opposite on the back of the lighter fabric. This line will serve as a guide for stitching. Stitch a 1/4” seam on both sides of the line.
Using your rotary cutter, carefully cut along the drawn line. You’ll now have two half-square triangles. Press the seams to one side or open, depending on your preference.
Trim your HSTs to the desired size using a square ruler. Accuracy at this stage ensures that your final Pinwheel Quilt Block Pattern will be even and aligned.
Arrange the four HSTs in a pinwheel formation with the same fabric always rotating in the same direction. Double-check placement before sewing.
Sew the top two HSTs together, then the bottom two. Press the seams, then join the top and bottom rows. Press again, and admire your completed Pinwheel Quilt Block Pattern!
4. Creative Variations and Quilting Ideas
The beauty of the Pinwheel Quilt Block Pattern lies in its flexibility. With just a few tweaks, you can create an entirely new look.
Try using four different fabrics for each HST for a scrappy pinwheel block. This is a great way to use up leftover fabric and create a dynamic, colorful design.
Another idea is to use ombré or gradient fabrics to create a fading effect within the pinwheel. This adds movement and sophistication to your quilt top.
You can also experiment with block rotation. Instead of aligning all your pinwheels in the same direction, rotate some to form secondary patterns such as stars or crosses.
Borders, sashing, and background fabric also play a key role. A bold border can frame your block beautifully, while sashing between blocks adds breathing room.
Consider mixing Pinwheel Quilt Block Patterns with other traditional blocks like Flying Geese or Four-Patch. The contrast can result in visually stunning compositions.
Finally, when quilting, echo the pinwheel shape with spiral or curved stitching to enhance the spinning motion. Hand quilting or machine quilting—both techniques work wonderfully here.
Frequently Asked Questions
What size should my starting squares be for a Pinwheel Quilt Block?
A good rule of thumb is to add 7/8” to the desired finished size of the half-square triangle. For example, for 3” finished HSTs, start with 3 7/8” squares.
Can I make a Pinwheel Quilt Block using charm packs or precuts?
Absolutely! Charm packs (5” squares) are perfect for making Pinwheel Quilt Block Patterns, especially for beginners. Just be sure to trim your blocks for accuracy.
What’s the best way to press the seams?
Some quilters prefer pressing seams open for flatter blocks, while others press to one side for strength. Choose the method that works best for your quilting style.
How can I make sure my points match up?
Use pins at seam intersections and sew slowly. Nesting seams (alternating directions) can also help your points align beautifully.
Is the Pinwheel Quilt Block good for beginners?
Yes! The Pinwheel Quilt Block Pattern is an ideal starting point for beginners due to its repetitive structure and simple techniques.
Can I scale the block up or down?
Definitely. The Pinwheel Quilt Block Pattern can be adjusted to any size by changing the starting square size. Just keep your seam allowance consistent.
In this guide, we explored the beloved Pinwheel Quilt Block Pattern, a timeless and beginner-friendly design that adds motion and personality to any quilt project. From understanding its structure to exploring creative variations, you’ve learned how to confidently sew this classic block and adapt it to your unique style.
Whether you’re stitching up a cozy baby quilt, a bold wall hanging, or a colorful table runner, the Pinwheel Quilt Block Pattern offers endless creative opportunities. It’s easy to piece, visually impactful, and incredibly satisfying to complete.
If you’ve enjoyed this tutorial, I’d love to hear from you. Please leave a sincere comment below sharing your thoughts, your experiences with the Pinwheel block, or suggestions for future tutorials. Let’s keep stitching and learning together!