
Starting with this Patchwork Zipper Pouch Tutorial is one of the easiest and most delightful ways to explore fabric mixing, color play, and practical sewing projects. This type of pouch is adored by crafters because it transforms small fabric scraps into something useful, charming, and truly personal. Whether you are brand-new to patchwork or already experienced with sewing, this guide will help you create a beautiful handmade pouch that looks polished and professional.
A patchwork zipper pouch is incredibly versatile. You can use it to store makeup, crochet hooks, sewing notions, coins, keys, or even small electronics. Because of its compact design and endless customization options, it makes a wonderful handmade gift. In this article, you will find a complete Patchwork Zipper Pouch Tutorial with simple explanations and a friendly tone to make the process enjoyable and stress-free.
Before we get into the step-by-step sections, it’s important to understand why this project is so popular. It teaches several basic sewing skills at once: piecing fabric, adding a zipper, lining the interior, and topstitching for a clean finish. By practicing with this Patchwork Zipper Pouch Tutorial, you not only make something beautiful, but also strengthen your foundational sewing abilities.
Understanding the Materials for a Patchwork Zipper Pouch
Choosing the right materials is essential to the success of this Patchwork Zipper Pouch Tutorial, and it all starts with fabric selection. Using cotton fabrics is highly recommended because they are easy to handle, durable, and widely available. Mixing prints, colors, and textures adds charm to your patchwork design. Small scraps, precuts, or leftover quilting cotton are perfect for this project.
Next, consider the lining fabric. It should be soft yet strong enough to hold up over time. Many crafters prefer cotton or polyester blends because these fabrics help the pouch maintain a neat interior. If you want extra structure, use fusible interfacing on the lining or outer panel to give your pouch a firm and stable feel.
Another important material is the zipper. For beginners, a nylon coil zipper is the easiest to sew, and it comes in many colors and sizes. Choosing a zipper that complements your patchwork design adds an extra touch of beauty to your pouch. The length of the zipper will determine how wide the pouch opens, so selecting a size slightly longer than the top of your pouch panel often works best.
Thread selection also matters in this Patchwork Zipper Pouch Tutorial. High-quality polyester thread provides strength and flexibility, making it ideal for projects that will be opened and closed frequently. Matching your thread to your fabric creates a cleaner final look, but contrasting thread can add a stylish decorative element.
Tools also play a role in successful sewing. A rotary cutter, cutting mat, and quilting ruler help achieve straight and precise fabric cuts. A sewing machine with a zipper foot attachment will make inserting the zipper much easier. Good pins or clips keep everything aligned as you stitch.
Finally, gather optional embellishments. Buttons, ribbons, appliqué pieces, or decorative stitching can personalize your pouch. This is where creativity shines. With all these materials ready, you are prepared to continue through the Patchwork Zipper Pouch Tutorial with confidence.
Step-by-Step Patchwork Construction
To begin building the patchwork exterior, decide on the style of your design. You may choose simple squares, rectangles, or more complex patterns. For beginners, the easiest approach is creating a grid of uniform squares. Arrange the pieces on a flat surface until you find a layout you love. Color balancing is crucial because it helps the final pouch look cohesive and visually appealing.
Start by sewing the pieces together row by row. Use a quarter-inch seam allowance, which is standard in quilting and essential for accuracy. After completing each row, press the seams with an iron. Alternating seam directions helps reduce bulk and ensures that seams nest neatly when rows are joined. This step gives your Patchwork Zipper Pouch Tutorial a polished appearance.
Once your rows are complete, stitch them together to form a full patchwork panel. Take your time matching the seams so the pattern looks sharp and professional. After sewing the rows together, press the panel again to create a smooth surface. Pressing throughout the process is one of the secrets to achieving precise, clean patchwork results.
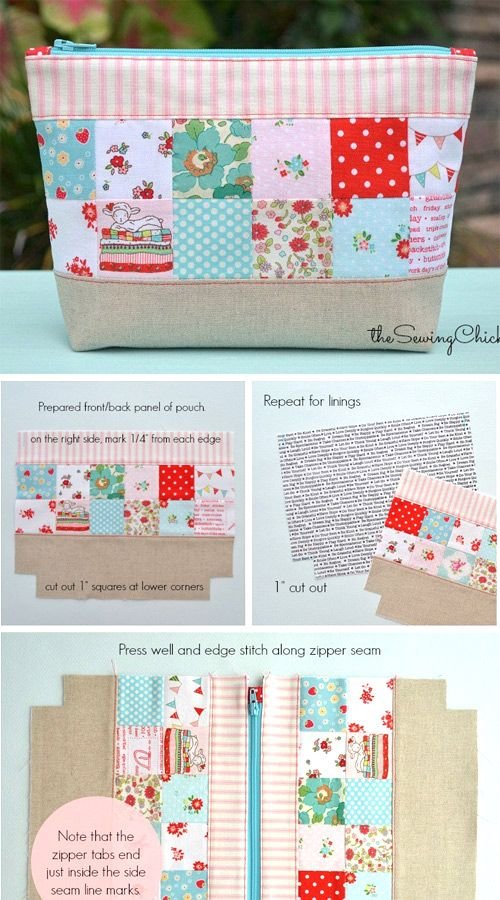
Next, trim the patchwork panel to the desired size. Make sure the edges are straight and even. This measurement will determine the final dimensions of your pouch. If you want a more structured pouch, apply fusible interfacing to the back of the patchwork panel at this stage. It strengthens the fabric and helps the pouch maintain its shape.
Prepare the lining fabric by cutting it to match the size of the patchwork panel. Using matching dimensions ensures everything fits together neatly once you assemble the pouch. Carefully iron the lining pieces so they are flat and ready for sewing.
Before moving on, double check your patchwork layout, interfacing, and lining. Good preparation simplifies the next steps of inserting the zipper and finishing the pouch. This Patchwork Zipper Pouch Tutorial prioritizes accuracy to help you achieve a high-quality final result.
Adding the Zipper to Your Patchwork Pouch
Adding the zipper may seem intimidating, but with clear guidance from this Patchwork Zipper Pouch Tutorial, the process becomes simple and enjoyable. Begin by placing the zipper face down along the top edge of the patchwork panel. Align the zipper edge with the fabric edge, making sure the pull tab is toward the outside of the pouch.
Next, place the lining fabric on top of the zipper, right side facing the patchwork. This creates a fabric-zipper-lining sandwich. Use clips or pins to hold everything securely. Keeping the layers aligned helps you achieve straight, clean stitching that enhances the final look of your pouch.
Attach your sewing machine’s zipper foot. This special presser foot allows you to stitch close to the zipper teeth without the foot getting in the way. Sew slowly along the zipper edge, backstitching at the beginning and end for durability. Once stitched, flip the lining away from the zipper and press the fabric for a crisp, smooth finish.
Repeat the process with the other side of the zipper by aligning the remaining panel and lining on the opposite side. Clip everything in place and sew carefully. After stitching, flip and press again. You should now have a neatly attached zipper with lining pieces on both sides. This is an important moment where your Patchwork Zipper Pouch Tutorial begins to look like an actual pouch.
Topstitching along the zipper adds strength and a professional appearance. Sew close to the zipper edge on both sides to secure the lining and prevent it from getting caught in the zipper when opening or closing the pouch. This step also enhances the durability of your finished pouch.
Before moving to the final construction, open the zipper halfway. This is extremely important because it allows you to turn the pouch right-side out later. Skipping this part can make it difficult to invert the pouch once the sides are sewn shut.
Finishing the Zipper Pouch
Now that the zipper is attached, you are ready to finish the pouch. Start by aligning the exterior panels right sides together and the lining pieces right sides together. Clip all four edges, making sure the zipper teeth are pushed toward the lining side. This arrangement helps the pouch maintain a polished shape once turned right-side out.
Begin sewing around the entire perimeter, but leave a small opening in the lining bottom. This unstitched gap will allow you to pull the pouch through. Use a consistent seam allowance, and backstitch at key points to strengthen the seams. This step completes the main construction taught in this Patchwork Zipper Pouch Tutorial.
Trim the corners to reduce bulk, being careful not to cut through the seams. Trimming creates sharper, more defined corners on the finished pouch. If your fabric is thick, you may also trim excess zipper tape to help everything lay flat.
Now turn the pouch right-side out by gently pulling it through the opening in the lining. Take your time so you do not stretch or damage the seams. Once everything is pulled through, push out the corners with a blunt tool such as a knitting needle or chopstick. This step reveals the final shape of your pouch.
Close the opening in the lining by stitching it shut with a small seam. Since the lining is on the inside, the stitches will be hidden. After closing the gap, push the lining into the pouch and smooth out the fabric. Your handmade patchwork zipper pouch is now complete and ready to use.
Finally, admire your finished project. You now have a personalized pouch created from fabric scraps, sewing skills, and creativity. This Patchwork Zipper Pouch Tutorial not only helps you make something useful but also inspires you to continue crafting and exploring new patterns.
About Patchwork Zipper Pouch Tutorial
What size should I make my patchwork zipper pouch?
The size depends on your needs. Many people prefer a medium pouch around 20 cm wide, but you can adjust the patchwork panel to make it larger or smaller.
Do I need a special sewing machine to follow this Patchwork Zipper Pouch Tutorial?
No, any basic sewing machine with a straight stitch and a zipper foot will work perfectly.
Can I make this project with fabric scraps?
Yes, this project is ideal for using leftover fabrics. Small pieces are perfect for creating unique patchwork designs.
Is interfacing necessary?
Interfacing is optional but recommended if you want a sturdier pouch. It helps the pouch keep its shape and adds durability.
What type of zipper works best?
A nylon coil zipper is the easiest to sew and comes in many colors. Choose one slightly longer than the pouch width.
Can beginners follow this Patchwork Zipper Pouch Tutorial?
Absolutely. The steps are simple, and even those new to sewing can complete this project successfully with patience and practice.
PATTERN HERE
This Patchwork Zipper Pouch Tutorial provides everything you need to create a beautiful handmade pouch from start to finish. You learned how to choose materials, sew the patchwork panel, attach a zipper, and finish the construction with confidence. I hope this guide inspires you to continue sewing and exploring creative projects. Please leave your sincere opinion and share suggestions on what you would like to learn next!