
Starting a patchwork tutorial can be one of the most rewarding journeys for anyone who loves creativity, fabric, and timeless craft traditions. Whether you are completely new to sewing or already have some experience with quilting, patchwork allows you to bring together small pieces of fabric to create something both practical and beautiful. The art of combining colors, patterns, and textures gives you endless possibilities to design quilts, bags, wall hangings, or decorative accessories that reflect your personality.
What makes a patchwork tutorial truly inspiring is that it teaches not just the technical side of sewing but also the creativity behind fabric arrangement. Each piece of fabric tells a story, and when stitched together, the final design becomes a unique expression of style and imagination. Many beginners are often surprised at how easy it is to start, especially when following step-by-step guidance that makes the process accessible to everyone.
Another important aspect is that patchwork is not only about sewing; it is also about mindfulness. The repetitive motion of stitching and the satisfaction of seeing your project grow piece by piece can be relaxing and fulfilling. This makes learning through a patchwork tutorial an enjoyable activity that blends craftsmanship with emotional well-being, giving you both a skill and a way to unwind.
Understanding the Basics of Patchwork
To begin any patchwork tutorial, you first need to understand what patchwork actually is. Patchwork is the art of joining different fabric pieces, often in geometric shapes, to form a larger design. These small pieces are usually sewn together with precise seams to create blocks, which can then be assembled into quilts, table runners, or even clothing.
The most common fabrics used in patchwork are cotton and linen, as they are easy to cut, sew, and maintain. Beginners should start with simple fabric choices, avoiding slippery or stretchy materials that can be harder to control. Choosing high-quality fabric is essential because it determines the durability and overall look of your finished piece.
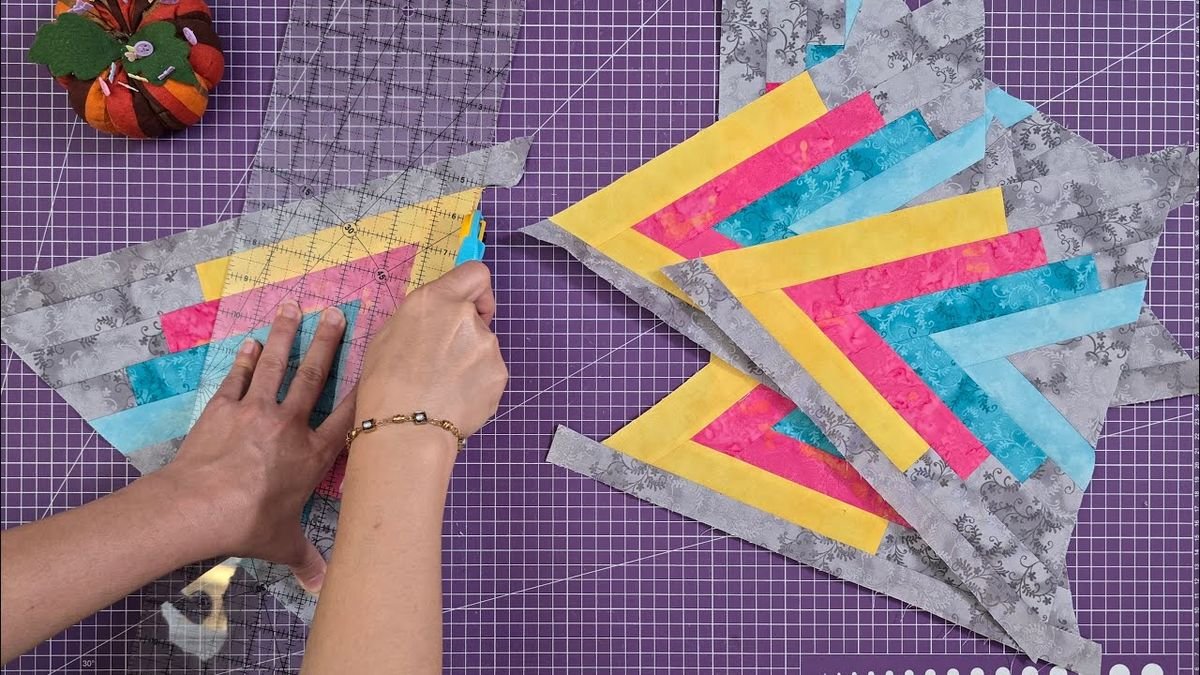
A patchwork tutorial often starts with teaching the importance of accurate cutting. Using tools like rotary cutters, self-healing mats, and transparent rulers helps ensure that your pieces align perfectly. Precision at this stage prevents mistakes later when sewing the blocks together.
Another core skill is mastering the quarter-inch seam allowance. This is the standard measurement used in patchwork to ensure all blocks are uniform and fit together seamlessly. Most sewing machines have markings or presser feet designed to help with this.
Pressing your seams as you sew is also emphasized in any reliable patchwork tutorial. Instead of ironing, pressing gently with the iron keeps the seams flat and avoids stretching the fabric. This small detail greatly improves the professional look of your final project.
Lastly, beginners should learn about simple block patterns such as the nine-patch, log cabin, or half-square triangles. These classic designs form the foundation of patchwork and are the starting point for more complex patterns later.
Essential Tools for a Successful Patchwork Project
A patchwork tutorial always highlights the tools you need before starting your first project. Having the right supplies ensures that your work is precise, easier, and more enjoyable from the beginning.
One of the most important tools is a rotary cutter. Unlike scissors, a rotary cutter glides smoothly through multiple fabric layers, making clean and accurate cuts. Paired with a self-healing cutting mat, it prevents damage to your workspace while keeping measurements precise.
A transparent quilting ruler is another must-have. It helps you cut straight lines and perfect angles, which are essential in patchwork where precision is everything. Investing in a good ruler saves time and reduces frustration later.
Sewing machines are central to patchwork, but not all machines are created equal. While any basic machine can work, features like adjustable stitch length and a walking foot attachment can make the process smoother. A patchwork tutorial usually explains how to set up your machine properly for consistent stitches.
Thread quality should not be overlooked. Using strong, all-purpose cotton thread ensures that your seams hold up over time. Beginners sometimes use mismatched or weak thread, which can cause breakage and weaken the final product.
You will also need fabric marking tools such as water-soluble pens or chalk. These help transfer cutting lines, seam guides, and placement marks without permanently staining the fabric. Having the right marking tools makes assembling blocks much easier.
Finally, a good iron is essential. Pressing your seams and fabric pieces keeps everything neat and professional. A patchwork tutorial usually recommends pressing after every step, which may seem repetitive but dramatically improves the quality of the finished project.
Step-by-Step Guide to Starting Patchwork
When following a patchwork tutorial, the best way to learn is by starting with a small project. This allows you to practice the techniques without feeling overwhelmed.
The first step is fabric selection. Choose fabrics that complement each other in color and print. Many beginners start with pre-cut fabric bundles, also known as fat quarters, which are designed to coordinate and make the process easier.
Next, cut your fabric pieces according to the chosen pattern. Precision is essential, so take your time with measurements. Remember, even a small mistake in cutting can affect the final look of your project.
Once the pieces are ready, arrange them on a flat surface to preview the design. This step allows you to experiment with color placement and symmetry. A patchwork tutorial often recommends taking a photo of the layout for reference during sewing.
Begin sewing the pieces together using the standard quarter-inch seam allowance. Work slowly, making sure each seam is straight. Chain piecing, where you sew multiple units without cutting the thread between them, can save time.
After sewing, press the seams carefully. Pressing towards the darker fabric helps prevent shadows from showing through lighter fabric pieces. This small habit makes your project look cleaner and more polished.
Finally, assemble the blocks into rows, and then join the rows together. By the end of this step, you will see your patchwork project coming to life, which is always an exciting and rewarding moment.
Creative Ideas and Advanced Patchwork Techniques
Once you have completed your first patchwork tutorial, you may want to explore creative variations and advanced techniques. These open the door to endless possibilities and more personalized projects.
Appliqué is a popular method where shapes are sewn onto a fabric base, adding decorative elements to your patchwork. This technique allows for storytelling through fabric, often creating floral, geometric, or whimsical designs.
Foundation paper piecing is another advanced skill that provides exceptional accuracy. With this method, fabric pieces are sewn directly onto paper templates, ensuring sharp angles and precise patterns. A patchwork tutorial often introduces this technique once you are comfortable with the basics.
Color theory also plays a huge role in creative patchwork. Understanding how colors contrast or complement each other can transform a simple design into something striking. Beginners often experiment with monochromatic themes or rainbow layouts to see the effects.
Another advanced idea is experimenting with irregular shapes, moving beyond squares and triangles. Curved piecing, for example, adds a dynamic and modern feel to your patchwork. It requires patience, but the results are worth the effort.
Adding texture through quilting stitches is equally important. Once your patchwork top is finished, stitching patterns across the layers not only hold everything together but also add dimension. Many quilters experiment with free-motion quilting for a more artistic finish.
Lastly, mixing patchwork with other crafts such as embroidery or crochet creates unique hybrid projects. A patchwork tutorial that introduces these combinations helps expand your creativity and make each project truly one of a kind.
About Patchwork Tutorial
What is patchwork used for?
Patchwork is used to create quilts, blankets, bags, wall art, table runners, and even clothing. It combines small fabric pieces into a larger design, making practical and decorative items.
Is patchwork difficult for beginners?
Not at all. A patchwork tutorial breaks the process into simple steps, making it accessible even for those with no prior sewing experience. Starting with basic blocks helps build confidence.
What fabrics are best for patchwork?
Cotton is the most recommended fabric for beginners. It is easy to handle, cut, and sew, providing durability and neat results.
Do I need an expensive sewing machine for patchwork?
No, a basic sewing machine is enough. While advanced features can help, many beginners successfully complete projects with simple machines.
How long does it take to complete a patchwork project?
The time depends on the size and complexity. Small projects like cushion covers can take a few hours, while large quilts may take weeks or months.
Can patchwork be done by hand?
Yes, patchwork can be sewn by hand. Although it takes longer, hand stitching offers precision and a traditional touch that many crafters enjoy.
What are patchwork blocks?
Blocks are small units of patchwork design, often made of squares, triangles, or other shapes. They are assembled together to form the larger project.
How do I choose colors for patchwork?
Many patchwork tutorials suggest starting with three to five coordinating colors. You can experiment with contrast, gradients, or themed palettes depending on your taste.
Can I recycle old clothes for patchwork?
Yes, recycling fabric from clothes or linens is a sustainable and creative option. Just make sure the fabric is clean and in good condition before cutting.
What is the difference between patchwork and quilting?
Patchwork refers to sewing fabric pieces together to form a design. Quilting is the process of stitching the patchwork top, batting, and backing layers together.
Learning through a patchwork tutorial is both fun and practical. It teaches you the fundamentals of fabric cutting, sewing, and design while giving you the chance to express creativity through handmade projects. From choosing fabrics to finishing touches, each step brings satisfaction and builds new skills.
If you are inspired to start, remember that patchwork grows with practice. Each project teaches you something new, whether it is precision, creativity, or patience.
Now I would love to hear from you: what did you think about this patchwork tutorial? Share your honest opinion and suggestions so we can continue exploring this wonderful craft together.