
Oval patchwork basket projects are loved by sewing and quilting enthusiasts because they combine creativity, functionality, and fabric scrap usage in a beautiful way. Creating an oval patchwork basket allows you to transform leftover fabrics into a charming and practical storage item. This handmade piece not only brings color and texture to your home but also helps organize your sewing room, bathroom, kitchen, or craft space. Because this project is beginner-friendly and highly customizable, it has become a favorite among crafters looking for a relaxing and rewarding activity.
Working on an oval patchwork basket is a wonderful way to explore fabric combinations while practicing essential sewing skills. You can experiment with prints, solids, and textures, making each basket unique and personal. Whether you prefer soft pastels, bold brights, or earthy tones, patchwork allows endless possibilities. The process is also a great opportunity to recycle small scraps that might otherwise be discarded. This transforms your crafting into an eco-friendly and budget-friendly experience.
Before diving into the steps, it is helpful to understand why an oval patchwork basket stands out from other sewing projects. Its shape offers a more elegant and versatile look than a traditional square or round basket, and the patchwork gives it a cozy handmade charm. You can adjust the size, height, and stiffness depending on how you plan to use it. Many people sew these baskets for gifting, décor, or even selling at local craft fairs. Now, let’s explore the details, techniques, and helpful tips used to create this lovely handmade piece.
Understanding the Structure of an Oval Patchwork Basket
The foundation of an oval patchwork basket begins with selecting the right fabrics. Choosing fabrics with similar thickness ensures that the final structure stays balanced. Cotton is the most popular choice because it is easy to sew and holds shape well with proper interfacing. Many sewists love mixing floral, geometric, and modern prints to give the project personality. Each fabric piece contributes to the final mosaic-like effect, making the basket eye-catching and unique.
Another crucial part of creating an oval patchwork basket is preparing the base. An oval base differs from a round one because it offers increased capacity and a more stable shape. This requires careful cutting and sometimes the use of templates. Adding thick interfacing or stabilizer is essential to help the basket stand upright. Some makers also prefer foam stabilizer for a more rigid finish.
The patchwork panels that form the sides of the basket are typically created by sewing small fabric squares or strips together. This is where creativity shines. You can create simple repeating patterns or mix contrasting pieces for a more artistic look. After assembling the patchwork, quilting the layers adds extra texture and firmness, making the basket both decorative and functional.
To finish the structure, the base is sewn to the side panels using slow and careful stitching. This step requires patience, especially around the curves, but the result is worth the effort. The oval shape brings a handcrafted elegance that straight seams cannot replicate. Once assembled, the basket already begins to show its charming character.
A lining is added inside the oval patchwork basket to hide raw seams and provide a professional finish. Using a complementary fabric for the lining enhances the overall aesthetic. The lining also strengthens the basket, making it more durable for everyday use. Some crafters add pockets inside for even more functionality.
Finally, adding handles completes the design. Handles can be made with fabric, webbing, or leather, depending on the desired style. Short handles give the basket a classic storage look, while long handles allow it to be carried around like a tote. This detail makes the basket practical and visually appealing.
Choosing the Best Fabrics and Materials
The first step in creating a beautiful oval patchwork basket is selecting your fabrics. Fabric choice brings personality to the project, and using a mix of coordinated prints ensures a cohesive design. Many sewists enjoy using leftover quilting cottons because they blend well and have the perfect weight for patchwork projects. Choosing fabrics in a similar color palette makes the final result look polished and intentional.
Interfacing or stabilizer is essential when sewing an oval patchwork basket. Without structure, the basket cannot hold its shape. Medium-weight or heavy-weight interfacing helps the walls stay firm, while foam stabilizers create a more sturdy, professional finish. Selecting the right stabilizer depends on how stiff you want the basket to be.
For the lining, cotton fabric is the most practical choice. It is easy to sew, durable, and helps the basket maintain shape. Soft colors or subtle prints work well because they keep the inside looking clean and organized. Matching the lining to the outer patchwork fabric helps create a harmonious design.
Thread selection is another important detail. Using high-quality cotton thread ensures smooth stitching and prevents thread breakage, especially when sewing multiple layers. Choosing a neutral thread color helps blend stitches into the patchwork pieces, making them less visible.
Tools also influence the final result. Rotary cutters, cutting mats, and quilting rulers allow precise cutting, which is essential for patchwork accuracy. Sewing clips are helpful when attaching the base to the sides, especially around oval curves. Sharp scissors and quality needles make sewing easier and cleaner.
Lastly, consider additional decorative elements. Some crafters add lace, buttons, or embroidered labels to personalize their oval patchwork basket. These optional touches turn a simple storage item into a heartfelt handmade creation that reflects your style.
How to Assemble the Patchwork Panels
To begin assembling the oval patchwork basket, start by cutting your fabric scraps into uniform pieces. Squares, strips, or rectangles all work well, depending on the pattern you want to create. Maintaining consistent measurements ensures a neat and even patchwork design. Take time to plan your layout before sewing to achieve a balanced mix of colors and prints.
Sew the fabric pieces together using a standard quarter-inch seam allowance. Pressing seams open or to the side helps reduce bulk and keeps the patchwork flat. Good pressing habits are essential in patchwork because they contribute to crisp lines and a cleaner finished look.
Once your patchwork panel reaches the desired width and height, you can attach batting or foam stabilizer. Quilting the layers adds texture and structure to the basket. Simple quilting lines or diagonal patterns work beautifully and are easy to sew for beginners. Quilting adds durability and gives the basket a professional touch.
After quilting, trim the panel to ensure clean edges. You can then measure and cut the lining to match the size of the quilted outer panel. Keeping both layers even ensures they fit together perfectly during assembly. This step helps avoid puckering and uneven finishes later on.
Next, create the oval base using fabric and stabilizer. Cut both the outer and lining fabrics using the same template for accuracy. Interfacing or foam stabilizer should be added to the base as well for added strength. A well-structured base is key to the basket’s durability.
Finally, sew the patchwork panel into a tube and attach it carefully to the oval base. This step may require slow stitching around curves, but patience ensures clean and strong seams. Using clips instead of pins can help hold thick layers securely without distorting the fabric.
Adding Finishing Touches
The final steps are what transform your oval patchwork basket from a simple handmade item into a polished piece. First, attach the lining to the inside of the basket. Sewing the lining and outer panel together ensures all raw edges are hidden, leaving a clean and professional interior. This enhances durability and improves the basket’s appearance.
Topstitching around the rim of the basket adds extra stability. This small detail gives the basket a crisp edge and prevents the lining from shifting over time. Topstitching also introduces an opportunity for decorative stitching, depending on your preference.
Adding handles is the next step. Handles should be strong enough to carry weight without stretching or tearing. Fabric-covered rope, leather straps, or reinforced cotton strips all work well. Choose a length that suits the basket’s intended use. Short handles create a classic storage look, while longer ones make the basket portable.
For additional personality, you can sew labels or tags onto the basket. Many crafters add embroidered labels to give their handmade piece a signature touch. These small accents make the basket look thoughtful and unique.
If you intend to use the basket for heavy storage, reinforcing the base with extra stitching helps maintain shape. This simple reinforcement ensures the oval patchwork basket remains functional for years. You may also add a removable insert for easier cleaning and maintenance.
Finally, step back and admire your work. Each patchwork basket tells a story through its fabrics and patterns. Whether you keep it for yourself or gift it to someone special, the beauty lies in its handmade charm and practicality.
What is an oval patchwork basket used for?
It is commonly used for organizing sewing tools, craft supplies, bathroom items, toys, or even small household accessories. The oval shape makes it more elegant and practical than other storage styles.
Can I make an oval patchwork basket using only fabric scraps?
Yes, this project is perfect for using leftover scraps. Patchwork naturally blends different pieces, making it an eco-friendly craft option.
What stabilizer works best for this type of basket?
Foam stabilizer gives the firmest structure, while heavy-weight interfacing works well for medium firmness. The choice depends on how rigid you want the basket to be.
Is this project suitable for beginners?
Absolutely. The techniques involved—patchwork, quilting, and basic sewing—are beginner-friendly. The curved base requires patience but is manageable with practice.
How can I personalize my oval patchwork basket?
You can add handles, decorative stitching, labels, embroidery, or embellishments like buttons and lace. Choosing unique fabric combinations also creates a personalized look.
Do I need a sewing machine to make this basket?
A sewing machine makes the process faster and stronger, but it is possible to sew a small basket by hand. However, it will require more time and careful stitching.
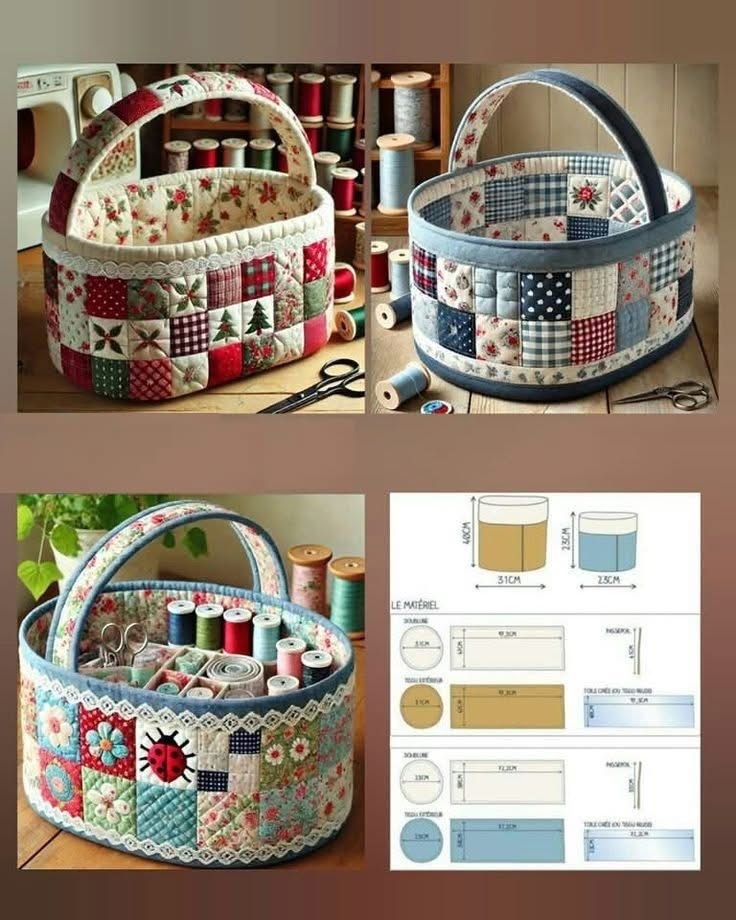
PATTERN HERE
Creating an oval patchwork basket is a rewarding and enjoyable sewing project that allows you to transform fabric scraps into something beautiful and functional. Throughout this article, you learned how to choose materials, assemble patchwork panels, structure the oval base, and add finishing touches to make your basket look professional and durable. This project offers endless opportunities for creativity and personalization. I would love to know your honest opinion—what did you think of this tutorial? Feel free to leave suggestions or share ideas for future topics!