
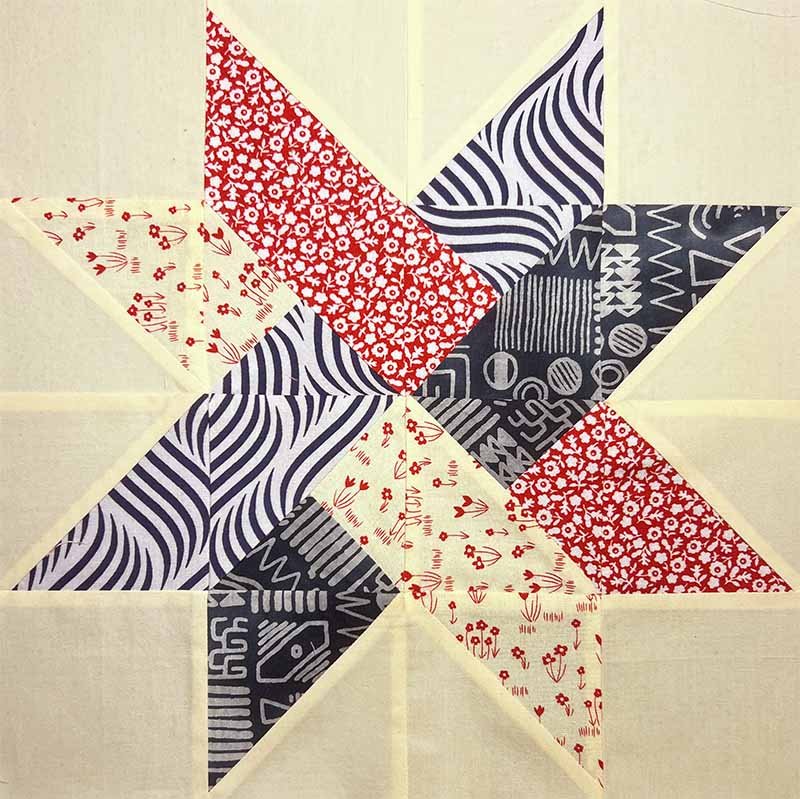
How to sew a 12.5″ woven star quilt block is a rewarding project for quilters who want to combine precision, creativity, and a beautiful design in a single piece. This timeless quilt block blends traditional star patterns with a woven illusion, creating a unique and eye-catching effect. Whether you’re making it for a larger quilt or as a stand-alone decorative piece, learning this technique can expand your quilting skills and open new creative possibilities.
This design is not only visually striking but also versatile. You can customize it with your favorite color schemes, fabrics, and textures to match any theme or season. Beginners and experienced quilters alike can enjoy the process, especially when following a step-by-step approach. With careful cutting, accurate piecing, and a little patience, your woven star quilt block will come together beautifully.
In this guide, we’ll go through everything you need to know — from fabric selection to final pressing — so you can confidently create your own 12.5″ woven star quilt block. The instructions are written with clarity and attention to detail, ensuring a smooth quilting experience while keeping the process fun and creative.
Choosing the Right Fabrics and Tools
When starting your 12.5″ woven star quilt block, fabric selection plays a big role in the final result. Choose a mix of solids and prints to highlight the woven effect. High-contrast combinations work best for making the star shape stand out. Cotton quilting fabric is ideal because it’s easy to sew, durable, and holds its shape well.
You’ll also need the right tools to ensure accuracy. A rotary cutter, a self-healing cutting mat, and a clear quilting ruler will help you cut precise pieces. Sharp sewing scissors, pins or clips, and a reliable sewing machine with a ¼” foot are also essential for achieving crisp seams.
Color placement is key to the woven star illusion. Plan your layout before cutting to ensure the pattern flows correctly. You might want to arrange your fabrics on a design wall or table to preview the look before committing.
A good pressing iron is another must-have. Pressing after every seam keeps the block flat and professional-looking. For a crisp finish, use a bit of steam or a pressing spray.
If you’re new to quilting, starting with pre-cut fabric bundles like fat quarters or charm packs can make the process easier. These cuts are already squared and ready to use.
Finally, keep your workspace organized. Having everything within reach will save time and make the sewing process smoother.
Cutting and Preparing Your Pieces
To make a 12.5″ woven star quilt block, precise cutting is essential. Begin by following a cutting chart that includes all the necessary measurements for your block size. Make sure your rotary cutter blade is sharp to avoid frayed edges.
Cut each piece with attention to grain direction. This ensures your block won’t stretch or warp when sewn together. Straight grain lines are especially important in maintaining the woven effect.
Label your fabric pieces as you cut them. Small sticky notes or chalk marks can help you remember which pieces belong to the star, background, or woven sections.
Check your measurements twice before sewing. Even a small difference in size can affect the accuracy of your final block. Consistency is key.
If you’re mixing prints, balance bold and subtle designs to avoid overwhelming the star’s shape. The woven illusion works best when there’s a clear distinction between light and dark fabrics.
Stack and group your pieces according to sewing order. This helps you move efficiently from one step to the next without confusion.
Piecing the Woven Star
Now comes the exciting part — sewing your woven star quilt block. Begin with the center units, carefully aligning edges before stitching with a ¼” seam allowance. Press seams open or to one side, depending on your preference and fabric bulk.
Work in sections, building the star points first. Accuracy here will determine how sharp and symmetrical your star appears. Use pins or clips to keep fabrics in place as you sew.
The woven effect is achieved by alternating colors in a way that mimics overlapping strips. Pay attention to your layout as you join each section to maintain this illusion.
Chain piecing — sewing multiple units in a continuous line — can save time and keep your pieces organized. This technique also helps maintain consistency in your seam allowances.
After completing the star points, attach the background squares and rectangles to frame the design. Double-check alignment before pressing to ensure the block remains square.
Finish by sewing all sections together, creating the full 12.5″ woven star quilt block. Press one final time for a crisp, professional finish.
Troubleshooting and Finishing Tips
Even experienced quilters can face challenges when making a woven star quilt block. One common issue is mismatched points. This can happen if your seam allowances are inconsistent. Always measure and adjust before sewing the next section.
If your block turns out slightly smaller or larger than 12.5″, don’t panic. Small adjustments can be made by trimming or adding narrow borders to bring it to the correct size.
Stretching or warping may occur if the fabric was cut off-grain or pressed too aggressively. Use gentle pressure when ironing and avoid pulling the fabric.
To enhance the woven effect, choose a quilting pattern that complements the design. Straight-line quilting following the woven paths can add depth and texture.
When joining this block to others, be mindful of seam alignment between blocks. Matching points and intersections keeps the quilt looking neat and intentional.
Lastly, store your completed block flat until it’s ready to be incorporated into your quilt project. This prevents creasing and distortion.
About Sewing a 12.5″ Woven Star Quilt Block
1. Can beginners make a 12.5″ woven star quilt block?
Yes, beginners can make this block by following clear instructions and taking their time. It’s a great way to practice precision sewing and color placement.
2. What fabrics work best for the woven star design?
High-quality cotton quilting fabric works best. Choose contrasting colors or prints to make the woven effect stand out.
3. How do I keep my star points sharp?
Accurate cutting, consistent ¼” seam allowances, and careful pressing are essential for achieving sharp points.
4. Can I change the size of the woven star quilt block?
Yes, you can scale the pattern up or down, but you’ll need to adjust all measurements proportionally.
5. What quilting stitch pattern suits this design?
Straight-line quilting that follows the woven paths enhances the illusion, but free-motion quilting can also add a creative touch.
6. Do I need special tools for this project?
While basic quilting tools are enough, a ¼” presser foot and a design wall can make the process easier and more precise.
7. How can I avoid fabric stretching while sewing?
Cut on the straight grain, use a sharp blade, and handle pieces gently during sewing and pressing.
8. Is this block suitable for scrap quilting?
Yes, the woven star block is perfect for using up fabric scraps, as long as you maintain strong contrast between pieces.
9. Can I sew this block entirely by hand?
Absolutely, though it will take longer. Hand sewing can give the block a charming, traditional feel.
10. How should I press seams for the best result?
Press after every seam. Whether you choose to press open or to one side, be consistent to maintain accuracy.
Making a 12.5″ woven star quilt block combines precision, creativity, and a rewarding visual effect. By choosing the right fabrics, cutting accurately, and sewing with care, you can create a block that’s both beautiful and versatile. We’ve covered everything from fabric selection to troubleshooting, so you can confidently start your own project.
Now it’s your turn — try this technique and let your creativity shine. Share your experience, leave a sincere opinion, and tell us what other quilting tutorials you’d love to see next.