
How To Make A Maple Leaf Quilt Pattern Step-by-step is one of the most exciting and creative quilting projects for beginners and experienced quilters alike. The beauty of this pattern is how it brings the warm feeling of autumn into your home with every carefully sewn piece. Whether you are creating a cozy quilt for your bed, a decorative wall hanging, or a heartfelt gift, this design captures the elegance of falling leaves and seasonal charm.
Learning how to make this quilt pattern may sound complex at first, but once you understand the process, it becomes a delightful journey of colors, fabrics, and creativity. The maple leaf quilt block is built using simple geometric shapes that combine to form the leaf’s outline, and when repeated across a quilt, the result is stunning. With the right steps and a clear plan, you can create a quilt that looks professional and truly unique.
In this article, you will learn not just the construction of a maple leaf quilt block, but also the essential techniques that will help you assemble, arrange, and finish your quilt. Each section of this guide is written to make the process simple, enjoyable, and achievable for all levels. By the end, you will feel confident about starting your own maple leaf quilt project.
Choosing the Right Fabric and Colors
When planning how to make a maple leaf quilt pattern step-by-step, the first stage is fabric selection. Fabrics play a major role in creating the warm, seasonal appearance that makes this design stand out. Quilters often choose fabrics in shades of red, orange, yellow, and brown to reflect the real colors of autumn leaves.
It is also possible to experiment with modern or abstract color choices. For example, imagine maple leaves in soft blues, greens, or even metallic tones for a quilt that reflects your personal style. Choosing a color palette that fits your home décor or the personality of the person receiving the quilt can make it more meaningful.
Texture is another detail to consider. Cotton fabrics are most common, but mixing in linen or textured fabrics can add depth to your quilt. The goal is to create visual variety without overwhelming the overall design.
A balanced mix of solids and patterned fabrics will make your quilt blocks pop. Too many patterns may make the leaf shape hard to see, while too many solids can make the quilt look flat. Finding harmony is key.
When purchasing fabric, always buy a little extra to allow for mistakes or future projects. Quilting often requires precise cutting, and extra fabric ensures you have backup if something goes wrong.
Lastly, prewashing your fabrics is highly recommended. This prevents shrinking and color bleeding later, making sure your finished quilt remains beautiful for years.
Cutting and Preparing Quilt Pieces
The next stage in how to make a maple leaf quilt pattern step-by-step is cutting the fabric into precise shapes. Accuracy during this step ensures that your quilt blocks align correctly when sewn together.
Each maple leaf block is typically made up of squares, half-square triangles, and rectangles. These basic shapes come together to form the recognizable leaf design. Using a rotary cutter, quilting ruler, and cutting mat will give you the precision needed.
Before you start cutting, iron all fabrics to remove wrinkles. Smooth fabric helps you achieve accurate cuts and prevents distortion when sewing. A clear workspace also reduces mistakes and keeps pieces organized.
When cutting, follow a plan or template. Most maple leaf quilt blocks are created using a 9-patch layout, which means arranging nine fabric squares in a grid to form the block. Two of these squares are half-square triangles, which shape the leaf’s pointed edges.
Labeling your cut pieces can be very helpful. Use sticky notes or fabric clips to keep track of which pieces form each part of the block. This prevents confusion and saves time during assembly.
Take your time during this stage. Cutting may seem repetitive, but careful preparation is what makes the final quilt look polished and professional.
Sewing the Maple Leaf Quilt Block
Now comes the most exciting part of how to make a maple leaf quilt pattern step-by-step: sewing the maple leaf block together. This stage brings all your preparation to life as the leaf shape starts to form.
Begin by sewing the half-square triangles. These are created by placing two fabric squares right sides together, drawing a diagonal line, sewing a seam on each side of the line, and then cutting along it. Press the seams open or to one side for a neat finish.
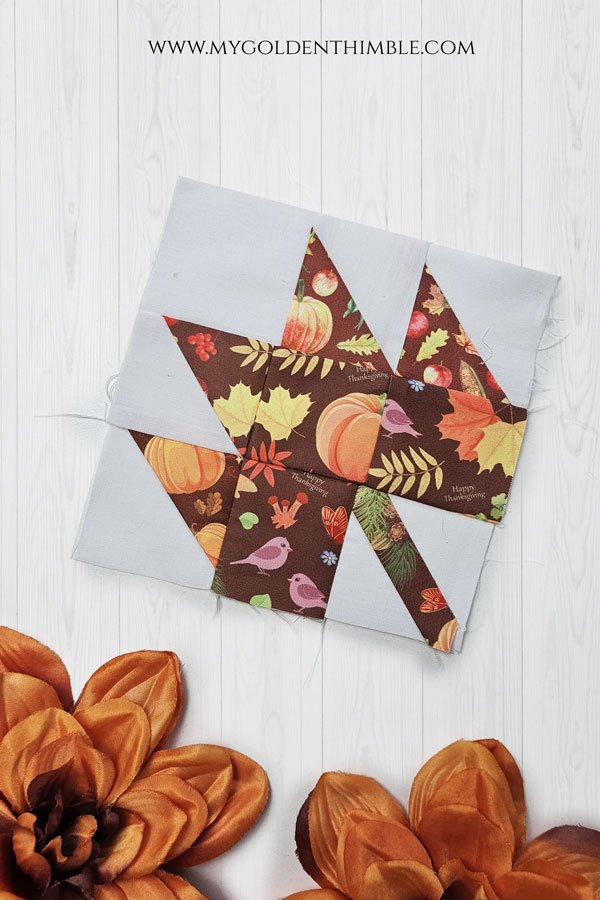
Next, arrange all your cut pieces into the 9-patch grid. Place the half-square triangles in the positions that form the leaf’s pointed edges, the stem piece at the bottom, and the solid squares to complete the shape.
Sew the pieces together row by row. After each row is complete, press the seams. Proper pressing prevents bulky intersections and ensures the block lays flat.
Once all rows are complete, sew them together to finish the block. At this point, you will clearly see the maple leaf design emerge. Each block can take about 20–30 minutes, depending on your experience.
Repeat this process until you have the number of maple leaf blocks needed for your quilt. The final quilt size will depend on how many blocks you make and how you arrange them.
Remember, small imperfections are part of quilting. Don’t stress over minor misalignments. The overall design will still look stunning.
Assembling and Finishing the Quilt
The final stage in how to make a maple leaf quilt pattern step-by-step is assembling your blocks into a full quilt and finishing it with borders, batting, and binding. This is where your project becomes a true quilt.
Start by laying out your maple leaf blocks on a large surface or design wall. Experiment with arrangements until you find one that flows visually. Some quilters prefer symmetrical layouts, while others like random, scattered placements for a more natural look.
After deciding on the arrangement, sew the blocks together in rows, then join the rows to complete the quilt top. Take care to press seams carefully as you go along.
Next, prepare your quilt sandwich. This consists of the quilt top, a layer of batting for warmth, and a backing fabric. Smooth each layer to prevent wrinkles and secure them with quilting pins or temporary adhesive spray.
Quilting stitches are then added to hold the layers together. You can stitch in the ditch, which means sewing along seam lines, or choose decorative quilting patterns to add texture. Free-motion quilting is another creative option if you want more freedom in your design.
Finally, bind the quilt edges with strips of fabric. Binding frames your quilt and gives it a professional, finished look. Hand-stitching the binding can be relaxing, while machine binding is faster and durable.
After binding, give your quilt a final press and admire your work. You now have a completed maple leaf quilt ready to be enjoyed or gifted.
About Maple Leaf Quilt Pattern
1. What size should a maple leaf quilt block be?
Most maple leaf quilt blocks are designed as 12-inch squares, but you can adjust the size depending on your quilt design.
2. Can beginners make a maple leaf quilt?
Yes, this pattern is beginner-friendly because it uses simple shapes like squares and half-square triangles.
3. How many blocks do I need for a full-size quilt?
It depends on block size and desired quilt dimensions. For example, a full-size quilt may require 30 to 42 blocks.
4. What is the best fabric for a maple leaf quilt?
100% cotton is the most popular choice for quilting because it is easy to sew, press, and wash.
5. Can I use non-traditional colors for the maple leaf quilt pattern?
Absolutely. While autumn tones are classic, using unique colors can make your quilt modern and personalized.
6. How long does it take to finish a maple leaf quilt?
The time varies depending on the size and your experience. A small quilt may take a week, while larger ones could take several weeks.
7. Do I need special tools for this project?
Essential quilting tools include a rotary cutter, cutting mat, quilting ruler, sewing machine, and iron.
8. How do I make my quilt look professional?
Careful cutting, precise seam allowances, proper pressing, and neat binding will give your quilt a polished look.
Now you know exactly how to make a maple leaf quilt pattern step-by-step, from choosing fabrics and cutting pieces to sewing blocks and finishing the quilt. This project combines creativity, patience, and skill, and the end result is always rewarding. Whether you stick to traditional autumn shades or experiment with bold modern palettes, your quilt will be unique and meaningful.
I hope this guide has inspired you to start your own maple leaf quilt journey. If you try it, please share your honest opinion and suggestions. Your feedback can help others feel more confident as they begin this beautiful quilting project.