
How to Make a Churn Dash Quilt Block: Essential Building Blocks of Quilting is a question many beginner and experienced quilters ask when they want to master the art of traditional patchwork. The Churn Dash quilt block is one of the most classic patterns in quilting history, loved for its timeless design, ease of construction, and versatility. Whether you are completely new to quilting or already have experience with piecing fabric, learning this block provides a solid foundation for your projects.
This pattern dates back to the 1800s and has remained popular for generations, proving its place as one of the essential building blocks of quilting. Its design resembles the paddles of an old butter churn, hence the name “Churn Dash.” Because of its geometric shape, it is simple to cut, piece, and assemble, yet it offers endless creative possibilities. Many quilters begin their journey by making this block because it introduces basic techniques such as half-square triangles, strip piecing, and block alignment.
If you want to create quilts that are both functional and artistic, understanding how to make a Churn Dash quilt block is the perfect starting point. Not only does this block teach you fundamental quilting skills, but it also encourages creativity, as you can experiment with colors, fabric choices, and layout designs. Let’s explore step by step how to bring this traditional design to life.
Understanding the Churn Dash Quilt Block
The Churn Dash quilt block is usually made from nine smaller units arranged in a three-by-three grid. It combines half-square triangles, rectangles, and a central square, which makes it an excellent exercise for precision and accuracy. Learning to piece this block teaches you how to work with both straight seams and angled cuts.
One of the reasons the Churn Dash remains so beloved is its simplicity. Unlike more complex blocks that require advanced cutting tools or templates, this block can be made with basic quilting supplies. A rotary cutter, ruler, and sewing machine are all you need to get started. Beginners often find comfort in starting with this block because it is forgiving, and small mistakes are not as noticeable once the quilt is finished.
The block is also highly adaptable. You can make it in any size by adjusting the measurements of the pieces. Traditionally, quilters create 6-inch, 9-inch, or 12-inch blocks, but you are free to experiment with other dimensions depending on your project. This flexibility makes it an ideal block for quilts, table runners, pillows, or even wall hangings.
Fabric choice plays a big role in how your finished block looks. Using contrasting fabrics highlights the sharp lines of the design, while subtle, tonal fabrics create a softer, vintage feel. This balance between simplicity and creativity is what makes the Churn Dash quilt block stand out as one of the essential building blocks of quilting.
Another benefit of mastering this block is how easily it combines with others. Many traditional quilts feature repeated Churn Dash blocks, while modern designs may pair it with stars, log cabins, or nine-patch patterns. Its versatility allows you to incorporate it into endless layouts.
Understanding this block fully before sewing helps you appreciate its design and prepares you for accurate cutting and piecing. Once you recognize its components, you are ready to move on to the cutting process.
Cutting the Fabric for a Churn Dash Quilt Block
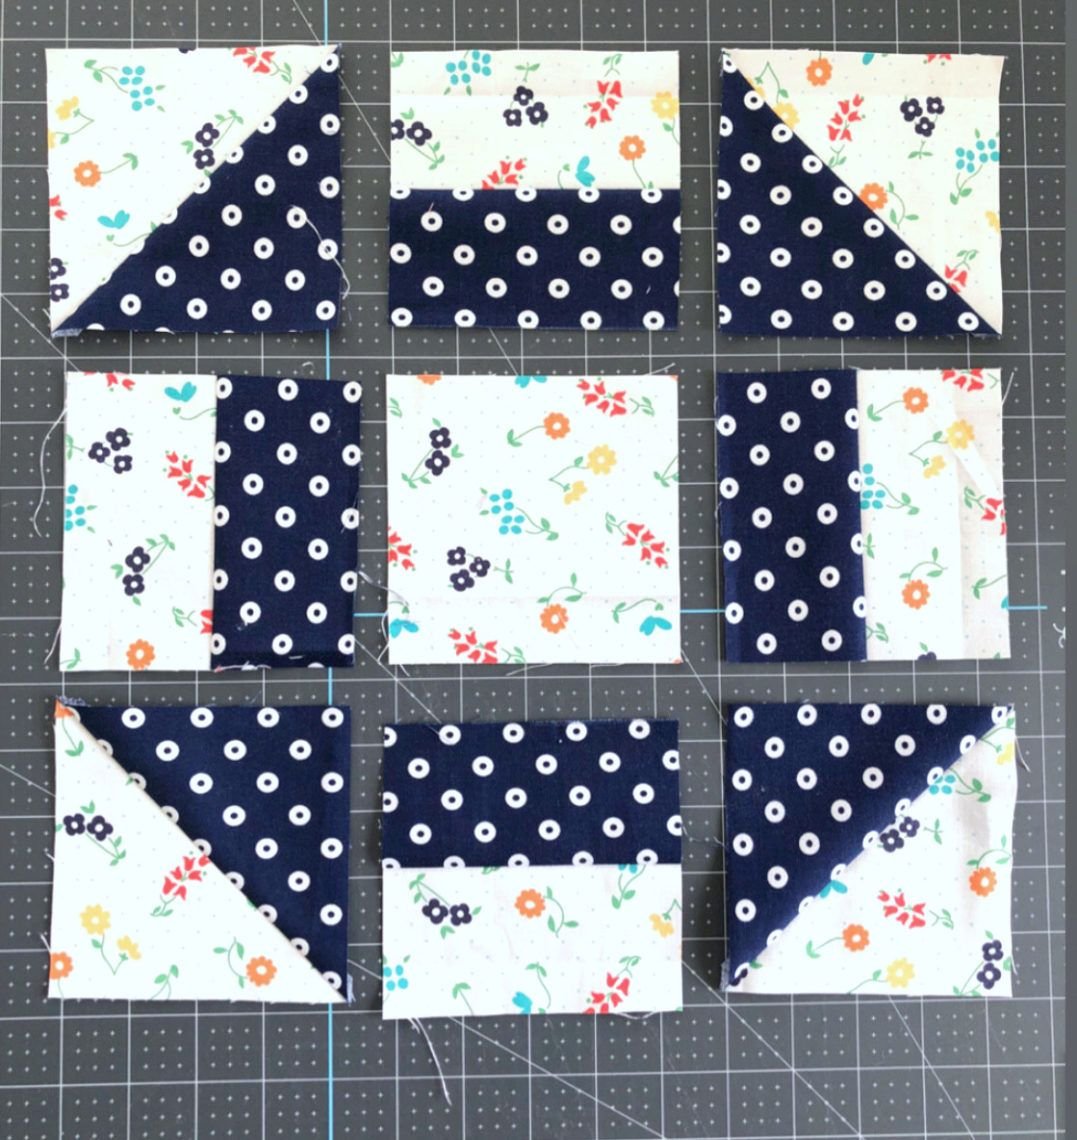
Learning how to make a Churn Dash quilt block begins with accurate cutting. The block is built from a center square, four rectangles, and four half-square triangles. Each piece must be cut to the correct size for the block to come together neatly.
The center square forms the heart of the design. It is typically cut from a fabric that contrasts with the surrounding pieces to draw attention to the block’s focal point. Many quilters choose a bold print or a darker shade for this square to give the block visual balance.
The rectangles make up the sides of the block. These are usually cut from a background fabric and placed horizontally and vertically around the center. The straight edges of these pieces make assembly simple, which is why this block is beginner-friendly.
The half-square triangles are what give the Churn Dash quilt block its characteristic churn-paddle look. To make them, you start with two squares of contrasting fabric, place them right sides together, and sew diagonally across the square. When cut and pressed, you end up with two half-square triangles.
Precision is very important during cutting. Even being off by an eighth of an inch can affect the final alignment of your block. Using a quilting ruler and rotary cutter ensures clean, accurate edges, which makes piecing much easier.
It’s also helpful to label or stack your pieces before sewing. Keeping your components organized allows you to move smoothly from one step to the next without confusion. Preparing your fabric carefully at this stage ensures your finished block will look professional.
By cutting your fabric with care, you set the foundation for successful assembly. Once your pieces are ready, the next step is sewing them together.
Assembling the Churn Dash Quilt Block
The fun part of learning how to make a Churn Dash quilt block is seeing all your pieces come together. Assembly is done in stages, starting with smaller units and moving toward the full nine-patch layout.
Begin by sewing your half-square triangles. These should measure exactly the same size as your rectangles and center square to fit into the grid. Press your seams carefully to ensure the block lies flat and doesn’t bulk up in the middle.
Next, arrange your pieces in the classic Churn Dash pattern: the center square in the middle, rectangles on each side, and half-square triangles in the corners. Laying out your block before sewing helps you double-check placement and avoid mistakes.
Sew each row together, starting with the top, then the middle, and finally the bottom. Afterward, join the rows to complete the block. Press seams as you go, alternating directions to reduce thickness.
Accuracy is key during assembly. Using a quarter-inch seam allowance ensures the block comes out to the intended size. Quilters often use a quarter-inch foot on their sewing machine to make this process easier and more consistent.
Chain piecing is another helpful method. By sewing multiple units in a continuous line without cutting the thread between them, you save time and keep pieces organized. This technique is especially useful if you’re making several Churn Dash blocks for a larger quilt.
Once assembled, give your block a final press. At this stage, you’ll see the full beauty of the Churn Dash quilt block design come alive.
Creative Variations and Uses of the Churn Dash
One of the joys of quilting is making traditional blocks your own, and the Churn Dash quilt block is no exception. With a little imagination, you can adapt this design to suit any quilting style.
Changing fabric choices dramatically alters the look of the block. Using solid colors gives a bold, modern appearance, while vintage prints can create a more classic, country charm. Experimenting with high-contrast fabrics makes the churn-paddle design stand out clearly.
You can also adjust the size of your block to fit different projects. Large Churn Dash blocks work beautifully in bed quilts, while smaller ones can be used for placemats or coasters. Some quilters even mix sizes within the same quilt for a unique layout.
Another way to create variation is through fabric placement. Instead of using the same fabric for all rectangles, try mixing prints for a playful effect. You can also replace the center square with a fussy-cut piece, showcasing a special motif or design.
The Churn Dash also combines well with other blocks. Pairing it with star blocks, nine-patches, or log cabins creates intricate quilt layouts with a mix of traditional designs. Because it’s such a versatile block, it blends seamlessly into many quilting patterns.
Modern quilters have also adapted the Churn Dash into creative reinterpretations. Some use asymmetrical layouts or improv piecing to give the block a fresh twist while still honoring its heritage. This proves that the Churn Dash quilt block is not only timeless but also endlessly adaptable.
By exploring variations, you keep your quilting practice exciting and personal. Every block you make tells a story through fabric, color, and design.
About the Churn Dash Quilt Block
What is a Churn Dash quilt block?
The Churn Dash is a traditional quilt block made of nine units, including half-square triangles, rectangles, and a central square. Its design resembles the paddles of an old butter churn, which is how it got its name.
Why is the Churn Dash block important in quilting?
It is considered one of the essential building blocks of quilting because it teaches fundamental piecing techniques and provides a strong foundation for learning more complex patterns.
What size should I cut my fabric pieces for a Churn Dash block?
The size depends on the finished block you want, but most quilters make 6-inch, 9-inch, or 12-inch versions. Accurate cutting and consistent quarter-inch seams are key to success.
Can beginners make a Churn Dash quilt block?
Yes, absolutely. The block is perfect for beginners because it uses simple shapes and basic sewing techniques. It’s a great way to practice accuracy without feeling overwhelmed.
How can I make my Churn Dash quilt block look unique?
Experiment with fabric choices, block sizes, and placement of pieces. Try mixing colors, using bold prints, or combining the block with other traditional patterns for variety.
What projects can I make with Churn Dash blocks?
These blocks can be used in quilts, pillows, table runners, wall hangings, and even small accessories like bags or pot holders. Their versatility makes them suitable for nearly any quilting project.
Learning how to make a Churn Dash quilt block: essential building blocks of quilting is an important step in any quilter’s journey. This classic block not only introduces fundamental skills like cutting, piecing, and pressing, but it also opens the door to endless creativity through fabric choices and variations.
Whether you’re a beginner or an experienced quilter, the Churn Dash offers timeless beauty and adaptability that will continue to inspire your projects for years to come.
Now that you’ve explored its history, construction, and creative potential, I’d love to hear from you. What do you think about the Churn Dash block? Have you tried making one yourself? Share your honest opinions and suggestions—I’m excited to learn from your quilting experiences.