
If you’re looking for a project that blends charm, creativity, and simplicity, this Heart Quilt Block Tutorial and Layout Options guide is the perfect place to start. Whether you’re a seasoned quilter or a curious beginner, heart blocks offer a heartfelt touch to any quilt. They’re especially popular for gifts, baby quilts, Valentine’s Day, and charity projects. What makes this project even more special is its flexibility — with just a few blocks, you can build numerous unique quilt designs.
In this comprehensive article, we’ll explore a step-by-step Heart Quilt Block Tutorial and provide multiple layout options to inspire your next quilting journey. You’ll learn how to cut, piece, and sew beautiful heart blocks and discover creative ways to arrange them. Our focus is on simplicity, accuracy, and style, ensuring quilters at all levels feel confident from start to finish.
Using Heart Quilt Block Tutorial and Layout Options as our main guidepost, we’ll also share essential tips for fabric choices, color coordination, and finishing touches. By following these steps, your quilt will not only look amazing but also feel personal and unique.
Getting Started: Materials and Measurements
Before diving into stitching your blocks, gather the right tools and materials. Having everything prepared helps reduce errors and keeps your creativity flowing.
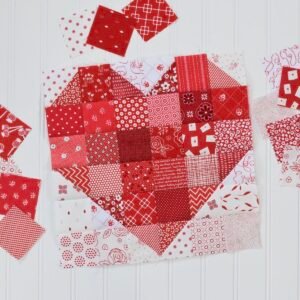
You’ll need fabric in at least two contrasting colors — one for the heart and one for the background. Solid colors work beautifully, but don’t hesitate to use prints or batiks for extra personality. A rotary cutter, quilting ruler, cutting mat, and sewing machine are essential tools for precision.
Each heart quilt block typically uses simple squares and rectangles. The most common size is a 6.5″ x 6.5″ unfinished block, which finishes at 6″ x 6″ when sewn into a quilt. Adjust the size to suit your design, but keep proportions consistent.
For a basic heart block, cut two 2.5″ squares for the top curves, one 4.5″ x 4.5″ square for the bottom, and two background triangles or squares for the top corners. These simple pieces come together in a surprisingly beautiful way.
Once your fabric is cut, sort the pieces into sets to streamline your workflow. This method is especially useful when making multiple blocks at once, saving time and ensuring uniformity.
Press all your fabric pieces before sewing. This may seem like a small step, but it makes a big difference in accuracy. Wrinkles can shift seams and cause misalignment in your final block.
Step-by-Step Heart Quilt Block Tutorial
Now that your pieces are ready, it’s time to sew your first heart quilt block. Take your time with this process — accuracy in piecing will reward you with clean lines and consistent shapes.
Start with the two smaller squares that form the heart’s top curves. Place each square on the top corners of the larger heart base square. Draw a diagonal line from corner to corner, sew along that line, and trim off the excess fabric. This creates the smooth curve of the heart’s top.
Next, attach these triangle-formed units to the top of your bottom heart piece. Press seams open or to the side, depending on your preference. This builds the basic heart shape from three major fabric units.
Join these top and bottom sections by aligning the seams carefully. Use pins or clips to hold them together before stitching. The key is to keep the center seam straight to preserve the heart shape.
Repeat these steps for each heart block. After sewing, press each block to keep seams flat and help maintain square dimensions. Proper pressing helps when assembling multiple blocks into a quilt top.
Check the final size of your blocks before continuing. Trim any uneven edges so each piece aligns perfectly with the others. This small step ensures your quilt rows are even and professional-looking.
As you gain confidence, experiment with color combinations and prints. Each heart quilt block tells a different story based on your choices. Try alternating light and dark fabrics or use ombré tones for a modern twist.
Creative Layout Options for Your Heart Quilt
One of the best parts of this Heart Quilt Block Tutorial and Layout Options guide is exploring how to arrange your blocks. The layout is where your quilt truly comes to life.
A classic layout involves placing the heart blocks in straight rows, all facing the same direction. This simple grid pattern is timeless and perfect for showcasing each heart’s detail. It works well for bed quilts, throws, and wall hangings.
For a playful touch, try alternating the heart blocks upside down in every other row. This zigzag effect adds movement and whimsy, especially in baby quilts or children’s designs.
Another creative layout option is the diagonal set. Instead of straight rows, rotate the quilt blocks 45 degrees and arrange them in diamonds. This layout adds visual interest and allows for striking color gradients.
You can also cluster hearts in groups of four to form larger motifs. This technique is useful when you want fewer individual blocks but still want to create a full quilt design. Add sashing or borders for a framed effect.
For scrap quilting, consider a color wash layout. Use hearts in a spectrum of colors and arrange them by shade to create a rainbow effect. This style is great for using up fabric scraps while creating a visually stunning piece.
Don’t forget negative space. Leaving areas of your quilt top without blocks can give the eye a place to rest and make the hearts pop even more. Try setting your heart blocks against a white or solid background for a minimalist feel.
Tips for Finishing Your Heart Quilt
After assembling your quilt top, it’s time to focus on finishing. This stage includes layering, quilting, and binding — each an opportunity to enhance your project.
Start by preparing your quilt sandwich: backing fabric, batting, and the quilt top. Use safety pins, spray baste, or thread basting to secure the layers. Smooth out any wrinkles to avoid puckering during quilting.
Choose a quilting design that complements your blocks. For heart quilts, consider echo quilting around each heart or using free-motion swirls to add softness. Straight-line quilting can also create a clean, modern finish.
Quilting can be done by machine or hand. Machine quilting is faster, but hand quilting adds a traditional, personal touch. Choose the method that best suits your style and available time.
When trimming your quilt, be sure to square it up accurately. Use a large cutting mat and rotary cutter for best results. A crooked edge can throw off the look of your binding.
Binding ties everything together. You can use a contrasting fabric to frame the quilt or match the border for a seamless look. Attach the binding by machine or hand, making sure corners are mitered neatly.
Finish by adding a label to your quilt. Include your name, date, and maybe a special message. It’s a small detail that adds meaning, especially if the quilt is a gift or family keepsake.
How to Customize Heart Quilt Blocks
Personalizing your heart quilt block tutorial and layout options adds charm and emotion to every piece. The more you customize, the more your quilt reflects your personality and purpose.
Consider using novelty fabrics that reflect a theme — like hearts made from floral prints for a spring quilt or red and green for a festive holiday version. The fabric can tell a story without any words.
Add embroidery or hand-stitched names inside the hearts for a personalized memory quilt. This is especially touching for baby blankets or family gifts.
Play with size! Instead of using uniform blocks, try combining small and large hearts in a single quilt. This visual contrast brings energy and movement to the layout.
Mix in alternate blocks like stars, nine-patch, or log cabin designs. This technique is ideal when you want a larger quilt but prefer fewer heart blocks.
Don’t forget to try applique hearts instead of pieced blocks. Applique allows for curves, layering, and more freedom in heart shape sizes and placement. Combine both methods in one project for texture and depth.
Finally, use heart blocks as accents — add them to the corners of a quilt, on pillow shams, or as part of a table runner. The versatility of heart quilt blocks makes them suitable for countless project ideas.
Heart Quilt Block Tutorial and Layout Options
What size are standard heart quilt blocks?
Most heart quilt blocks are 6” finished, but you can resize them easily. Common options are 8”, 10”, or 12” blocks depending on your project.
Is this pattern suitable for beginners?
Yes! The Heart Quilt Block Tutorial and Layout Options is beginner-friendly, with basic squares and triangles. It’s a great way to practice piecing and learn about layout design.
How much fabric do I need for a heart quilt?
This depends on the size of the quilt. For a lap quilt (50″ x 60″), you might need about 2 yards for the hearts and 3 yards for the background. Add more if you want borders or a wider layout.
Can I use scraps for the heart blocks?
Absolutely. Scraps work wonderfully, especially for a colorful or scrappy quilt. Just make sure the fabric pieces are large enough to cut your shapes.
What is the best layout option for a modern look?
A diagonal or ombré layout gives a fresh, modern aesthetic. Use solid colors or bold prints with high contrast for best results.
How do I keep the heart shapes symmetrical?
Precision in cutting and sewing is key. Use a rotary cutter and quilting ruler, and take time aligning your seams. Pressing after each step helps maintain symmetry.
We hope this complete Heart Quilt Block Tutorial and Layout Options guide inspired your creativity and boosted your quilting confidence. From step-by-step instructions to creative layout ideas and finishing tips, this article aimed to walk you through every part of the process with clarity and heart.
Quilting is more than a craft — it’s a way to express emotion, celebrate memories, and create lasting comfort. Your choices in fabric, layout, and style make every quilt truly your own.
If you found this tutorial helpful or tried any of the techniques above, we’d love to hear from you! Please leave your honest opinion and feel free to share your suggestions for future tutorials or block styles.