
Starting your quilting journey with an Easy Patchwork Block is one of the most rewarding and stress-free ways to explore the world of quilting. Whether you’re a total beginner or an experienced quilter looking for a quick and satisfying project, patchwork blocks provide the perfect canvas to play with colors, fabrics, and creativity. The best part? You don’t need fancy tools or advanced techniques—just fabric, thread, and a little guidance.
In this article, we’ll take a deep dive into what makes an Easy Patchwork Block so appealing. We’ll explore how to create them, tips for success, and a few inspiring ideas to get your creative energy flowing. These blocks serve as the foundation for quilts of all sizes and styles. Mastering the basic block opens doors to endless design possibilities.
The goal here is to offer a warm, step-by-step introduction to the process, using a humanized tone, clear instructions, and SEO-friendly language so you can feel confident as you stitch your way through your next project. So grab your fabric stash, and let’s begin creating your very own Easy Patchwork Block masterpiece.
What Is an Easy Patchwork Block?
An Easy Patchwork Block is a simple square or rectangular unit made by sewing together smaller fabric pieces in a specific arrangement. These individual blocks are the basic units of a quilt, and when joined together, they form beautiful and complex patterns. The simplicity of these blocks makes them ideal for beginners or anyone looking to complete a quick and fulfilling project.
The beauty of patchwork lies in its adaptability. You can use scraps, pre-cut squares, or freshly cut fabrics to build your blocks. It’s a flexible craft that allows creativity to flourish, even with limited materials. Because each block is created separately, it’s easy to experiment and learn without the pressure of a large commitment.
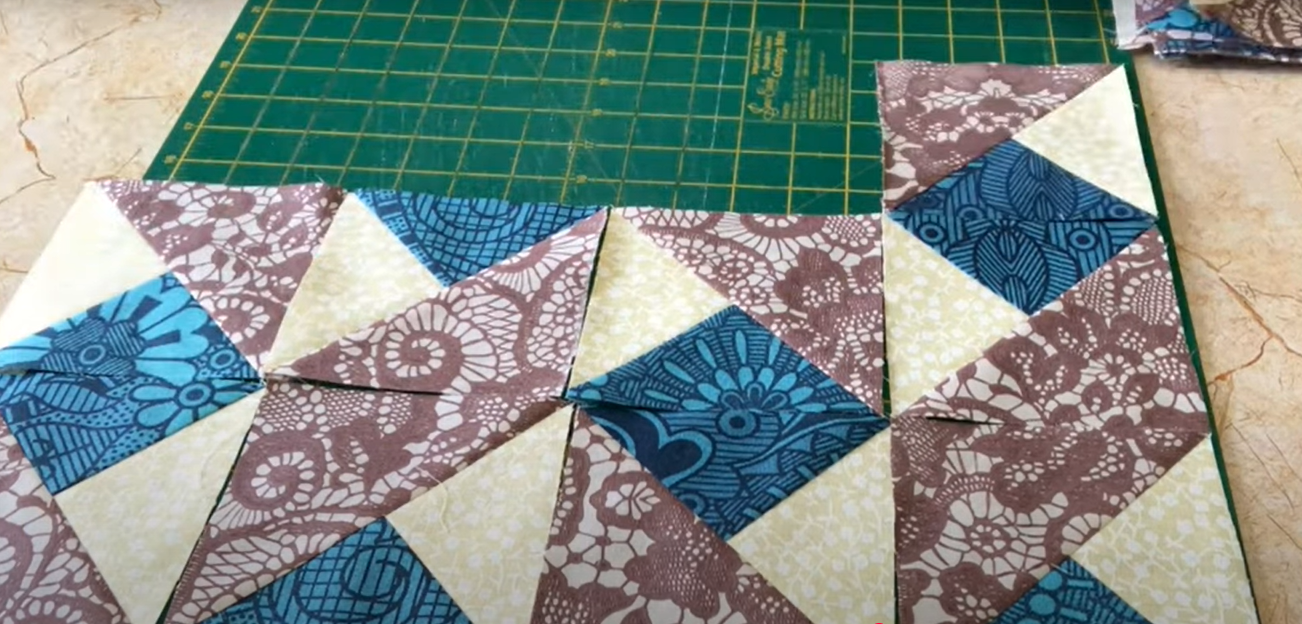
For those just starting out, the most recommended format is the nine-patch block, which involves sewing nine smaller squares together in three rows. It’s a classic method, but the possibilities go far beyond it. From checkerboard layouts to half-square triangles, the concept of an Easy Patchwork Block can be tailored to fit any design vision.
Creating one of these blocks doesn’t require advanced sewing skills. If you can sew a straight line and measure your fabric accurately, you’re already halfway there. With time, your blocks will become more precise and your seams more seamless.
You can also customize your blocks with different fabric themes—floral prints for a spring vibe, earthy tones for a rustic quilt, or bold solids for a modern touch. This makes the process not only accessible but also deeply personal and expressive.
Most importantly, each Easy Patchwork Block is a step toward building something meaningful. Whether it’s a gift for a loved one or a cozy addition to your own home, every stitch brings a sense of accomplishment.
Tools and Materials You’ll Need
To make your own Easy Patchwork Block, you’ll need just a few basic tools. These are usually easy to find at any fabric or craft store, and most are reusable across future projects.
Start with a good pair of fabric scissors or a rotary cutter. A rotary cutter, combined with a self-healing cutting mat, will give you clean, accurate cuts every time, which is crucial for matching seams later on. Precision here saves time during assembly.
Next, gather a clear quilting ruler. This helps measure and cut your fabric squares or rectangles evenly. Accurate cuts are essential in patchwork because even small measurement errors can throw off your whole design.
Choose cotton fabric, as it’s easy to sew and press. Pre-washed and ironed fabric is best to avoid shrinkage or bleeding during the first wash. Using fabric scraps is a great way to be sustainable and creative at the same time.
For thread, use a quality all-purpose or cotton thread. Neutral colors like white, beige, or gray are versatile, but feel free to match your thread to the fabric for a more cohesive look. A standard sewing machine is perfect for this task, but hand-sewing is also an option if preferred.
Straight pins or fabric clips will help you hold your fabric in place while sewing. This helps maintain alignment and prevents shifting. An iron and ironing board are must-haves for pressing seams, which keeps everything flat and neat.
Finally, keep a seam ripper nearby. Even experienced quilters make mistakes, and this little tool will save you time and frustration. Creating your Easy Patchwork Block should be enjoyable, not stressful.
How to Sew Your First Patchwork Block
To start sewing your Easy Patchwork Block, first decide on the size and layout of your block. A common choice is the 6” or 12” finished block, but feel free to adjust it based on your needs or quilt design.
Begin by cutting your fabric into squares. For a 9-patch block, you’ll need nine equal-sized squares. Arrange them in a 3×3 grid on your work surface. Play around with color placement before sewing—this is where your creativity shines.
Start by sewing the squares in each row together using a 1/4-inch seam allowance. Keep your seams straight and consistent for best results. After sewing each row, press the seams with an iron—either open or to one side depending on preference.
Once all three rows are sewn and pressed, sew the rows together in sequence. Take your time lining up the seams so the intersections meet neatly. Press the completed block again to set the seams and flatten the fabric.
If your block edges aren’t perfectly square, don’t worry. Use a ruler and rotary cutter to square it up. Precision increases with practice, and even slightly imperfect blocks still make beautiful quilts.
Repeat this process to make more blocks. Once you have several, you can begin arranging them to form a quilt top. Mix and match colors, rotate blocks, or alternate designs to create dynamic layouts.
The great part about working with Easy Patchwork Blocks is that you can build your quilt gradually. One block at a time, you move closer to your final creation. It’s a forgiving, modular approach that makes quilting accessible and fun.
Tips for Better Patchwork Results
Practice makes perfect, especially when working on an Easy Patchwork Block. The more blocks you create, the more confident you’ll become in your technique. Here are some practical tips to help you along the way.
Use a consistent seam allowance throughout your project. A 1/4-inch seam is standard in quilting, and consistency is crucial for blocks to fit together properly. You can use a special presser foot for easier alignment.
Press your seams after every step. This might seem tedious, but it helps your blocks lay flat and join more neatly. It also reveals whether your cuts or seams need adjusting for future blocks.
Chain piecing is a great time-saving technique. Instead of sewing and trimming one square at a time, line up multiple pieces and sew them in sequence without cutting the thread in between.
Choose color schemes in advance. Planning your fabric palette can save time and create more cohesive quilts. Use a color wheel or inspiration board to visualize your final design.
If you’re unsure about how a block will look, make a test block first using inexpensive fabric. This allows you to tweak measurements or design choices without wasting your favorite materials.
Lastly, don’t stress about perfection. Slight imperfections often disappear when the blocks are joined into a quilt. The charm of patchwork lies in its handmade, personalized nature.
Creative Ways to Use Patchwork Blocks
Besides quilts, your Easy Patchwork Block creations can be used in many fun and practical ways. Their versatility allows you to craft gifts, home décor, or personal accessories.
Use a single block to make a decorative pillow cover. Add a border, quilt it lightly, and sew a backing. It’s a fast way to enjoy your work and brighten any space.
Turn patchwork blocks into potholders or coasters. These smaller items are excellent for using up leftover fabric and practicing your technique on a smaller scale.
Create a fabric wall hanging. Combine a few themed blocks and add sashing, borders, and a backing for a custom textile artwork. This makes a beautiful handmade gift.
Make a tote bag panel using a patchwork block. Add lining and sturdy handles for a stylish and functional result. Quilted bags are especially popular at craft fairs.
Use patchwork blocks as quilt labels or memory blocks. Add embroidery or hand-written messages to commemorate a special occasion or loved one.
Finally, sew a set of blocks into a table runner. This is a great way to show off your favorite fabrics and add a handmade touch to your dining space.
Frequently Asked Questions
What size should I cut my squares for an Easy Patchwork Block?
Most beginners start with 2.5″ or 5″ squares. These are easy to handle and work well with popular pre-cut fabric packs.
Can I sew patchwork blocks by hand?
Yes! Hand-sewing is entirely possible and traditional in quilting. It takes longer but offers great control and is relaxing for many crafters.
What is the best fabric for patchwork blocks?
100% cotton is the most commonly used fabric due to its ease of cutting, sewing, and pressing. It also holds its shape well.
How do I keep my seams aligned?
Pinning, pressing, and maintaining a consistent seam allowance are key. Practice improves alignment over time.
Do I need a sewing machine to quilt?
While a sewing machine speeds up the process, patchwork blocks can absolutely be made by hand if preferred.
What if my blocks aren’t perfectly square?
Don’t worry! You can trim blocks to size after sewing. Small imperfections usually won’t be noticeable in the final quilt.
In this article, we explored the joy and simplicity of making an Easy Patchwork Block, from the materials you need to creative ways to use your finished pieces. We covered techniques, helpful tips, and answered common questions to help you succeed in your quilting journey.
Whether you’re making your first block or your hundredth, remember that quilting is a personal, expressive art. Every stitch tells a story, and the process is just as meaningful as the final product.
If you found this article helpful, please share your honest opinion and feel free to leave your suggestions. Your feedback helps us continue creating useful content tailored to your interests.