
If you’re looking for a vibrant and joyful quilting project, this Bright Jewel Strip Pieced Table Runner Tutorial is exactly what you need. In this guide, you’ll learn step-by-step how to create a stunning table runner using jewel-tone fabric strips that can bring any table to life. Whether you’re a beginner or a seasoned quilter, this project offers the perfect balance between creativity and simplicity.
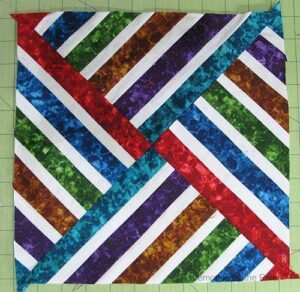
The Bright Jewel Strip Pieced Table Runner Tutorial focuses on strip piecing techniques, using radiant jewel-toned fabrics that create a shimmering effect. This type of project is ideal for using up fabric scraps or showcasing a carefully selected palette of colors. The results are always eye-catching, making it a great centerpiece for holidays, celebrations, or everyday charm.
Throughout this article, you will find practical instructions, expert tips, and visual inspiration to help you bring your Bright Jewel Strip Pieced Table Runner Tutorial project to life. With the right materials and some creativity, you can make a table runner that radiates warmth and personality, all while improving your quilting skills.
Choosing the Right Fabric for a Jewel-Tone Effect
Selecting the right fabric is essential for the success of your Bright Jewel Strip Pieced Table Runner Tutorial. Jewel tones—like emerald green, sapphire blue, ruby red, and amethyst purple—are known for their richness and depth. They reflect light in unique ways and add an elegant vibrance to any quilted piece.
Start by choosing high-quality cotton fabrics. Cotton holds its shape well, is easy to sew, and works beautifully with strip piecing. Look for batiks or tone-on-tone prints in bold, saturated colors. Avoid overly busy patterns, as they may distract from the overall strip design.
Aim for a cohesive palette. Even though jewel tones are bold, they can clash if not selected carefully. Choose 5–7 different colors that complement each other, and test them by laying the strips side by side. Keep contrast in mind—too many similar hues might make the design look flat.
Pre-wash your fabric to prevent color bleeding and shrinkage. Jewel-tone fabrics sometimes release excess dye, and it’s better to address that before sewing. After washing, press each piece well for clean, accurate cuts.
Use a rotary cutter and cutting mat to create even strips, typically 2.5 inches wide. Consistency in width is key in strip piecing. Accurate cutting helps the fabric pieces align properly when stitched together.
Don’t forget the background or neutral fabric. A deep charcoal, navy, or even black can enhance the jewel-tone effect. Neutrals frame your bright colors and make them pop without competing for attention.
Lastly, consider including a few metallic or shimmer-infused fabrics for sparkle. A tiny bit of shine adds luxury without overpowering the jewel tones. Be careful not to overdo it—a little glimmer goes a long way in a Bright Jewel Strip Pieced Table Runner Tutorial.
Step-by-Step Piecing Instructions
Now that you’ve selected your fabric, it’s time to move on to the most exciting part: sewing your Bright Jewel Strip Pieced Table Runner Tutorial together. Strip piecing is both efficient and rewarding, making it ideal for beginners and time-conscious quilters alike.
Begin by grouping your fabric strips into pleasing arrangements. Play with the order until you find a combination that feels balanced. You can go random or follow a repeating pattern—whatever speaks to your design instincts.
Sew the strips together along their long edges, using a consistent 1/4-inch seam allowance. This standard quilting seam ensures everything aligns properly. Press seams open or to one side, depending on your preference.
After sewing your strip set, square it up by trimming the edges. This gives you a clean, even piece to work with in the next steps. Take your time—accuracy here will make the final product look professional.
Next, subcut the strip set into smaller segments, usually rectangles. These blocks will be rearranged to form your table runner’s unique layout. This step adds visual movement and complexity without requiring more sewing.
Once your blocks are arranged, sew them together to form the full runner top. Pay attention to how the colors flow and intersect—it’s the magic of strip piecing! Alternate block directions if you want a more dynamic look.
Add borders if desired. A narrow dark border can frame the design beautifully and prevent the edges from fraying over time. The border also adds width and visual weight to the final piece of your Bright Jewel Strip Pieced Table Runner Tutorial.
Quilting and Finishing Techniques
The top is pieced, and now it’s time to quilt your Bright Jewel Strip Pieced Table Runner Tutorial. This stage brings texture and dimension, making your runner more than just a flat design—it becomes a tactile experience.
Begin by layering your quilt sandwich: backing fabric on the bottom (right side down), batting in the middle, and your pieced top (right side up). Smooth out any wrinkles and pin or baste to secure.
Choose a quilting design that complements the strips. Straight-line quilting works wonderfully and enhances the linear look. You can stitch in the ditch or add lines at angles for extra interest.
For a more intricate touch, consider free-motion quilting. Swirls, pebbles, or meandering patterns contrast beautifully with the geometric strip layout. Just practice on a scrap piece before diving into your main project.
Use thread that blends or contrasts depending on your style. A neutral thread won’t compete with your jewel tones, while a metallic or bold color thread can become a design element in itself.
When quilting is complete, trim the edges of your table runner. Be sure the sides are straight and even to create a polished finish. Take care around corners to ensure they’re sharp and clean.
Finish with binding. Choose a fabric that frames your quilted runner and ties your color palette together. Double-fold binding adds durability, and hand-stitching the back gives a smooth, professional look. Now your Bright Jewel Strip Pieced Table Runner Tutorial masterpiece is ready to impress!
Creative Variations and Design Ideas
One of the best parts about this Bright Jewel Strip Pieced Table Runner Tutorial is how easy it is to personalize. You can modify the layout, colors, or size to fit your table, event, or personality. The possibilities are endless.
Try a diagonal strip layout for a fresh take. Instead of horizontal strips, sew them at an angle and then trim the runner into a rectangle. This adds dynamic movement and a more modern feel.
Make it seasonal by choosing holiday-themed jewel tones. Think icy blues and silvers for winter, or ruby and gold for festive decor. Your table runner can be a part of your year-round decorating rotation.
Add appliqué elements to your runner top before quilting. Small floral or geometric motifs can enhance the jewel tones and bring extra dimension to the design. This is a great way to use scrap pieces creatively.
Incorporate a personalized label or embroidered message on the back. Whether it’s a date, name, or occasion, these details make your project meaningful—especially if it’s a gift.
Make matching accessories! Use leftover strips to create placemats, coasters, or napkin rings. A coordinated set is perfect for dinner parties, weddings, or gifts.
Finally, share your creation. Whether it’s through photos, social media, or showing friends in person, the joy of quilting is amplified when you inspire others. Each Bright Jewel Strip Pieced Table Runner Tutorial is a unique expression of creativity and care.
FAQ: Bright Jewel Strip Pieced Table Runner Tutorial
What is strip piecing in quilting?
Strip piecing is a quilting technique where long strips of fabric are sewn together and then cut into segments. It speeds up the process and creates interesting patterns with minimal effort.
What size should I cut my fabric strips?
Most quilters use 2.5-inch-wide strips for projects like this one. However, you can adjust the width depending on the look you want and the size of your table runner.
Can I use pre-cut fabric like jelly rolls?
Absolutely! Jelly rolls are pre-cut 2.5-inch strips that are perfect for a Bright Jewel Strip Pieced Table Runner Tutorial. They save time and often come in coordinated colors.
Do I need a quilting machine?
No. A standard sewing machine is sufficient for this project. You can do both the piecing and quilting with basic equipment.
How long does this project take to complete?
Depending on your experience, it can take anywhere from 4 to 8 hours. It’s a manageable weekend project with beautiful results.
What’s the best batting for a table runner?
Choose a thin cotton or cotton/poly blend batting. Since it’s a table runner, you don’t want too much loft, which can cause dishes to wobble.
Conclusion
The Bright Jewel Strip Pieced Table Runner Tutorial offers a wonderful opportunity to explore color, pattern, and texture in a fun and manageable quilting project. From fabric selection to final stitching, every step adds a touch of creativity to your home decor.
By following this guide, you’ve learned how to select jewel-toned fabrics, piece them together using strip piecing techniques, quilt the runner, and add finishing touches that make your project shine. It’s a joyful process with stunning results.
We’d love to hear what you thought about this tutorial. Leave a sincere opinion in the comments and feel free to share your suggestions or creative variations. Happy quilting!