
3D sewing tutorial using fabric scraps is one of the most enjoyable and creative ways to transform leftover materials into beautiful, eye-catching handmade pieces. Many crafters love the process of turning small pieces of fabric into intricate decorative elements that stand out in shape, texture, and style. Using fabric scraps is not only an eco-friendly practice but also a budget-friendly way to expand your sewing skills while experimenting with new techniques.
Working with 3D sewing allows you to build layers, create unique shapes, and bring movement to your craft projects. Whether you are a beginner or an experienced sewer, this method can elevate your handmade creations and make them look more artistic and professional. With the right instructions, you can turn simple scraps into flowers, mini sculptures, quilt embellishments, and home décor accessories.
In this article, you will learn how to follow a complete 3D sewing tutorial using fabric scraps, step by step, using easy-to-understand directions. The entire process is designed to inspire creativity, teach practical techniques, and ensure your project stays within friendly crafting guidelines. Let’s explore how scraps can become your favorite sewing material for dimensional art.
How to Prepare Fabric Scraps for 3D Sewing
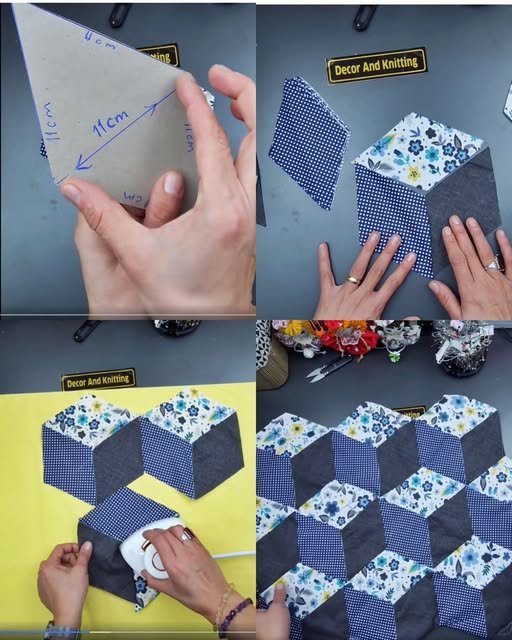
Preparing your scraps is the first and most important step in any 3D sewing tutorial using fabric scraps because the size, texture, and type of material influence the final outcome. Start by sorting all your scraps by color, pattern, and thickness. This will help you visualize combinations and make each 3D piece cohesive.
Next, press your fabric scraps with an iron to remove wrinkles and folds. This simple step enhances precision, especially when cutting layers or assembling shapes. Good preparation ensures that the pieces fit correctly and add depth to the final project.
Once your scraps are flat, cut them into uniform shapes according to the design you want to create. You can choose circles, squares, petals, or abstract patterns. Consistent cuts help you stack the layers neatly when forming 3D elements.
After cutting, consider backing your thinner scraps with interfacing. This makes the fabric sturdier and helps your 3D elements stand upright or keep their intended shape. It’s especially important when working with very soft or stretchy materials.
Choose complementary colors that enhance the 3D effect. Contrasting colors create bold designs, while similar tones generate a soft, elegant look. Selecting the right palette is essential for giving your final piece personality.
At this stage, test combinations by stacking different shapes to see how the layers interact. This is the perfect moment to experiment with textures such as cotton, linen, felt, or even denim. Each texture will add a unique dimension to your creation.
Building 3D Shapes Using Simple Sewing Techniques
After preparing your materials, the next stage in your 3D sewing tutorial using fabric scraps is learning how to assemble the shapes. Begin by placing the largest layer at the bottom and the smallest on top. This creates a natural dimensional structure.
Use a simple running stitch to hold all the layers together. This stitch is easy for beginners and allows you to quickly secure the pieces before adding decorative stitching. Keep your stitches small and even for a clean finish.
If you want your 3D shape to stand out more, add a small amount of stuffing between some of the layers. Even a tiny bit of filling can bring a soft three-dimensional puff to flowers, stars, or sculptural details.
For projects with curved edges, a blanket stitch or whipstitch adds both stability and visual charm. These stitches help define the outline and enhance the handmade aesthetic of the project.
Consider using decorative thread in metallic tones or contrasting colors to highlight the 3D layers. This technique adds a unique touch and makes the dimensional elements even more striking.
As you gain confidence, try mixing shapes, such as combining petals and circles or layering geometrical pieces with free-form designs. This playful experimentation enhances your sewing creativity and produces completely unique 3D effects.
Creative Projects You Can Make With 3D Fabric Scraps
One of the best aspects of a 3D sewing tutorial using fabric scraps is discovering how many projects you can create. You can start with small embellishments and work up to detailed home décor items.
A popular beginner project is creating 3D fabric flowers. These are perfect for decorating quilts, hair accessories, purses, or even greeting cards. With layered petals and a stitched center, they add instant charm.
Another idea is making 3D appliqués for quilts. Adding dimensional elements brings movement and life to the fabric surface, transforming simple quilts into artistic pieces full of texture.
Fabric scraps are also great for making tiny stuffed ornaments. These can include stars, hearts, mini animals, or abstract forms that can hang from a mobile or be displayed on shelves.
If you enjoy home décor, consider making 3D wall art using layered fabric shapes arranged in patterns or nature-inspired designs. This project allows full creativity and the freedom to experiment with colors.
Scraps can also be used to create fun keychains with raised elements. These lightweight accessories make great gifts and are simple enough for quick sewing sessions.
For more advanced crafters, combining several 3D pieces to build a large artistic installation can be a wonderful challenge. This might include a full bouquet of fabric flowers or a sculptural quilt block.
Tips for Enhancing Your 3D Sewing Results
To make the most of your 3D sewing tutorial using fabric scraps, using the right techniques will greatly improve your results. One important tip is to select sharp scissors or rotary cutters to ensure clean fabric edges.
Another helpful step is reinforcing areas that will endure more handling. Adding a small piece of interfacing or stabilizer behind delicate scraps keeps them in shape longer and prevents distortion.
Experiment with different stitch lengths to see which best enhances your 3D effect. Short stitches create tighter, more controlled shapes, while longer stitches add a more relaxed look.
Practice layering contrasting fabrics such as matte cotton with shiny satin. These combinations bring more visual interest and make the dimension stand out even more.
Be patient as you assemble your layers. Taking your time ensures that every shape aligns perfectly and the final structure appears smooth and stable.
Finally, store your finished 3D pieces carefully to prevent flattening. Keeping them in a box or hanging them ensures your dimensional creations maintain their shape for a long time.
About 3D Sewing With Fabric Scraps
What is 3D sewing?
3D sewing is a technique where fabric layers are shaped and stitched to create raised or dimensional effects, making the project visually dynamic.
Can beginners follow a 3D sewing tutorial?
Yes, beginners can easily start with simple shapes and layer them to create 3D effects using basic stitches.
Which scraps work best for 3D sewing?
Cotton, felt, denim, and other medium-weight fabrics provide structure and are easy to layer, especially for dimensional shapes.
Do I need special tools for 3D sewing?
No, basic sewing tools such as scissors, needles, thread, and optional interfacing are enough to create most 3D projects.
How can I make my 3D shapes stand out more?
Use layers of different sizes, add small amounts of stuffing, or choose contrasting fabrics to enhance dimension.
What projects can I create with 3D sewing?
You can make flowers, appliqués, ornaments, wall art, keychains, and decorative pieces for quilts or home décor.
PATTERN HERE
This 3D sewing tutorial using fabric scraps shows how even the smallest leftover materials can be transformed into beautiful, dimensional, and artistic pieces. By preparing your scraps carefully, layering with intention, and exploring creative projects, you can turn simple fabric into meaningful handmade art. I hope this guide inspires you to experiment with new shapes, techniques, and textures. Please leave your sincere opinion and suggestions so I can continue creating helpful tutorials for your sewing journey.