
How to Crochet SKULLS! is one of the most creative and edgy crochet projects you can dive into. Whether you’re crafting spooky home décor, unique accessories, or Halloween-themed gifts, skull motifs bring a bold and playful touch to your crochet work. If you’ve ever wondered how to blend charm and a hint of the macabre into your yarn art, you’re in the right place.
Learning how to crochet skulls doesn’t require being a seasoned crocheter. With the right guidance, even beginners can produce eye-catching skull designs that range from cute and cartoony to realistic and detailed. These skulls can be used in countless ways—banners, appliqués, coasters, keychains, or even incorporated into larger blankets and clothing pieces.
In this comprehensive guide, we’ll explore everything you need to know about how to crochet skulls, from the tools and yarn to use, to patterns, styles, and project ideas. Whether you want to start small or go all in with an intricate design, this article is packed with tips and inspiration.
Choosing the Right Yarn and Tools
When starting out with how to crochet skulls, selecting the correct materials can make a big difference in the final look and feel of your project. Lightweight yarn is ideal for smaller, decorative skulls, while bulkier yarns create bolder and more noticeable pieces. Cotton yarns are often preferred for their crisp stitch definition, which is great for showing off the skull’s details.
Use a crochet hook size that corresponds to your yarn, but remember that smaller hooks create tighter, more defined skull shapes. For most patterns, a hook in the range of 2.5mm to 4mm works well. Keep stitch markers on hand to help you track your rounds, especially if you’re working in the round rather than rows.
Color choice also plays a role. Traditional skulls are often worked in white, off-white, or ivory yarn, but don’t be afraid to explore vibrant color combinations, especially if you’re inspired by Day of the Dead (Día de los Muertos) motifs. Contrasting yarns for borders or accents can make your skull really stand out.
For stuffing or three-dimensional skulls, use polyester fiberfill to maintain shape. If you’re making flat skull appliqués, you can skip the stuffing entirely. Scissors, tapestry needles, and blocking tools will help you give your skulls a clean and finished look.
Don’t forget to check your tension! Skull patterns often rely on symmetry, and uneven tension can warp the final shape. Practice a few rows of the pattern before starting your final piece.
Finally, always have your pattern or reference sketch close by. Visualizing your final product makes it easier to adjust your approach along the way, and gives you a roadmap for every stitch.
Simple Flat Skull Patterns for Beginners
If you’re new to how to crochet skulls, flat skull appliqués are the perfect place to start. These designs are typically worked in the round, starting with a magic circle or chain loop as the foundation. From there, simple increases and decreases form the shape of the skull.
Begin with a circle to form the top of the head. Once the basic shape is formed, create the jaw by working into just a portion of the stitches in rows rather than rounds. A common feature in many beginner patterns is the use of half double crochet (hdc) and double crochet (dc) to build volume.
Eye sockets and nose holes can be crocheted directly into the pattern or stitched on afterward using black yarn. Some crafters prefer using safety eyes or buttons to represent the eye sockets, adding texture and dimension.
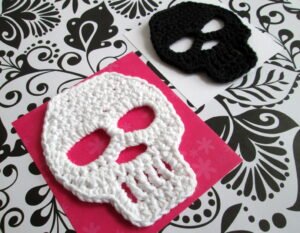
Flat skulls are great for banners, table decorations, or even as patches on denim jackets and tote bags. You can personalize each one by using different colored yarns or adding details like bows, flowers, or facial expressions.
Once you’re comfortable with the basics, try layering your skull appliqué on a contrasting crochet square or circle. This frames the skull and gives it a more finished appearance, perfect for incorporating into larger projects.
Blocking your finished skull will help it lay flat and maintain its shape. This is especially useful if the pattern includes more intricate stitchwork that needs definition.
Experimentation is key. Don’t be afraid to modify patterns or mix stitches to achieve the exact look you want. Crochet is as much an art form as it is a craft.
Making 3D Crochet Skulls
Ready to take your skull-making skills to the next level? Once you’ve mastered the flat designs, you can explore how to crochet skulls in three dimensions. These 3D skulls are perfect for decorations, toys, or centerpieces.
Start with a sphere pattern, which will form the top portion of the skull. Using single crochet (sc) stitches in continuous rounds helps create a smooth, solid shape. Gradually increase your stitches to form the head’s widest point, then decrease as you move down toward the jaw.
To define the skull’s facial structure, you can shape the jaw area using strategic increases and decreases, or by crocheting separate pieces and stitching them together. For example, some patterns use a separate jaw that is sewn to the base of the head.
Details like eye sockets and nasal cavities can be created using black yarn and surface crochet, embroidery techniques, or by crocheting and attaching small circles. You can also carve out spaces and line them with black felt for a hollow look.
To create the illusion of teeth, alternate colored stitches or use embroidery floss to stitch small vertical lines along the jaw area. This adds realism without complicating the pattern too much.
For added personality, accessorize your skull with miniature hats, scarves, or sunglasses. This is especially popular during seasonal crafting, like Halloween or Day of the Dead celebrations.
Don’t forget to stuff the skull evenly and close it tightly to avoid misshapen results. Stitch your final seams securely, especially if the skull will be handled frequently or given as a toy.
Creative Ways to Use Crocheted Skulls
One of the most exciting aspects of learning how to crochet skulls is exploring all the creative ways to use them. From wearable art to interior décor, skull motifs are versatile and eye-catching.
You can incorporate crocheted skulls into blankets by joining multiple appliqués with granny squares or a solid background. This makes for a bold, custom-made throw that’s perfect for gifting or display.
For fashion enthusiasts, try attaching smaller skulls to hats, beanies, or bags. This adds a unique, edgy twist to ordinary accessories and shows off your crochet skills.
Wall hangings are another fantastic project. Combine skull appliqués with tassels, fringe, and macramé elements to create a statement piece. You can customize it with beads, metallic threads, or even glow-in-the-dark yarn.
If you enjoy functional art, try making skull-shaped coasters, pot holders, or placemats. These are great for parties or themed dinners and are always conversation starters.
Bookmarks, keychains, and brooches are smaller items that still let your skulls shine. Use fine yarn or thread for detailed miniatures, and attach them to hardware like key rings or clips.
For Halloween décor, crochet a skull garland or wreath. String together several skull motifs with black yarn or ribbon and hang them across a fireplace or doorframe.
Advanced Techniques and Personalization
Once you’re comfortable with the basics, you can take how to crochet skulls to a more advanced level. Complex stitches and embellishments can elevate your project and reflect your personal style.
Try integrating post stitches or popcorn stitches to add texture to your skulls. These can be used to highlight features like cheekbones or jawlines. Crocheting around a wire frame can also help the skull hold a more defined shape.
Colorwork is another advanced technique worth exploring. Use tapestry crochet or intarsia methods to create multicolored designs within a single skull. This is especially useful if you want to add facial features or decorative patterns.
You can even combine different crochet techniques, like Tunisian crochet, for an extra layer of visual interest. These patterns may take longer but the result is often more intricate and polished.
Embellishments like beads, sequins, or embroidery floss add flair and personalization. For instance, embroidering flowers or hearts into the skull makes a charming Day of the Dead-style piece.
Layering elements like felt backings, lace overlays, or fabric accents can create a mixed-media effect, making your skulls stand out even more. These techniques are ideal for gift items or art displays.
Finally, don’t be afraid to draft your own skull pattern. Start by sketching your design on graph paper and translating it into stitches. This allows for full creative control and ensures your project is truly one of a kind.
How to Crochet Skulls
Q: What’s the best type of yarn for crocheting skulls?
A: Cotton yarn is ideal due to its stitch definition, but you can also use acrylic or blended yarns depending on the desired texture.
Q: Can beginners learn how to crochet skulls?
A: Absolutely. Start with simple flat skull patterns and gradually move to 3D versions as your skills improve.
Q: How long does it take to crochet a skull?
A: A small flat skull can take 30–60 minutes, while 3D skulls may take several hours depending on the complexity.
Q: What are some good uses for crocheted skulls?
A: They’re perfect for home décor, accessories, clothing patches, party decorations, and handmade gifts.
Q: Are skulls only for Halloween?
A: Not at all! They’re popular year-round, especially for gothic, rock, and Día de los Muertos-themed crafts.
Q: How can I make my skulls look more realistic?
A: Use shaping techniques, embroidery for facial features, and strategic color placement to add depth and realism.
In this guide, we’ve explored how to crochet skulls, from the simplest patterns to complex, personalized creations. You’ve learned about tools, yarns, 2D and 3D designs, and how to use your skulls in creative projects. With a bit of patience and practice, anyone can master the art of crocheting skulls.
Now it’s your turn! Try out a pattern, experiment with colors, and bring your unique vision to life. If this guide helped you, please leave a sincere opinion and feel free to share any suggestions or experiences in the comments. Let’s keep the creativity alive!