
How to Crochet a Pumpkin Playset: A Detailed Guide is the perfect project for crafters who want to combine creativity, seasonal charm, and handmade warmth. This type of crochet project is not only fun to make, but it also offers endless opportunities for customization. Whether you are creating a cozy fall decoration, a cute playset for children, or a unique gift for friends, crocheting a pumpkin playset will spark your imagination and bring a touch of autumn magic into your home.
When learning how to crochet a pumpkin playset, you will discover that it is a beginner-friendly project that can also challenge more experienced crafters with intricate details and creative additions. From shaping the pumpkins to adding stems, leaves, and even miniature accessories, the process can be as simple or as detailed as you want it to be. The best part is that the final result is versatile—you can use it for decoration, storytelling playsets, or even as part of festive table centerpieces.
This detailed guide will take you step-by-step through the process, explaining essential stitches, techniques, and tips for achieving the best results. You will also learn how to adapt the pattern for different sizes, colors, and styles so your crochet pumpkin playset perfectly matches your personal taste and purpose. Let’s dive into the creative process and explore all the ways you can bring this seasonal project to life.
Choosing the Right Yarn and Tools
Selecting the proper materials is the foundation for successfully learning how to crochet a pumpkin playset. The yarn you choose will determine the texture, durability, and overall look of your finished project.
Start with a medium-weight yarn, as it offers the perfect balance between structure and flexibility. Cotton yarn works well because it holds its shape and gives a neat stitch definition. Acrylic yarn is another great option, especially if you want a softer and more budget-friendly choice. Consider using a variety of autumn colors such as burnt orange, mustard yellow, deep green, and even cream for a rustic touch.
Next, you will need the right hook size. Typically, a 4 mm to 5 mm crochet hook works perfectly for this type of project. Using a slightly smaller hook than recommended on the yarn label will create tighter stitches, ensuring your pumpkins maintain their shape.
Besides yarn and hooks, gather essential tools like stitch markers, a yarn needle for sewing pieces together, and polyester fiberfill for stuffing. You may also want to have embroidery floss or thinner yarn for adding decorative details like leaf veins or facial expressions if you’re making a playful set for children.
Investing in quality tools will make your work more enjoyable and produce a polished, long-lasting pumpkin playset. Having everything prepared before starting will also keep you focused and inspired throughout the crafting process.
Finally, remember that while the materials guide the outcome, your creativity is the real magic. Even with the same yarn and hook size, every crocheter will produce a unique interpretation of the pattern, making each pumpkin playset one-of-a-kind.
Basic Stitches and Techniques for a Pumpkin Playset
Before diving fully into how to crochet a pumpkin playset, it’s important to familiarize yourself with the stitches and techniques you’ll use. Mastering these will make the process smooth and enjoyable.
The foundation chain is where most crochet projects begin. This is followed by working single crochet (sc) stitches, which are essential for creating a tight, firm texture suitable for pumpkins. You’ll also use increases and decreases to shape the pumpkin body, giving it a rounded and plump appearance.
A magic ring is another important technique, especially for starting circular crochet pieces like the base of your pumpkin. This method ensures there’s no hole in the center, which creates a neat and professional finish. If you are new to the magic ring, practicing a few times before starting the actual project is helpful.
Slip stitches are used to join rounds and create a smooth seam. Mastering this will keep your playset looking clean and uniform. Additionally, working in the round is a must-know skill for this project, as it allows you to shape your pumpkin without creating visible seams.
Stuffing the pumpkin correctly is also an essential technique. You want enough fiberfill to hold the shape, but not so much that it stretches the stitches. Adding the stuffing gradually while shaping the pumpkin will give you better control over its final form.
Lastly, sewing and attaching the pumpkin’s stem, leaves, and any extra details will require basic embroidery or sewing skills. Even if you’re not experienced, simple and small stitches will work beautifully and add to the handmade charm.
Step-by-Step Guide to Crocheting a Pumpkin Playset
Now that you have your materials and know the basic techniques, let’s go step-by-step through how to crochet a pumpkin playset from start to finish.
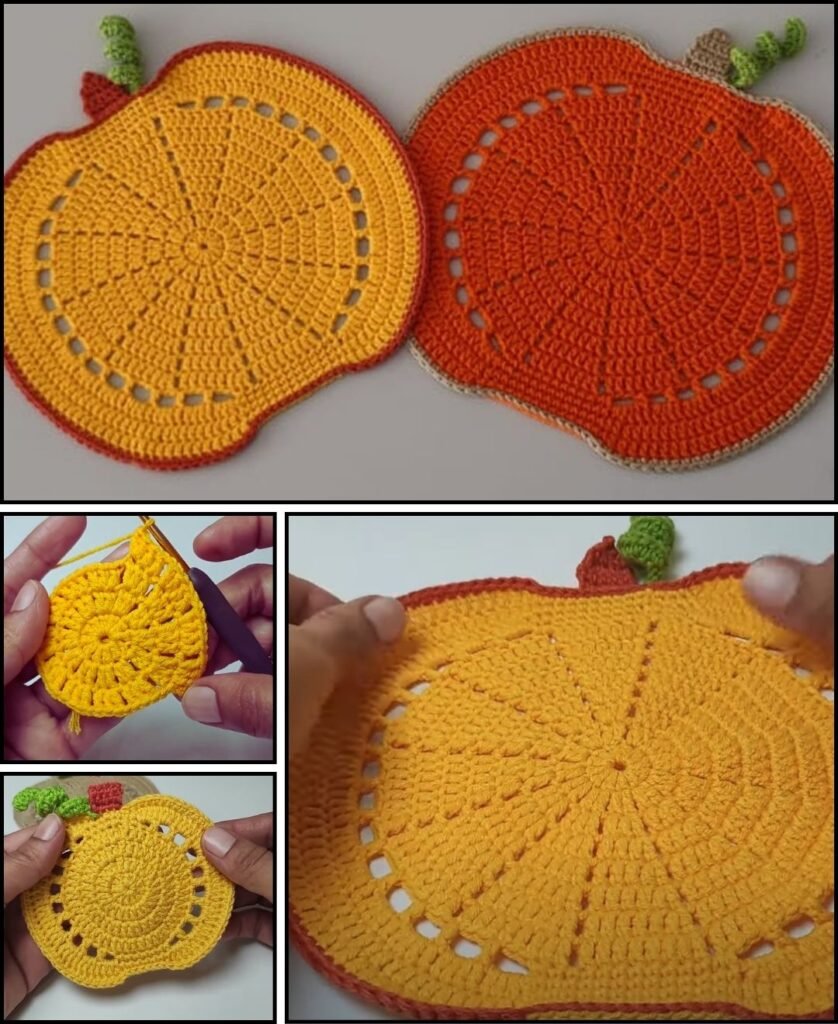
Begin with the magic ring and work your first round of single crochet stitches into it. Increase evenly across several rounds until the base reaches your desired width. This will form the widest part of the pumpkin.
Once you’ve reached the width, start working rounds without increases to create height. This is where your pumpkin begins to take shape. Continue until the height matches the width or slightly less, depending on the style you want.
Next, you’ll start decreasing to close the top of the pumpkin. Insert your fiberfill gradually as you work these decreasing rounds. Once you have a small opening left, finish stuffing and pull the yarn tight to close. Secure and weave in the ends.
For the stem, use green or brown yarn to crochet a small tube or cone. Attach it securely to the top of the pumpkin. Then crochet a few leaves using a leaf pattern of your choice, making sure they are proportional to the pumpkin size.
If you are creating a pumpkin playset, repeat the process to make several pumpkins in different sizes and colors. You can also add accessories like a miniature basket, tiny crocheted vines, or even little characters to enhance the playset theme.
Finally, arrange your completed pieces together to form the playset. Whether displayed on a shelf, used for play, or incorporated into seasonal décor, your handcrafted pumpkin set will be a charming and eye-catching addition to your collection.
Creative Ways to Customize Your Pumpkin Playset
One of the joys of learning how to crochet a pumpkin playset is the opportunity for customization. You can adapt colors, textures, and shapes to create something truly unique.
Experiment with different yarn textures for variety. Using velvet yarn will give your pumpkins a luxurious feel, while tweed or heathered yarn adds a rustic touch. You can even mix yarn types within the same pumpkin for interesting visual effects.
Try playing with size variations. Create a family of pumpkins ranging from tiny, palm-sized ones to large statement pieces. These can be displayed together for a charming, tiered effect.
Add fun details to make your playset more interactive. For a children’s toy version, embroider cute faces, sew on buttons, or crochet little accessories like hats or scarves for the pumpkins. This adds personality and encourages imaginative play.
If you’re using your playset as decoration, consider adding scent. Place a small sachet of cinnamon sticks or cloves inside the pumpkin before closing it to give off a delightful autumn aroma.
Another creative option is to make themed pumpkins. Instead of traditional fall colors, try pastel pumpkins for a spring feel, white pumpkins for a modern minimalist look, or even bright rainbow pumpkins for a playful twist.
Your crochet pumpkin playset can be as simple or elaborate as you wish. By experimenting with different elements, you’ll create a collection that reflects your style and creativity.
About Crocheting a Pumpkin Playset
Q: Is crocheting a pumpkin playset suitable for beginners?
A: Yes, it is beginner-friendly, especially if you start with simple stitches like single crochet and avoid overly complex details at first.
Q: How long does it take to crochet one pumpkin?
A: Depending on size and your skill level, a small pumpkin can take about 1–2 hours, while a larger or more detailed one might take 3–4 hours.
Q: Can I wash crocheted pumpkins?
A: Yes, but it’s best to hand wash them in cool water and air dry to preserve their shape and colors.
Q: What’s the best stuffing for crocheted pumpkins?
A: Polyester fiberfill is the most common choice, as it’s lightweight, washable, and holds shape well.
Q: Can I sell crocheted pumpkin playsets I make?
A: Absolutely, as long as you use your own design or have permission if following someone else’s pattern.
Q: How can I make the pumpkin segments more defined?
A: Use a long piece of yarn and a tapestry needle to wrap around the stuffed pumpkin several times, cinching it slightly to create distinct segments.
In this guide, we explored how to crochet a pumpkin playset step-by-step, from choosing materials and mastering basic stitches to customizing your project with creative details. Whether you’re making it as a seasonal decoration, a children’s toy, or a thoughtful handmade gift, the process is both relaxing and rewarding. Your unique touches will make the playset truly special.
Now that you know the techniques and creative options, it’s your turn to pick up your hook and bring your pumpkin playset to life. I’d love to hear your honest opinion and any suggestions for improving this guide—your feedback will help inspire even more creative crochet projects in the future.