
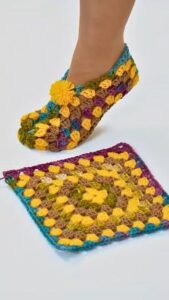
If you’ve been searching for a cozy, handmade gift idea or simply want to treat your feet with something warm and charming, this Easy Crochet Granny Square Slippers Tutorial is exactly what you need. This project is ideal for beginners who are familiar with the classic granny square and want to transform it into a functional and stylish pair of slippers. Whether you’re crafting for yourself or someone you love, this tutorial will walk you through each step using simple techniques.
Easy Crochet Granny Square Slippers Tutorial is not just about stitching pieces together—it’s about creating comfort, creativity, and care with your hands. These slippers are soft, adaptable to many sizes, and a perfect scrap yarn project. You don’t need fancy tools or expensive materials—just some colorful yarn, a crochet hook, and a little time.
Throughout this tutorial, we’ll be using the key phrase Easy Crochet Granny Square Slippers Tutorial frequently and naturally, ensuring a clear structure and making it easier for readers and search engines to understand the content. Let’s dive into this creative journey that brings both nostalgia and practicality in one delightful crochet project.
1. Understanding the Granny Square Basics
Before we jump into slipper-making, it’s essential to grasp the foundation of this pattern: the granny square. The granny square is a versatile, classic motif known by crocheters across generations.
Start by selecting your favorite yarn colors. While traditional granny squares are often multicolored, you can choose a more modern, minimalistic palette if that suits your taste. This is where your personal style can shine through.
Use a crochet hook that matches the weight of your yarn—usually, a 4.0mm to 5.5mm hook works great with medium-weight yarn. For this Easy Crochet Granny Square Slippers Tutorial, a worsted weight yarn is ideal for both warmth and structure.
The basic granny square starts with a magic ring or a small chain circle. You’ll build three double crochet clusters into this center, separated by chain spaces. This creates the signature cornered shape.
As you continue building your rounds, the granny square begins to grow. Make sure your tension is consistent to keep your squares even and flat, avoiding any curling at the edges.
For the slippers, you’ll need to crochet several granny squares of equal size—usually six squares per slipper, depending on your desired length and width. Keep your yarn tails neat, weaving them in as you go for a cleaner finish.
2. Assembling the Slippers
Once your granny squares are ready, the next step in this Easy Crochet Granny Square Slippers Tutorial is assembly. This part may feel a bit like a puzzle, but with clear instructions, it’s fun and simple.
Lay out your squares on a flat surface in the arrangement you want. Typically, you’ll use one square for the toe, two for the sides, one for the heel, and two for the sole.
Using a yarn needle or your crochet hook, start seaming the edges with a slip stitch or whipstitch method. Both work well; it’s a matter of preference. Keep your stitches snug but not too tight.
Begin by connecting the toe square to the two side squares. Then, add the heel square to the back. Seam the sides together to form the top of the slipper.
The final step is attaching the sole squares. Place them along the bottom, aligning the edges, and seam them securely to the upper section of the slipper.
Repeat the same process for the second slipper. Double-check the sizes as you go—symmetry is important for comfort and fit. If needed, block your squares before assembly for cleaner lines.
3. Customizing Your Crochet Slippers
Now that the basic Easy Crochet Granny Square Slippers Tutorial steps are covered, let’s explore how to personalize your pair. This is where you can truly let your creativity run wild.
Choose colors that reflect your personality or the season. Think warm tones for autumn, pastels for spring, or festive reds and greens for holiday slippers. Using leftover yarn from past projects makes this an eco-friendly choice too.
You can add a decorative edge to your slippers using a picot stitch, shell stitch, or even a simple crab stitch for a polished look. This detail can elevate the overall appearance of your work.
Attach small embellishments like buttons, pompoms, or crochet flowers to the top for a unique touch. Just be sure they’re securely fastened, especially if making slippers for children.
Consider lining your slippers with fleece or felt for extra warmth and comfort, especially in colder climates. Simply trace the sole, cut the fabric, and hand-stitch it into place.
If the recipient needs extra grip, use fabric puff paint or hot glue dots on the bottom. This creates a non-slip surface perfect for hardwood or tile floors.
Lastly, play around with sizing. You can easily make larger or smaller squares, or add a border around your granny squares to make the slippers roomier. This flexibility is what makes granny square projects so beginner-friendly and fun.
4. Tips for Success and Maintenance
To ensure your Easy Crochet Granny Square Slippers Tutorial project lasts a long time and stays in great shape, follow these tips for success and maintenance.
Use quality yarn that’s soft but durable. Acrylic yarn is a great choice for beginners—affordable, washable, and available in many colors. Cotton yarn is breathable, while wool adds extra warmth.
Always measure your foot (or the intended wearer’s foot) before starting. Adjust the number of granny squares or rounds accordingly to ensure a snug yet comfortable fit.
Weave in your ends thoroughly to prevent unraveling. Use a yarn needle to tuck each tail into the stitches for a neat and durable finish.
Wash your slippers gently by hand or on a delicate machine cycle. Avoid hot water and never use a dryer unless your yarn label says it’s safe. Air-drying preserves shape and fiber strength.
Store your crochet slippers in a dry area. Avoid damp spaces to prevent mold or mildew, especially if using natural fibers like wool.
If you notice wear over time—like stretched stitches or loose seams—you can always add a few reinforcement stitches. Crochet is forgiving, and repairs are usually quick and easy.
Easy Crochet Granny Square Slippers Tutorial projects are rewarding not just in how they look but in how they feel—warm, soft, and handmade with care. When made with love and attention, they can last for years.
FAQ – Easy Crochet Granny Square Slippers Tutorial
Q: How many granny squares do I need to make one pair of slippers?
A: Generally, you’ll need around 12 squares (6 per slipper), but this can vary depending on the size of the squares and the desired slipper size.
Q: What’s the best yarn for making crochet slippers?
A: Worsted weight acrylic or cotton yarns are ideal. Acrylic is affordable and easy to wash, while cotton is breathable and soft.
Q: Can I make these slippers in different sizes?
A: Yes! Simply adjust the size of each granny square or add more rounds. You can also add borders or extra rows to make them larger.
Q: Are these slippers good for beginners?
A: Absolutely. This Easy Crochet Granny Square Slippers Tutorial is beginner-friendly, especially if you already know how to make a basic granny square.
Q: How do I keep the slippers from slipping on hard floors?
A: Apply a few dots of hot glue or puff paint to the soles. Once dry, they’ll act as a non-slip grip.
Q: Can I use different joining methods?
A: Yes. You can join your squares with a whipstitch, slip stitch, or even a join-as-you-go method depending on your preference and comfort level.
This Easy Crochet Granny Square Slippers Tutorial has taken you through every step—from creating the classic granny square to assembling and customizing a pair of cozy, stylish slippers. It’s a practical and heartwarming project that suits crocheters of all levels.
With a few simple stitches and creative decisions, you can transform leftover yarn into something truly useful and beautiful. These slippers are not just accessories—they’re expressions of care, color, and creativity.
We hope you enjoyed following this tutorial. If you try it out, please share your experience! Leave your honest feedback, suggestions, or tips you discovered while making your own slippers. Your thoughts help improve this space for everyone in our crochet-loving community.