
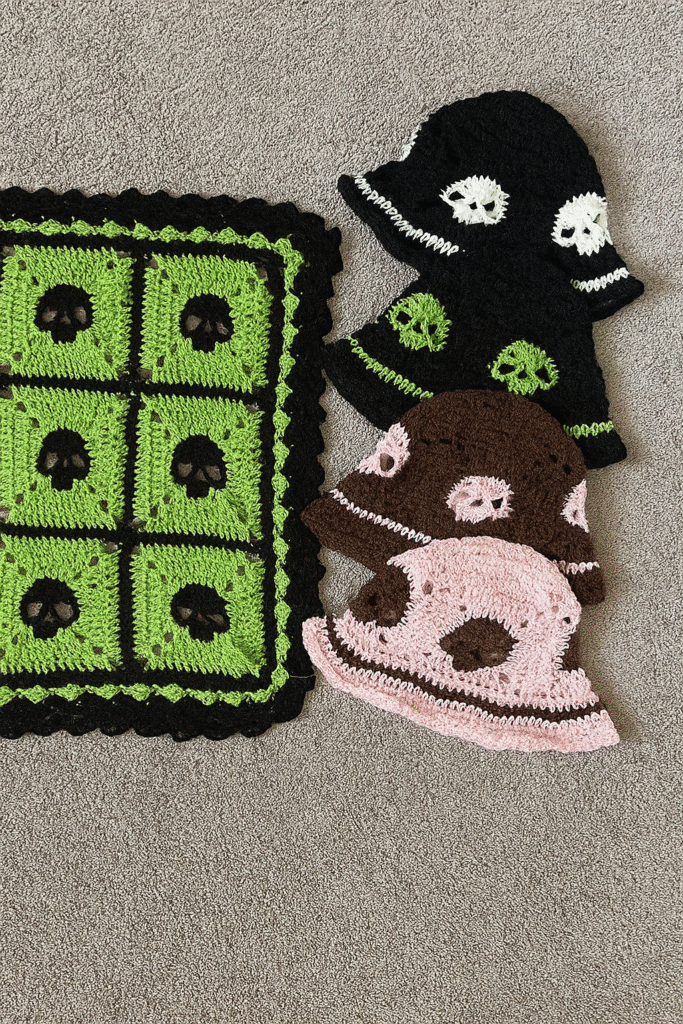
If you’ve been searching for a creative and stylish way to express your unique personality through handmade fashion, this DIY Crochet Skull Granny Square Bucket Hat Tutorial is the perfect project for you. This design combines the timeless charm of crochet granny squares with a trendy skull motif, creating a bold and eye-catching accessory that stands out from the crowd. Whether you’re a seasoned crocheter or a beginner eager to learn, this tutorial will guide you step-by-step through the process of crafting your very own skull-patterned bucket hat.
The beauty of this crochet skull granny square bucket hat lies in its versatility. You can customize the colors, adjust the size, and even experiment with different yarn textures to create a hat that truly represents your personal style. Handmade fashion has made a major comeback in recent years, with crochet accessories leading the trend due to their nostalgic yet modern appeal. Making your own crochet hat not only saves money but also gives you a sense of accomplishment and creativity.
In this DIY Crochet Skull Granny Square Bucket Hat Tutorial, you’ll learn the techniques needed to create individual skull granny squares and assemble them into a stylish bucket hat. From choosing the right materials to mastering the perfect stitch tension, this guide covers everything you need to know. So grab your yarn, crochet hook, and a cozy seat — let’s dive into the art of creating a statement piece that’s both fun and fashionable!
How to Start Your DIY Crochet Skull Granny Square Bucket Hat
The first step in any successful crochet bucket hat project is choosing the right yarn and hook. For this pattern, it’s best to use medium-weight cotton yarn. Cotton gives your hat structure and breathability, making it perfect for both warm and cool weather. Opt for colors that contrast well to highlight the skull design — for example, black and white or dark gray and cream combinations work beautifully.
Next, ensure you have the appropriate hook size. A 4mm or 4.5mm crochet hook typically pairs well with medium-weight yarn. The hook size can affect the tightness of your stitches — a smaller hook will create a tighter weave, while a larger one will give a looser, more flexible finish. Experiment with a few test stitches to see what works best for your desired look and fit.
Before diving into the skull pattern, practice making a few basic granny squares. These traditional crochet motifs consist of clusters of double crochet stitches arranged in a square formation. Getting comfortable with this stitch pattern will make it easier to incorporate the skull design later.
When you’re ready to add the skull motif, use a contrasting yarn color to crochet the facial details. The key is to follow a pixel-style pattern where each stitch represents a part of the skull image. There are many simple skull charts you can follow, or you can draw your own grid pattern for a unique look.
Once your first skull granny square is complete, make sure to block it. Blocking helps even out the stitches and ensures all your squares are uniform in shape and size. This step is crucial for assembling the bucket hat smoothly later on.
Finally, decide how many squares you’ll need for your hat. Generally, you’ll need about eight to ten skull granny squares for the crown and sides, and a few more plain squares for the brim. Adjust this number depending on your head size and how snug you want your hat to be.
Assembling the Skull Granny Squares into a Bucket Hat
Now that your squares are ready, it’s time to piece them together to form your DIY Crochet Skull Granny Square Bucket Hat. Start by laying out your skull and plain squares in a circular pattern to visualize how they’ll come together. Position the skull squares evenly around the hat to maintain symmetry and balance in the design.
Join the squares using the whip stitch or slip stitch method. Whip stitching creates a flat, nearly invisible seam, while slip stitching adds a subtle ridge for texture. Be consistent with your joining technique throughout to maintain a cohesive appearance. Use the same yarn color as your background squares to keep the joins discreet.
Once the crown of the hat is complete, you’ll need to crochet a connecting round along the bottom edge to prepare for the brim. This round unifies all the squares and gives the hat a smooth transition from the body to the brim.
For the brim, crochet several rounds of double crochet stitches, gradually increasing every few stitches to create a gentle outward flare. The brim should be wide enough to shade your eyes but not so floppy that it loses shape. Around six to eight rounds usually achieve a perfect balance.
If you want a firmer brim, consider adding a round of single crochet stitches at the end or even weaving in thin craft wire for structure. However, keep comfort in mind — your bucket hat should remain flexible and wearable.
Finally, weave in all the loose yarn ends using a tapestry needle. Trim any excess yarn carefully to prevent fraying. When finished, gently steam-block the hat to shape it perfectly. This will make your crochet skull granny square bucket hat look neat, professional, and ready to wear.
Customizing Your DIY Crochet Skull Granny Square Bucket Hat
One of the best aspects of this DIY Crochet Skull Granny Square Bucket Hat Tutorial is the creative freedom it offers. You can personalize your hat in endless ways, turning it into a one-of-a-kind accessory that reflects your individuality.
Try experimenting with different color palettes. Classic black and white create a gothic aesthetic, while bright neons or pastel tones can give your skull motif a playful and modern twist. You can even alternate background colors on each square for a patchwork-style effect.
If you want to take your design a step further, incorporate embellishments. Add small beads to the skull eyes, or use metallic yarn for a touch of shimmer. You could also attach tiny chains or fabric patches for a punk-inspired vibe.
Another customization idea is altering the hat’s size and shape. By adjusting the number of granny squares, you can make the hat larger or smaller. For a deeper bucket style, add an extra row of squares before attaching the brim. For a shallower, trendier fit, reduce one row.
Consider making matching accessories such as a skull-patterned tote bag or fingerless gloves to complement your bucket hat. This creates a cohesive, handmade look that’s both stylish and eco-friendly.
Finally, remember that crochet is an art form. Don’t be afraid to experiment. Every handmade hat tells a story — your creativity and effort make it truly special.
Care and Maintenance Tips for Your Crochet Skull Bucket Hat
Taking proper care of your crochet skull granny square bucket hat will ensure it lasts for years while maintaining its original charm. Handmade items deserve a little extra attention, especially those crafted from delicate yarn.
First, always hand wash your crochet hat using cold water and mild detergent. Avoid wringing or twisting the fabric, as this can distort the stitches. Instead, gently press out excess water using a clean towel.
When drying, lay the hat flat on a dry towel in its natural shape. Never hang it to dry, as this can stretch the yarn and ruin the structure. Avoid direct sunlight, which can fade the colors over time.
If your hat becomes wrinkled or misshapen, lightly steam it back into form. Hold a steam iron a few inches away — never directly on the yarn — and gently reshape the hat with your hands while it’s warm.
Store your hat in a cool, dry place when not in use. You can keep it in a breathable fabric bag to protect it from dust. Avoid plastic containers, as trapped moisture can damage the yarn.
Lastly, if you notice any loose stitches or fraying, repair them immediately. A simple reinforcement stitch can prevent larger unraveling later. With these care tips, your DIY crochet skull bucket hat will remain a standout accessory for many seasons.
DIY Crochet Skull Granny Square Bucket Hat Tutorial
1. Can beginners make this hat?
Yes! This DIY Crochet Skull Granny Square Bucket Hat Tutorial is beginner-friendly. As long as you know basic stitches like chain, double crochet, and slip stitch, you’ll be able to follow along easily.
2. How long does it take to finish the hat?
Depending on your skill level and the amount of time you dedicate each day, you can complete the hat in about 2 to 4 days. Experienced crocheters might finish it faster.
3. What type of yarn works best?
Cotton yarn is ideal because it provides structure and breathability. However, you can also use acrylic yarn for a softer texture or blended fibers for added durability.
4. Can I resize the hat?
Absolutely. Adjusting the number of granny squares or rounds in the brim allows you to make the hat larger or smaller to suit your head size.
5. How do I keep the brim from flopping?
Use tighter stitches on the last few rounds of the brim or add a row of single crochet for stability. If you prefer a stiff brim, you can insert flexible craft wire or use starch spray.
6. Can I sell hats made from this tutorial?
Yes, as long as you made them yourself. Handmade crochet items are popular at craft fairs and online marketplaces, so selling your creations is a great idea.
By following this DIY Crochet Skull Granny Square Bucket Hat Tutorial, you’ve learned how to create a stylish, handmade accessory that blends creativity, craftsmanship, and fashion. From choosing your yarn to customizing your skull motifs, every step allows you to express your individuality through crochet art.
Crocheting your own skull bucket hat is not just about making something beautiful — it’s about enjoying the process, honing your skills, and crafting something that reflects your unique personality. Whether you’re wearing it at a festival, the beach, or just out with friends, this hat is sure to turn heads and spark conversations.
What did you think of this tutorial? Share your honest opinion and suggestions below — your feedback helps inspire new creative crochet projects for everyone to enjoy!