
If you’re looking to add a cozy and charming touch to your home décor, a Crochet Star Rug is the perfect project for you. This step-by-step guide will walk you through the process of creating a beautiful star-shaped rug that combines functionality with artistry. Whether you are an experienced crocheter or a beginner eager to try something new, this guide will make the creation process simple and enjoyable.
The Crochet Star Rug: Step-by-Step Guide not only provides detailed instructions but also highlights important techniques and tips to ensure your project turns out perfectly. This rug is ideal for any room, adding a playful yet elegant detail that stands out. Plus, crocheting your own rug allows you to customize colors, yarn type, and size to match your style and needs.
Creating a Crochet Star Rug is a rewarding experience, bringing a handmade warmth into your home. This project is great for those who love crafting and want to try making something unique and useful. Follow this guide closely, and you’ll be proud to show off your handiwork.
Understanding the Crochet Star Rug Design
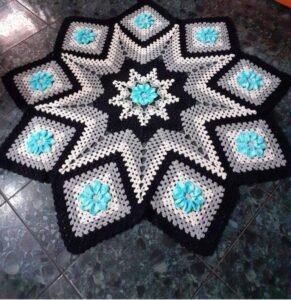
The first step in making your Crochet Star Rug is understanding its design. The star shape offers a dynamic and eye-catching pattern that works well with various yarn textures and colors. This unique shape is formed by a series of geometric crochet stitches arranged carefully to achieve the star appearance.
This rug design incorporates common crochet techniques such as chains, double crochets, and slip stitches. While the pattern looks intricate, the guide breaks down each section into manageable parts. Understanding the star’s structure will help you crochet with more confidence and accuracy.
Choosing the right yarn and hook size is crucial for this project. A thicker yarn creates a sturdier and softer rug, while thinner yarn might make the star look more delicate but less durable. We will cover materials later in detail, but keep in mind that the star’s points and the rug’s overall symmetry are essential for the rug’s final look.
The Crochet Star Rug: Step-by-Step Guide emphasizes precision in counting stitches and rounds. A well-executed star pattern ensures that your rug lays flat and keeps its shape. It’s normal to take your time on the early rounds to get a perfect base for the star.
One of the most satisfying parts of this design is watching the star emerge as you progress. Each point of the star appears in turn, and with consistent tension and stitch work, your rug will take on a stunning three-dimensional form.
This step highlights the importance of following instructions carefully, and encourages you to enjoy the creative process. The star rug isn’t just a project; it’s a beautiful piece of art that you make with your own hands.
Materials and Tools Needed for Your Crochet Star Rug
To begin your Crochet Star Rug: Step-by-Step Guide, gathering the right materials and tools is essential. This ensures that the project runs smoothly and the final product is durable and comfortable.
First, select the appropriate yarn. For a rug, a bulky or super bulky yarn works best. Acrylic or cotton yarns are popular choices since they are both washable and strong. You want a yarn that can withstand foot traffic and frequent cleaning.
Next, choose a crochet hook size that corresponds to your yarn weight. Typically, a 6.0mm to 8.0mm hook works well for bulky yarns. Using the recommended hook size helps maintain consistent tension and prevents the rug from becoming too stiff or too loose.
You will also need scissors to cut your yarn and a yarn needle for weaving in ends. These tools are necessary for finishing the rug neatly and professionally.
Consider using a stitch marker to mark your rounds and important points in the pattern. This will help you keep track of your progress and avoid mistakes, especially when working on the star’s intricate points.
Having a comfortable workspace with good lighting is important for long crochet sessions. Prepare a flat surface where you can lay out your rug as you work to check the shape and size frequently.
Finally, keep a measuring tape handy to monitor the size of your rug as it grows. This helps ensure your Crochet Star Rug fits perfectly in your desired space.
Step-by-Step Instructions for Crocheting the Star Rug
Starting your Crochet Star Rug: Step-by-Step Guide involves following a clear sequence of crochet stitches that shape the star’s points and body. Begin with a magic ring, which allows you to create a tight center for your star without a hole.
Once you have your magic ring, crochet the initial round with double crochets. This establishes the base circle. Then, you will start increasing stitches strategically to form the star’s points. These increases are what give the rug its distinctive shape.
Pay attention to the pattern’s instructions for alternating between stitch types, such as double crochets and chains. These variations create the textured look of the star points and help the rug lay flat.
As you complete each point of the star, make sure to count your stitches accurately. Miscounting can distort the star’s symmetry and affect the overall shape of the rug.
After finishing all points, continue crocheting rounds to increase the rug’s size or add borders. You can customize this part by adding colors or different stitches for extra flair.
Finishing the rug requires weaving in all yarn ends carefully with a yarn needle to prevent unraveling. Blocking the rug afterward can help smooth out any uneven edges and give your star a professional finish.
Tips and Tricks for a Perfect Crochet Star Rug
Creating the perfect Crochet Star Rug takes patience and attention to detail. Here are some tips from experienced crocheters to help your project succeed.
First, always maintain consistent tension throughout your work. Inconsistent tension can make your star uneven and affect how it lies on the floor.
If you’re new to crochet, practice the basic stitches before starting the rug. Knowing how to do double crochet, slip stitch, and chain stitch confidently makes the process easier.
Use stitch markers to mark the beginning of rounds and the tips of star points. This will help you avoid losing track, especially in a complex pattern.
Don’t hesitate to pause and count your stitches regularly. It’s much easier to fix mistakes early than after several rounds.
Experiment with colors if you want your rug to be vibrant and lively. Using contrasting or gradient yarns can create interesting effects on the star shape.
Lastly, keep your rug clean as you work by washing your hands or crocheting in a clean environment. This ensures your rug stays fresh and ready to use once completed.
FAQ: Frequently Asked Questions About Crochet Star Rug
Q: What type of yarn is best for a Crochet Star Rug?
A: Bulky or super bulky yarn in cotton or acrylic is ideal because it provides durability and softness, suitable for floor use.
Q: Can beginners follow this Crochet Star Rug: Step-by-Step Guide?
A: Yes, the guide breaks down each step in detail. Beginners with basic crochet knowledge can follow along with patience.
Q: How do I keep my Crochet Star Rug flat?
A: Consistent stitch tension and accurate stitch counts are key. Blocking your finished rug also helps maintain a flat shape.
Q: What hook size should I use?
A: Typically, a 6.0mm to 8.0mm hook works well with bulky yarns for this project.
Q: Can I customize the size of the star rug?
A: Absolutely! You can add more rounds to increase the size or use thicker yarn and larger hooks.
Q: How do I wash the finished rug?
A: Follow the yarn manufacturer’s care instructions, but generally, hand washing in cold water and air drying is safest.
In this Crochet Star Rug: Step-by-Step Guide, you have learned how to create a beautiful and functional star-shaped rug. From understanding the star’s design, gathering the right materials, following detailed crochet instructions, to using helpful tips, this guide covers everything you need to make your own stunning rug.
Crocheting your own star rug is a rewarding experience that adds a handmade touch to your home while showcasing your skills. Remember, patience and attention to detail are essential for a flawless finish.
If you have any questions, suggestions, or want to share your experience making the Crochet Star Rug, please leave your honest feedback. Your input helps improve future guides and inspires others to start their crochet journey. Happy crocheting!