
If you’ve been looking for a fun, beginner-friendly project to combine your love for crochet and cute accessories, this Crochet Kitty Cat Zipper Pouch Tutorial & Pattern is exactly what you need. This adorable design blends functionality with creativity, making it a perfect handmade gift, a market best-seller, or a charming addition to your own collection.
The Crochet Kitty Cat Zipper Pouch Tutorial & Pattern is ideal for crafters who enjoy quick projects that deliver big results. Whether you’re storing coins, small cosmetics, or crochet hooks, this pouch is both practical and irresistibly cute. Its kitty face and ears add a whimsical touch, while the zipper ensures your belongings are safe and secure.
In this detailed tutorial, we’ll guide you step by step through creating your own pouch, covering everything from materials and stitches to customization ideas. The Crochet Kitty Cat Zipper Pouch Tutorial & Pattern is not just easy to follow—it’s also a joyful experience for any crocheter, regardless of skill level.
Materials and Tools You’ll Need
Before we dive into stitching, it’s important to gather all the supplies. The right materials will ensure your Crochet Kitty Cat Zipper Pouch Tutorial & Pattern turns out just as cute and durable as you imagine.
You’ll need a medium-weight cotton yarn in your chosen kitty color. Cotton yarn is preferred because it gives structure and durability to the pouch, which is important for daily use.
For the hook, a 3.5 mm to 4 mm crochet hook works best for this type of yarn. Make sure your tension is tight enough to avoid large holes, especially since this pouch will hold small items.
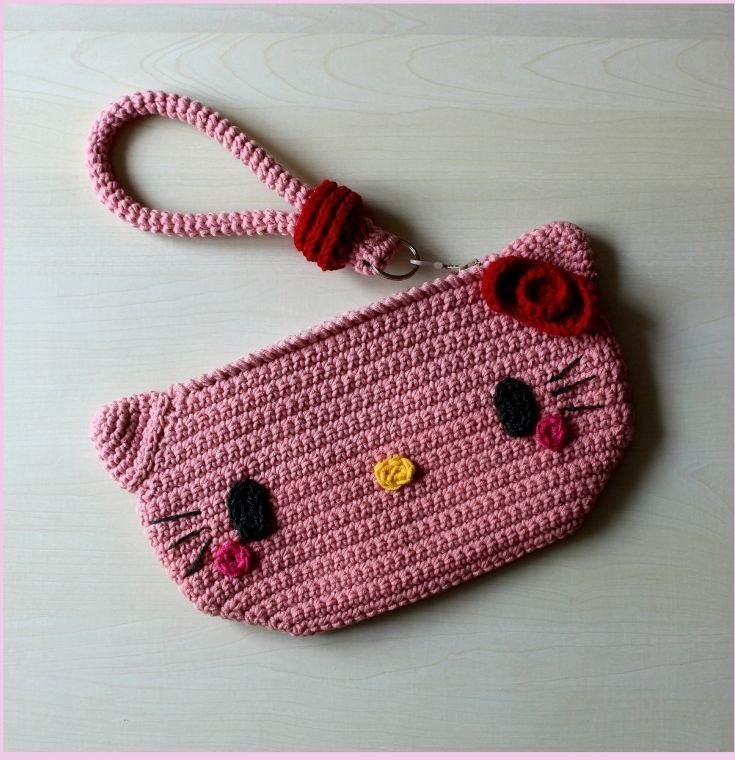
Other essentials include a 6-inch zipper, yarn needle, stitch markers, and felt for the kitty’s facial features. You can also add safety eyes or embroider the eyes using black yarn or thread.
To make your Crochet Kitty Cat Zipper Pouch Tutorial & Pattern unique, think about your color scheme. You can go with a traditional black or gray cat or get playful with pinks, blues, or pastels.
Finally, don’t forget scissors and fabric glue (optional) for attaching details securely. With everything in place, you’re ready to begin crafting your own feline-inspired pouch.
Step-by-Step Instructions for Crocheting the Base
The foundation of the Crochet Kitty Cat Zipper Pouch Tutorial & Pattern begins with creating a flat oval shape, which forms the front and back of the pouch. This is done using basic stitches, making it suitable for beginners.
Start by making a chain of 21 stitches. This chain will determine the width of your pouch. In the second chain from the hook, begin single crocheting across, then continue around the opposite side of the chain to create an oval.
Work in continuous rounds, increasing at both ends to keep the oval shape even. After about 6 to 8 rounds, depending on your desired pouch size, stop increasing and continue crocheting evenly to build up the sides.
You should have two identical oval panels by now. These will form the front and back of the Crochet Kitty Cat Zipper Pouch Tutorial & Pattern. Make sure they’re symmetrical and lay flat.
Now, crochet a simple strip for the pouch’s edge, which will hold the zipper. This part can be about 1 inch wide and long enough to go around the pouch. Seam it carefully to both panels using a whip stitch.
Finish the base by attaching the zipper to the edge strip using either a sewing needle or hot glue. The Crochet Kitty Cat Zipper Pouch Tutorial & Pattern starts coming to life at this stage—now it’s time to add the feline charm!
Creating the Kitty Features
Now that the structure is complete, it’s time to add the cat’s personality to your Crochet Kitty Cat Zipper Pouch Tutorial & Pattern. This part allows you to express creativity and make your pouch stand out.
Start with the ears. Crochet two small triangles using the same yarn and hook. Attach them to the top of the front panel, making sure they are symmetrical. You can sew or crochet them directly into the edge.
For the eyes, you can use safety eyes, buttons, or crochet small circles. If using felt, cut out two circles and glue or sew them in place. Embroider a little sparkle detail to make the eyes come alive.
The nose and whiskers are usually embroidered with black or pink yarn. Use a backstitch or satin stitch to shape the nose into a small triangle in the center. Add whiskers to each side with straight stitches.
You can also crochet small cheeks using pink yarn and attach them below the eyes. This gives your Crochet Kitty Cat Zipper Pouch Tutorial & Pattern a kawaii-inspired look that’s super trendy.
For an extra playful touch, add a small bow, a flower, or even a little bell to your cat. Customize it to match the recipient’s style or to coordinate with your own accessories.
By now, your pouch should have its distinct kitty character. This is what makes the Crochet Kitty Cat Zipper Pouch Tutorial & Pattern so fun—it’s not just a project, it’s a personality!
Tips for Customization and Personalization
One of the best parts of following a Crochet Kitty Cat Zipper Pouch Tutorial & Pattern is how easily you can personalize it to fit your taste or brand. Here are some ideas to make your creation truly one-of-a-kind.
Start by choosing unexpected colors. A pastel rainbow kitty or even a bold neon design can stand out in craft markets or as a unique gift. Don’t be afraid to stray from typical cat colors.
Instead of felt or buttons, try using embroidery for all facial features. This makes the pouch machine washable and baby-safe, which adds versatility to your Crochet Kitty Cat Zipper Pouch Tutorial & Pattern.
Add a keychain loop to one side so the pouch can double as a coin purse or attach to a backpack. This makes it more functional and attractive for everyday use.
Consider lining the inside with fabric for extra durability. Use a needle and thread to attach the lining securely. This can elevate your handmade pouch and add a professional touch.
If you’re making several pouches, give each one a different expression or emotion—happy, sleepy, winking, or surprised. It’s a fun way to offer variety while using the same basic pattern.
The beauty of the Crochet Kitty Cat Zipper Pouch Tutorial & Pattern is how adaptable it is. You can follow the base instructions but make something that’s uniquely yours each time.
Selling and Gifting Your Kitty Cat Pouch
Once your Crochet Kitty Cat Zipper Pouch Tutorial & Pattern project is complete, it’s time to think about what to do with it. Whether you’re looking to sell or gift it, this item is sure to charm everyone.
For selling, present the pouch professionally by adding a tag with washing instructions and your brand name. Take clear, well-lit photos and highlight the pouch’s handmade details.
People love gifting unique items. A kitty cat pouch makes a thoughtful birthday or holiday present for cat lovers, children, or anyone who enjoys handmade crafts.
If you’re making this for a child, remember to securely attach all embellishments. Replace small buttons with embroidery to avoid choking hazards. Safety should always come first.
Market your Crochet Kitty Cat Zipper Pouch Tutorial & Pattern using emotional appeal—share how it’s made with love and care, not mass-produced. This resonates with handmade enthusiasts.
You could also bundle it with matching accessories, like a crochet keychain or headband, to create a themed gift set. Themed bundles are often more attractive to buyers and gift-givers.
Don’t forget to share your finished work on social media or with crochet groups. It’s a great way to gain feedback, meet fellow crafters, and inspire others with your creative version of the Crochet Kitty Cat Zipper Pouch Tutorial & Pattern.
Crochet Kitty Cat Zipper Pouch Tutorial & Pattern
Q: Is this project suitable for beginners?
A: Yes! The Crochet Kitty Cat Zipper Pouch Tutorial & Pattern uses basic stitches and techniques, making it accessible for beginners. Clear steps and simple materials keep things easy to follow.
Q: What type of yarn is best for this pouch?
A: Medium-weight cotton yarn is recommended for durability and structure. It holds the shape well and is easy to work with, especially for accessories that need to be sturdy.
Q: Can I make this pouch without a sewing machine?
A: Absolutely. All elements can be sewn by hand using a needle and thread. Some crafters also use fabric glue to attach the zipper and felt pieces securely.
Q: How long does it take to complete the pouch?
A: On average, it takes 2 to 4 hours, depending on your crochet speed and experience. Embellishments and hand-sewing may add some extra time.
Q: Can I sell the finished items made from this pattern?
A: Yes, you can sell finished products, especially if you’ve added your own creative touches. Always credit the inspiration if you’re following a publicly available pattern.
Q: Is it safe for kids?
A: It can be! Make sure all parts are securely attached, and avoid small buttons or beads for young children. Embroidery is the safest option for facial features.
In this article, we explored how to create a charming and practical Crochet Kitty Cat Zipper Pouch Tutorial & Pattern. From choosing materials to adding finishing touches, you now have all the steps needed to craft your own kitty pouch. Whether you keep it for yourself, gift it to a loved one, or sell it at your next craft fair, this project is bound to be a favorite.
If you enjoyed this guide, please consider leaving a sincere opinion or suggestions. Your feedback helps improve future tutorials and inspires more creative projects. Happy crocheting!