
Creating your own crochet doll keychain using an opening ring is a fun, creative, and satisfying project for crochet lovers of all skill levels. Whether you are a beginner looking to make your first handmade accessory or an experienced crocheter seeking a small and charming project, this tutorial will guide you through every detail. These tiny dolls not only make adorable decorations for your bags or keys but also serve as thoughtful handmade gifts for friends and loved ones.
In this complete crochet doll keychain tutorial using an opening ring, you will learn how to design, assemble, and attach your mini doll securely using an opening key ring. By mastering this technique, you can create personalized crochet dolls in any color combination or style, giving them unique personalities. The process is simple once you understand the basic crochet stitches and how to join your work to the metal ring.
Beyond being cute accessories, these crochet keychains are part of a larger trend in handmade crafts. The rise of amigurumi and DIY fashion accessories has inspired millions of crafters to express themselves through yarn art. By following this crochet doll keychain tutorial using an opening ring, you can create sustainable, meaningful art pieces while practicing mindfulness through crafting.
Materials and Tools Needed for the Crochet Doll Keychain
To begin this crochet doll keychain tutorial using an opening ring, it is essential to have the right materials and tools. The good news is that you do not need expensive supplies—just a few basic crochet essentials that you may already have at home.
First, you will need cotton yarn in your chosen colors. Cotton is ideal because it provides structure and durability, which helps the doll maintain its shape over time. Choose soft pastel colors or vibrant hues depending on your style. For the best results, use fine or medium-weight yarn that suits a 2.5 mm to 3 mm crochet hook.
Second, prepare your crochet hook, ideally in size 2.5 mm or 3 mm, depending on your yarn thickness. The hook size will determine how tight or loose your stitches appear, so make sure your tension is consistent throughout the project. A smaller hook ensures a more compact and detailed look for miniature dolls.
You will also need polyester stuffing to fill your doll’s head and body. This material helps give volume and stability without making the keychain too heavy. You can use leftover stuffing from previous projects or purchase a small bag at any craft store.
The most important component is the opening key ring. Choose a sturdy metal ring that opens easily but locks securely when closed. This allows you to attach your crochet doll to keys, zippers, or bags safely. Many crafters prefer using lobster clasps or split rings depending on their preference.
Lastly, make sure to have a yarn needle, scissors, and stitch markers ready. The needle helps with sewing parts together, while stitch markers assist in keeping track of your rounds, especially when working in amigurumi style. Once everything is gathered, you are ready to begin your crafting journey.
Step-by-Step Guide: Making the Crochet Doll
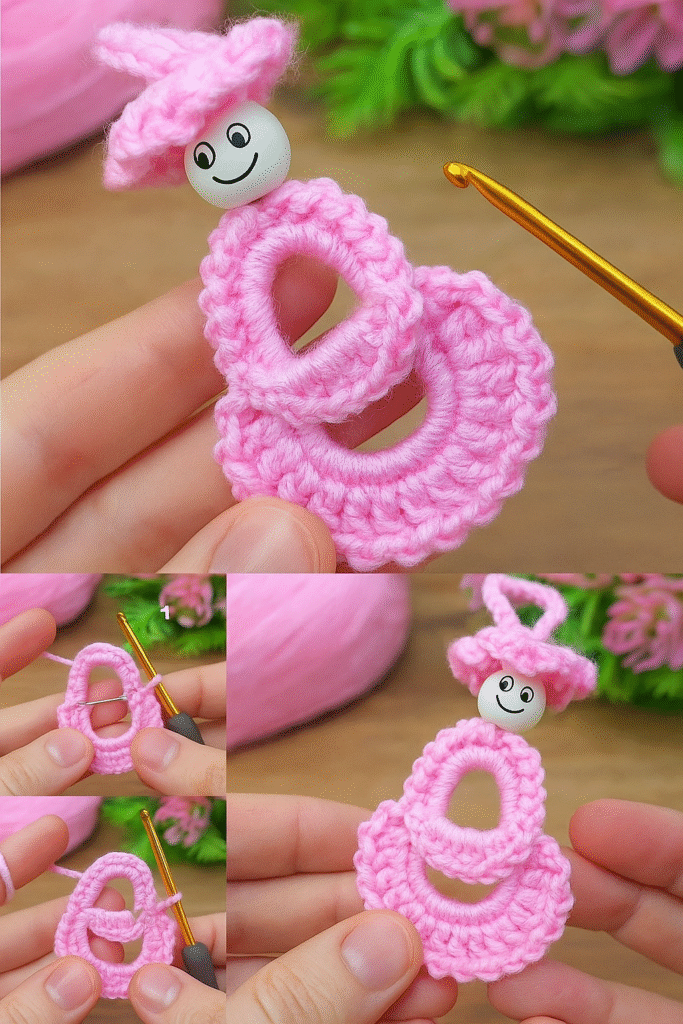
Now that you have all your materials, it’s time to dive into the step-by-step crochet doll keychain tutorial using an opening ring. Start with the head, as it forms the central part of the doll. Using your main color yarn, make a magic ring and crochet six single crochets into it. Continue increasing each round until you have about 24 stitches. This will form a small, round head.
After reaching the desired size, maintain a few rounds without increases to create depth. Then, begin decreasing gradually to close the shape, leaving a small opening for stuffing. Insert your polyester filling before closing completely. This gives the head a soft but firm appearance.
For the body, repeat a similar process, but make it slightly smaller than the head. You can shape the body like a cone or cylinder depending on your desired doll style. Once the body is stuffed and sewn to the head, your mini figure begins to take form.
Next, crochet the arms and legs using the same yarn color or choose contrasting tones for a playful design. Make them thin and short since this is a keychain-sized doll. Attach each limb carefully using your yarn needle. Make sure they are symmetrical and securely sewn to avoid detachment over time.
Add hair and facial features using embroidery thread or small yarn pieces. For eyes, you can use safety eyes or embroider simple stitches. A small smile adds charm to your doll’s face, bringing it to life. Hair can be long, short, or styled into buns—experiment with your creativity.
Once the doll’s structure is complete, you can add small details such as a dress, hat, or scarf. These accessories can be crocheted separately and sewn onto the doll. The secret to a beautiful crochet doll keychain lies in these small finishing touches.
Attaching the Opening Ring to the Crochet Doll
After finishing the doll, it’s time to learn how to attach the opening ring properly. This step ensures your keychain is not only decorative but also durable and functional.
Start by inserting a small metal jump ring into the top of your doll’s head using a yarn needle or pliers. Be gentle to avoid damaging the stitches. Once the jump ring is in place, attach it to the opening key ring. Make sure it is closed tightly to prevent slipping.
If you prefer extra stability, you can crochet a small loop at the top of the doll’s head before attaching the metal ring. This method provides additional reinforcement, especially for larger keychains. The loop can be made with chain stitches and sewn securely into the head.
Another popular option is using lobster clasps, which make the keychain removable. These are practical for people who like to switch accessories between different bags or keys. Choose the attachment method that best fits your lifestyle and design.
After connecting the opening ring, gently test the strength of the connection by pulling lightly. The doll should stay firmly attached without stretching or coming loose. Reinforce any weak areas by adding a few extra stitches if necessary.
Finally, trim any excess yarn, hide the ends using a needle, and smooth the doll’s surface. At this point, your crochet doll keychain using an opening ring is ready to use or gift to someone special.
Creative Ideas and Customization Tips
One of the joys of following a crochet doll keychain tutorial using an opening ring is the freedom to customize every detail. You can create countless variations to match different personalities, seasons, or holidays.
For example, you can make a Christmas version by adding a tiny red hat and scarf, or a spring version with flower decorations. These seasonal themes make your keychains more appealing and suitable for selling at craft fairs or online stores.
If you enjoy personalizing gifts, consider crocheting mini dolls inspired by loved ones. Change hair color, clothing style, or accessories to reflect their personality. This makes your crochet dolls even more meaningful and unique.
Another idea is to experiment with different yarn textures. Using velvet, metallic, or gradient yarns can add visual interest to your work. However, always ensure the yarn is not too heavy for a keychain to avoid damaging the opening ring.
Adding embroidered initials or small beads is also a beautiful way to make your doll stand out. Just be sure to attach them securely, especially if the keychain will be handled frequently.
Lastly, remember that crafting is about joy and creativity. Each doll you make tells a small story, reflecting your imagination and care. Continue practicing and exploring new techniques to improve your craftsmanship.
About Crochet Doll Keychain Using an Opening Ring
1. Can beginners make a crochet doll keychain using an opening ring?
Yes! This project is perfect for beginners. The stitches are simple, and the small size allows you to practice essential techniques like increasing, decreasing, and sewing parts together.
2. What type of yarn is best for this project?
Cotton yarn is highly recommended because it provides structure, softness, and durability. It also holds shape better than acrylic yarn for small crochet pieces.
3. How do I attach the doll securely to the opening ring?
You can sew a loop at the top of the doll’s head and attach the opening ring through it, or use a metal jump ring for a stronger connection. Ensure all parts are tightly fastened.
4. Can I wash my crochet doll keychain?
Hand washing with mild soap and cold water is best. Avoid soaking metal parts for too long, and let the keychain air dry completely.
5. How long does it take to make one crochet doll keychain?
It depends on your experience, but most crafters complete one within two to three hours. With practice, you can finish even faster.
6. Can I sell crochet doll keychains made from this tutorial?
Absolutely! As long as your designs are original and handmade, you can sell them at craft fairs or online. Handmade crochet items are always in demand for their charm and uniqueness.
By following this crochet doll keychain tutorial using an opening ring, you’ve learned how to craft a delightful mini accessory that’s both practical and artistic. From selecting materials and crocheting each piece to attaching the ring and customizing the design, every step brings creativity and joy to the process.
Whether you plan to make one for yourself or as a heartfelt gift, these crochet keychains are a wonderful expression of handmade art. Now it’s your turn—try it out, experiment with colors and styles, and see how many different dolls you can create!
I’d love to know your thoughts! Share your honest opinion and suggestions about this tutorial. Your feedback helps inspire more creative crochet guides in the future.