
Starting your crafting journey with a 3D Flower Hat: Free Crochet Tutorial is a delightful way to blend creativity, texture, and handmade charm into one meaningful project. This type of hat stands out because of its dimensional floral motif, making it an eye-catching piece for all ages. Whether you want a stylish accessory for yourself or a thoughtful handmade gift, crocheting a 3D flower hat is both relaxing and rewarding.
One of the biggest reasons crafters love working with a 3D Flower Hat: Free Crochet Tutorial is the ability to personalize the final result. You can play with bright colors, soft tones, or a mix of creative combinations to produce expressive designs. By using lightweight or medium-weight yarns, you can create a hat that suits cool mornings, festive events, or simply your everyday wardrobe. No matter your skill level, this project encourages playful experimentation and confident learning.
Following a detailed 3D Flower Hat: Free Crochet Tutorial helps you develop essential crochet techniques while building a beautiful textured accessory. By focusing on stitches that form petals, clusters, and layered designs, you gain experience that will be useful for countless future projects. This comprehensive guide will walk you through each step, ensuring you feel supported and inspired from start to finish.
Understanding the Basics Before You Start
Learning the foundation of a 3D Flower Hat: Free Crochet Tutorial makes the process smoother and much more enjoyable. Before picking up your hook, it is essential to understand what type of yarn and hook size will create the best texture for your project. Many crafters prefer a worsted-weight yarn for structure, but lighter yarns can create a softer, more delicate appearance.
You will also want to familiarize yourself with common stitches such as slip stitch, chain stitch, single crochet, and double crochet. These fundamental techniques are often used in tutorials that focus on floral designs. While the petals may look complex, they are built through repetition and layering, making them easier than they appear at first glance.
Understanding gauge is another key factor when following a 3D Flower Hat: Free Crochet Tutorial. A consistent gauge ensures the hat fits properly and maintains its intended shape. Taking a few minutes to create a small swatch before starting can help you avoid surprises later on. Once you grasp these basics, you’re ready to dive into the creative aspect of crafting your flower hat.
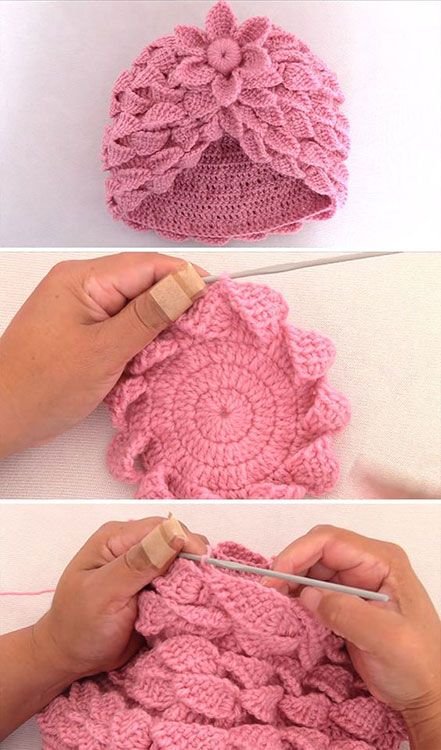
How to Crochet the Main Body of the Hat
To begin working on the main body of your 3D Flower Hat: Free Crochet Tutorial, start by making a comfortable magic ring or chain loop. This center will establish the shape of your hat, and building from the crown downward helps maintain balance and structure. Slowly increase your stitches as you work in rounds so the hat expands naturally.
After the initial increases, continue to crochet in smooth, even circles. Keeping your tension consistent is essential, as this affects both the hat’s comfort and visual appearance. Many crafters enjoy using a slightly looser tension for this type of hat because it helps the flower details stand out more vividly.
As the body of the hat grows, periodically measure its size to ensure a proper fit. Crochet tutorials often provide suggested measurements for different sizes, but your personal tension and yarn choice may vary. Adjust as needed by adding or reducing rounds to achieve your desired length.
Adding texture to the hat body enhances the overall effect of your 3D Flower Hat: Free Crochet Tutorial. You can incorporate front-post stitches, back-post stitches, or light ribbing to complement the floral layers. These small additions bring dimension without overshadowing the 3D flower.
Before completing the hat body, try it on or measure it against the intended wearer’s head size. This step prevents the hat from becoming too tight or too loose. Once you are satisfied with the shape, you can finish the brim with single crochet or slip stitch rounds.
When the body is complete, take a moment to examine your work. A clean, finished base prepares the perfect canvas for adding the stunning 3D flower that defines this project.
Creating the Dimensional Flower
The highlight of any 3D Flower Hat: Free Crochet Tutorial is the beautiful raised flower that gives the hat its signature personality. To begin crafting the flower, start with a small round base. This foundation will support the layers of petals and ensure they stay secure even with regular wear.
Many 3D flowers are built using simple chain combinations and double crochet clusters. These stitches naturally curl and lift, forming delicate petal shapes. Creating multiple layers enhances the depth of the flower, giving it a bold and impressive appearance.
When working on the petals, consistency is important. Aim to keep each petal about the same size to maintain harmony and symmetry. If one layer seems too large or small, you can easily adjust your stitch count to balance the overall design.
Attaching the flower to the hat requires both care and precision. Use a long yarn tail and carefully sew through the flower base and hat fabric, securing each layer without flattening the petals. This step ensures the flower remains firmly in place.
As you add each floral layer, observe how the textures interact. The goal is to make the flower look naturally full, with petals that gently lift away from the hat surface. This is where a 3D Flower Hat: Free Crochet Tutorial truly shines, blending technique with artistic freedom.
After all the petals are attached, fluff and adjust the flower to give it the perfect final shape. A well-formed 3D flower instantly transforms a simple hat into a charming and stylish accessory.
Final Touches and Customization Ideas
With the main construction complete, the finishing touches bring your 3D Flower Hat: Free Crochet Tutorial to life. Adding small details such as a decorative button, embroidery accents, or even tiny leaves can enhance the floral design beautifully. Just remember to keep add-ons light to preserve the hat’s wearable comfort.
Color combinations play a major role in customization. You may choose soft pastel petals for a delicate spring look or bright, bold shades for a cheerful and playful style. Mixing yarn textures like variegated or textured fibers can also create unique visual effects.
Another way to personalize your hat is by adjusting the brim. A rolled brim offers a classic look, while a ribbed brim provides a snug and warm fit. Experimenting with these options helps you craft a hat that reflects your personality and needs.
If you plan to gift your creation, consider matching the flower colors to the recipient’s favorite shades. Handmade items feel even more special when they reflect thoughtful choices. This makes a 3D Flower Hat: Free Crochet Tutorial an ideal project for heartfelt presents.
You can also create matching accessories such as scarves, gloves, or headbands to complement the hat. Coordinated pieces create a charming handmade set that adds versatility to your wardrobe.
When all the finishing touches are complete, take a step back and admire your work. You’ve created something original, textured, and undeniably beautiful with your own hands.
About 3D Flower Hats
How long does it take to complete a 3D flower hat?
Most crafters can complete a 3D flower hat within a few hours to a couple of days, depending on skill level and the complexity of the flower layers.
Do I need advanced crochet skills for this project?
No. A 3D Flower Hat: Free Crochet Tutorial is beginner-friendly as long as you know basic stitches like single crochet and double crochet.
What type of yarn works best?
Worsted-weight yarn is commonly used because it holds the flower structure well, but lightweight yarn can be used for softer and more delicate designs.
Can I wash a crocheted 3D flower hat?
Yes, but always follow yarn label instructions. Handwashing is recommended to preserve the flower’s shape.
How do I keep the flower from falling off?
Secure the flower by sewing it firmly through several layers of hat fabric. Using a strong yarn tail ensures lasting durability.
Can I make the flower removable?
Yes, you can attach a clip or button so the flower can be changed or repositioned for versatility.
PATTERN HERE
Creating a 3D Flower Hat: Free Crochet Tutorial project is a wonderful way to combine creativity, texture, and personalization in one beautiful item. This guide introduced the essential steps for crafting the hat body, forming the dimensional flower, and adding final custom details. Now that you understand the full process, you can confidently create your own unique version. I hope this article was helpful and inspiring. Please leave your sincere opinion and any suggestions you have—I would love to hear your thoughts and ideas!