
Creating a Tree Amigurumi Crochet Pattern is one of the most delightful ways to bring a piece of nature into your handmade crafts. Whether you’re a beginner learning to crochet or an experienced crafter looking for your next creative project, a crochet tree amigurumi is the perfect mix of relaxation and artistry. With its charming appearance and endless customization possibilities, this crochet pattern allows you to express creativity while adding a cozy touch to your home décor.
The popularity of tree amigurumi crochet patterns has grown rapidly, especially among crafters who enjoy making eco-inspired or seasonal designs. They are often used as gifts, desk decorations, or even as part of themed amigurumi collections. With a few basic stitches and some soft yarn, you can create miniature crochet trees that symbolize growth, harmony, and creativity.
In this guide, you’ll learn everything you need to know about making your own tree amigurumi crochet pattern — from essential materials to advanced tips for shaping and detailing. The step-by-step approach ensures that even if you’re new to crochet, you can confidently bring your project to life while enjoying the process.
Materials and Tools for Tree Amigurumi Crochet Pattern
To start your tree amigurumi crochet pattern, you’ll need just a few basic materials, most of which are easy to find at any craft store. Gathering the right supplies before you start ensures that your project runs smoothly and results in a neat, well-shaped amigurumi tree.
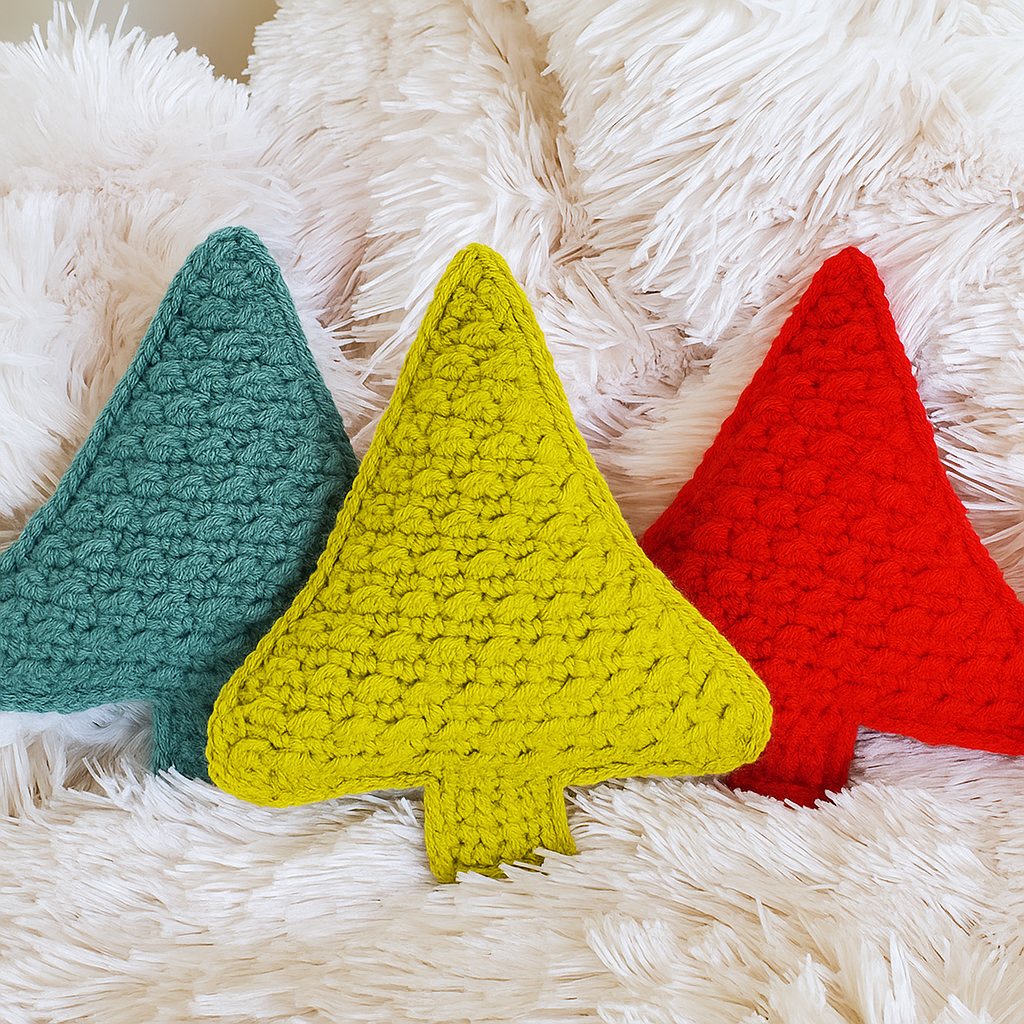
First, choose the yarn that best suits your vision. Cotton yarn is ideal for a smooth finish and sturdy shape, while acrylic yarn provides a softer texture and a more playful look. Using two shades of green for the leaves and brown for the trunk can create a realistic, natural appearance.
Next, you’ll need an appropriate crochet hook. The size of the hook depends on your yarn thickness. Typically, a 2.5mm to 3.5mm hook works perfectly for amigurumi projects, helping maintain tight stitches that prevent stuffing from showing through.
Don’t forget the stuffing material, usually polyester fiberfill. This gives your crochet tree its plush shape. A yarn needle is also essential for sewing the parts together neatly. Some crafters use safety eyes to give their trees personality, but you can also embroider eyes and a smile for a cuter, handmade look.
Other helpful tools include stitch markers to keep track of rounds, scissors for trimming yarn ends, and a pattern guide or notebook to jot down adjustments if you’re creating your own design. Once you have these materials ready, you’re set to begin crocheting your tree amigurumi with confidence.
Finally, remember that patience and practice make perfect. The beauty of working on a tree amigurumi crochet pattern is that every stitch adds to a growing creation — just like a real tree.
Step-by-Step Instructions to Crochet Your Amigurumi Tree
The process of creating a tree amigurumi crochet pattern begins with forming the base or trunk. Start with a magic ring and single crochet stitches to form the bottom circle. Continue crocheting in rounds, gradually increasing the stitch count to shape the trunk’s width. Once the base reaches the desired size, you can maintain the stitch count for several rounds to build height.
After the trunk is complete, you’ll move on to crocheting the leafy top. To make the canopy, start with another magic ring using green yarn. Increase stitches evenly to form a dome-like shape. Depending on your preferred tree style, you can make the canopy round, oval, or even slightly wavy for a more natural look.
When the main body parts are ready, fill them with stuffing before closing the ends. Be sure to distribute the filling evenly so your tree stands upright without leaning. Use your yarn needle to carefully sew the top and bottom parts together, making sure the stitches are tight and seamless.
Now comes the fun part — customization. You can add small details like embroidered flowers, fruits, or a happy face. Some crocheters even attach little felt birds or hearts to their tree amigurumi for a whimsical touch.
If you want to make a seasonal version, try using different color schemes. For example, pastel greens for spring, vibrant hues for summer, golden tones for autumn, or white and silver for a winter tree. This flexibility makes the tree amigurumi crochet pattern a versatile and year-round project.
Once you’ve completed your design, take a moment to admire your work. You’ve just created a mini piece of nature from yarn, patience, and creativity — a true symbol of growth and craft.
Tips for Perfecting Your Tree Amigurumi Crochet Pattern
Even if you’re familiar with crochet, perfecting your tree amigurumi crochet pattern takes a few expert tips. Small adjustments in technique can make a big difference in the final result.
The first tip is to keep your tension consistent. Amigurumi requires tight, even stitches so that the stuffing doesn’t show through. If you notice small gaps between stitches, consider using a smaller hook size or adjusting your tension slightly.
Another key is to count your stitches carefully. Since amigurumi patterns are worked in continuous rounds, it’s easy to lose track and accidentally add or skip a stitch. Using stitch markers at the beginning of each round can prevent mistakes and save time later when assembling the parts.
For shaping, practice increasing and decreasing smoothly. Abrupt changes in stitch count can make your tree look uneven. Gradual increases create natural curves, while gentle decreases help the top taper gracefully.
When assembling your amigurumi tree, always sew parts securely. Loose stitching can cause the pieces to detach over time. Thread your yarn needle through both loops of each stitch to create a firm bond between sections.
Adding surface details enhances realism. Try crocheting tiny leaves, flowers, or mushrooms around the base. You can also use embroidery thread to add vines or rings on the trunk, making your design unique and lively.
Finally, don’t rush the finishing touches. A few extra minutes spent shaping, sewing, or trimming can elevate your project from good to stunning. The best tree amigurumi crochet patterns are those that show care in every detail.
Creative Ideas and Uses for Tree Amigurumi Crochet Pattern
Once your tree amigurumi crochet pattern is complete, you’ll find countless ways to use and display it. These charming creations make perfect handmade gifts for friends, family, or even teachers — symbolizing growth, wisdom, and care.
One popular idea is to use mini crochet trees as holiday ornaments. Attach a small string loop to the top, and you’ll have adorable decorations for Christmas or other festive occasions.
They also make great desk companions. Placing one near your workspace adds a touch of calm and creativity, reminding you of nature even during busy days. Some people even add a drop of essential oil to the stuffing for a gentle aroma.
If you enjoy storytelling or themed crafts, your amigurumi tree can become part of a miniature forest collection. Combine it with crocheted animals, mushrooms, and flowers to create a magical handmade scene.
Tree amigurumis are also excellent for educational crafts with children. They can learn about trees, nature, and crafting while developing motor skills and creativity. Just make sure to supervise small parts like safety eyes.
Finally, your tree amigurumi crochet pattern can inspire eco-friendly awareness. Many crafters use these cute trees as symbols for sustainability, encouraging others to appreciate nature while reducing waste through handmade art.
About Tree Amigurumi Crochet Pattern
1. What is a tree amigurumi crochet pattern?
A tree amigurumi crochet pattern is a step-by-step crochet design that helps you create a soft, stuffed tree made from yarn. It’s a popular project for both beginners and advanced crocheters.
2. How long does it take to make one tree amigurumi?
Depending on size and complexity, it usually takes between 3 to 6 hours to complete a small to medium-sized crochet tree.
3. Can beginners make a tree amigurumi?
Yes! The pattern mainly uses basic stitches like single crochet, increase, and decrease, making it a great starting project for beginners.
4. What type of yarn is best for amigurumi trees?
Cotton yarn works best for structured shapes, while acrylic yarn gives a softer, fluffier appearance. Choose based on your preference.
5. How do I make my tree stand upright?
Ensure the base is well-stuffed and the bottom stitches are tight. You can also add a small weight or cardboard disk at the base for extra stability.
6. Can I wash my tree amigurumi?
Yes, but handwashing is recommended. Use mild soap and cold water, then air dry completely.
7. Can I sell my finished crochet trees?
Absolutely! Many crafters sell handmade tree amigurumi crochet patterns and finished products online, as long as the pattern you use allows commercial use.
8. How can I make my amigurumi more detailed?
Add embroidered textures, small crochet accessories, or varied shades of green yarn to give your tree more dimension and realism.
Creating a Tree Amigurumi Crochet Pattern is a joyful and fulfilling craft that combines imagination, patience, and skill. With just yarn and a hook, you can design a small world of creativity — one that brings peace, beauty, and personality to your space. From choosing materials to adding unique details, each step helps you grow as an artist and creator.
We hope this detailed guide has inspired you to start your own crochet tree project. If you’ve tried making a tree amigurumi crochet pattern, share your honest opinions and suggestions — your feedback helps make future creations even better. What type of tree will you make next? Let your imagination bloom!