
If you have ever wanted to know HOW TO MAKE AN AMIGURUMI HAND FROM THE WANDINHA SERIES, you are in the right place. This iconic crochet piece is inspired by the famous character “Thing” from the Wandinha series, making it a fun and creative project for crafters of all levels. By following a few simple steps, you can create a detailed and realistic amigurumi hand that is both decorative and collectible.
The popularity of the Wandinha series has inspired countless fans to bring a piece of its charm into their homes. Crafting a hand amigurumi not only pays homage to this quirky character but also helps you practice important crochet techniques. Whether you are making it for yourself, as a gift, or even to sell, this project will capture attention.
In this guide, you will learn all the steps for HOW TO MAKE AN AMIGURUMI HAND FROM THE WANDINHA SERIES, from choosing the right yarn to finishing the tiny details that make it come alive. We will also cover tips to make your work look professional and last for years.
Materials You Will Need
Before starting, it’s important to gather all the materials required for HOW TO MAKE AN AMIGURUMI HAND FROM THE WANDINHA SERIES. Having everything ready will make the process smoother and more enjoyable.
First, select a high-quality cotton yarn in a skin-tone color similar to the “Thing” character from Wandinha. Cotton yarn is recommended because it provides a neat finish and holds shape well. You will also need a smaller hook size than the yarn suggests to ensure tight stitches.
You’ll need a set of stitch markers to keep track of your rounds, especially since the hand involves detailed shaping. This will prevent you from losing your place and help keep the piece symmetrical.
Polyester fiberfill is essential for stuffing the amigurumi hand, giving it the right structure without becoming too heavy. Make sure to fill it evenly to avoid lumps.
A tapestry needle will help with sewing the fingers, thumb, and wrist together. It will also be useful for weaving in ends neatly, which is important for a polished look.
Optional materials include small safety eyes or embroidery thread if you want to give the hand additional character. While the original “Thing” is plain, adding features can give your project a unique touch.
Finally, keep a pair of small scissors at hand to trim excess yarn and tidy up your work as you go along.
Step-by-Step Crochet Instructions
The process for HOW TO MAKE AN AMIGURUMI HAND FROM THE WANDINHA SERIES starts with the base of the wrist and works upward to the fingers. By working in continuous rounds, you ensure a seamless structure.
Begin with a magic ring and crochet single stitches around to form the base. Increase gradually until you reach the desired wrist width. This will form the starting point for the entire hand.
Once the wrist section is complete, you will crochet upward to form the palm. Keep your stitches tight to maintain shape and avoid stuffing from showing through.
When shaping the fingers, work each one separately in small tubes. You will typically crochet a finger in the round, then fasten off, leaving a long tail for sewing. This is where stitch markers help to keep count and avoid mistakes.
Attach the fingers to the palm carefully, ensuring they are evenly spaced and proportional. Sewing them one by one is the best way to keep the shape accurate.
After attaching all fingers, crochet and attach the thumb at a slight angle to give it a realistic look. The thumb placement is key to making the amigurumi look lifelike.
Finally, stuff the hand evenly, close the top of the wrist neatly, and weave in all loose ends for a clean finish.
Tips for a Professional Finish
When learning HOW TO MAKE AN AMIGURUMI HAND FROM THE WANDINHA SERIES, the small details matter just as much as the main structure. These tips will help you achieve a polished final result.
Work with consistent tension throughout the project. Uneven tension can make the shape look distorted and cause stuffing to peek through the stitches.
If you want your hand to stand upright, consider adding a small weight to the base before stuffing. This could be a flat stone or a small bag of beads wrapped securely.
Use invisible decreases when shaping the fingers and palm. This technique creates a smooth look without gaps in the stitches.
Block your finished piece lightly by shaping it with your hands and letting it sit overnight. While not always necessary, it can help even out the form.
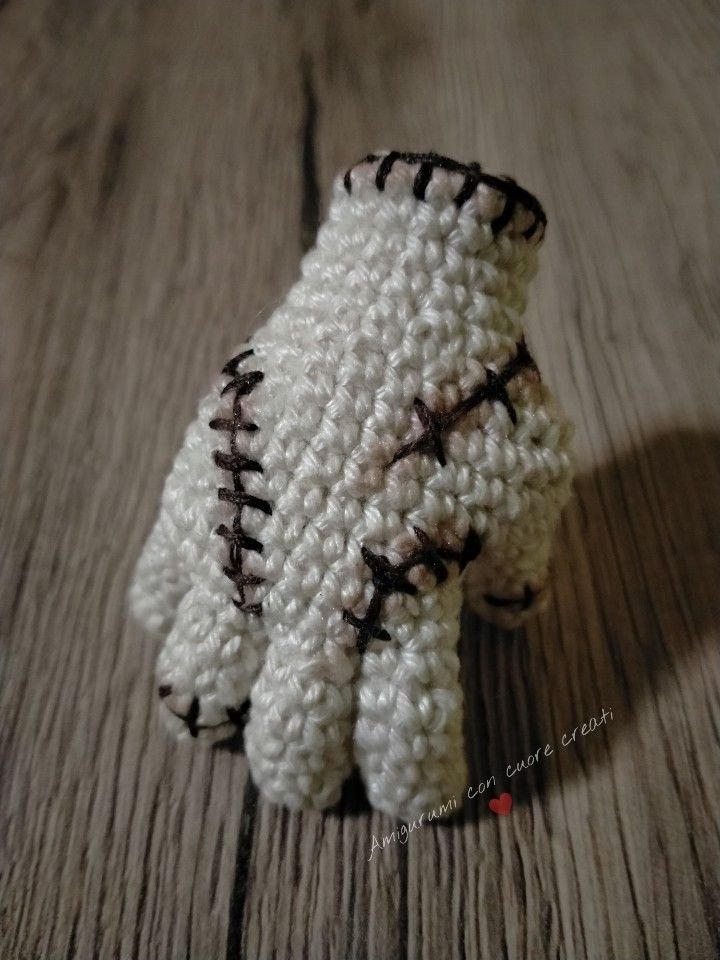
For a unique touch, try adding embroidered details such as tiny scars or stitches to match the “Thing” aesthetic from Wandinha. This can make your hand more recognizable to fans.
Lastly, take your time during assembly. Rushing can lead to misaligned parts, which can affect the overall appearance.
Creative Uses for Your Amigurumi Hand
One of the best things about knowing HOW TO MAKE AN AMIGURUMI HAND FROM THE WANDINHA SERIES is the many ways you can use it. This project goes beyond being just a display piece.
You can use it as a decorative item for a Wandinha-themed room or shelf. Its quirky look will instantly catch the eye of guests.
It can also serve as a unique Halloween decoration. Placing it on a table or bookshelf adds a spooky yet charming touch to your decor.
For those who enjoy cosplay, the amigurumi hand can be a fun prop. It’s lightweight and safe to carry around at conventions or themed events.
If you run a small handmade business, selling this amigurumi can be a niche product for fans of the series. Always ensure you respect copyright laws and market it as fan-inspired art.
You can also gift it to a friend who is a fan of the show. Handmade items carry sentimental value and are often treasured for years.
Finally, the techniques you learn here can be applied to other amigurumi projects, helping you improve your crochet skills overall.
HOW TO MAKE AN AMIGURUMI HAND FROM THE WANDINHA SERIES
1. How long does it take to make an amigurumi hand?
It depends on your crochet speed and experience, but most crafters can finish it within 6 to 8 hours over a few days.
2. Do I need advanced crochet skills for this project?
Not necessarily. While some parts require careful shaping, basic stitches like single crochet, increase, and decrease are enough for beginners with patience.
3. Can I use acrylic yarn instead of cotton?
Yes, but cotton yarn gives a cleaner look and holds the shape better. Acrylic may be softer but less defined.
4. How do I make the hand look more realistic?
Pay attention to proportions and use angled thumb placement. Adding small embroidered details can also enhance realism.
5. Is this project safe for children?
Yes, as long as you avoid small parts like safety eyes or loose decorations for very young children.
6. Can I wash the amigurumi hand?
Yes, but hand washing is recommended to maintain shape and prevent yarn from fraying.
Now you know exactly HOW TO MAKE AN AMIGURUMI HAND FROM THE WANDINHA SERIES, from gathering the right materials to adding final touches that make it stand out. By following these steps, you can create a unique and charming crochet piece that will impress anyone who sees it. We hope this guide has inspired you to start your own project. Please leave your honest opinion and suggestions so we can continue creating helpful and inspiring tutorials.