
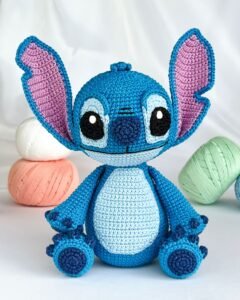
If you’re a fan of crocheting adorable plush toys, you’ve likely come across the term Amigurumi Stitch – Pattern. This technique has become a global phenomenon among crafters who love bringing soft, cuddly characters to life using just yarn, a hook, and a little creativity. Whether you’re a beginner or a seasoned crocheter, learning how to master the Amigurumi Stitch – Pattern is a joyful journey into the world of handmade art.
The beauty of Amigurumi Stitch – Pattern lies in its simplicity and versatility. While the basic stitches may be familiar—like single crochet or increase and decrease—what sets amigurumi apart is how these stitches are used to sculpt three-dimensional forms. From charming animals to whimsical characters, the possibilities are endless when you understand the foundational elements of this crochet style.
In this comprehensive guide, you’ll discover everything you need to know about working with Amigurumi Stitch – Pattern. We’ll explore the tools you need, essential techniques, creative tips, and practical advice for perfecting your plush creations. Whether you’re making gifts, decorations, or starting your own collection, this tutorial will set you on the right path.
1. Understanding the Basics of Amigurumi Stitch – Pattern
The term “amigurumi” originates from Japan and combines the words “ami” (crocheted or knitted) and “nuigurumi” (stuffed doll). As the name suggests, Amigurumi Stitch – Pattern involves using simple crochet stitches to build soft, rounded shapes that are then stuffed and assembled into toys or figures.
Most amigurumi projects begin with a magic ring, a technique that allows you to crochet in the round with a tight, closed center. This is crucial for creating a seamless base for your design. From there, single crochet stitches are worked continuously in spirals rather than joined rounds. This method gives amigurumi its signature clean look.
Another hallmark of the Amigurumi Stitch – Pattern is the emphasis on shaping. By strategically increasing and decreasing stitches, you can manipulate the fabric to curve, bulge, or taper, depending on your desired outcome. These shaping techniques make it possible to form complex characters with realistic proportions and details.
Stuffing and assembly are also key components. Polyfill stuffing is commonly used to give structure and softness to your finished piece. Proper stuffing technique ensures your creation holds its shape while remaining cuddly. Once individual parts like the head, limbs, and body are complete, they are sewn together with invisible stitches for a polished finish.
Choosing the right yarn and hook size is vital. Most amigurumi creators prefer cotton or cotton-blend yarns, which offer excellent stitch definition and durability. A smaller hook than usual is used to create tight stitches that prevent stuffing from peeking through. These details make a significant difference in the overall look of your project.
Lastly, safety eyes, embroidery, and embellishments bring your creation to life. While plastic safety eyes are popular, you can also embroider eyes and features using yarn or thread, especially for baby-safe or pet-safe toys. The finishing touches—like a smile, blush, or accessories—add personality and uniqueness to your piece.
2. Tools and Materials for the Amigurumi Stitch – Pattern
When it comes to mastering the Amigurumi Stitch – Pattern, having the right tools and materials will make the process smoother and more enjoyable. Start with a good quality crochet hook in the appropriate size—usually smaller than what the yarn label recommends to ensure tighter stitches.
Choose a yarn that’s smooth, easy to work with, and doesn’t split easily. Amigurumi Stitch – Pattern works best with cotton or acrylic yarn, which both offer good tension and finish. Avoid fuzzy yarns as they can make it difficult to see your stitches and make adjustments.
You’ll also need stitch markers. Since amigurumi is usually crocheted in a spiral, it’s easy to lose track of rounds. A simple stitch marker helps you keep count and prevents accidental mistakes. A locking stitch marker is ideal as it stays securely in place.
Sharp scissors and a yarn needle are essential. Scissors will help you snip yarn cleanly without fraying, while the yarn needle is used to weave in ends and sew parts together. Opt for a blunt-tipped needle with a large eye for easier use with yarn.
Polyester fiberfill is the preferred stuffing material. It’s lightweight, washable, and holds shape well. Be careful not to overstuff, as it can stretch your stitches and cause gaps in the fabric. Add stuffing gradually as you crochet each section.
Optional but useful tools include embroidery floss, felt for facial details, and blush for cheeks. These finishing elements can take your amigurumi from cute to extraordinary. Keep a small toolkit of embellishments to add variety and charm to your designs.
3. Techniques to Master the Amigurumi Stitch – Pattern
Learning the Amigurumi Stitch – Pattern means becoming confident in a few core techniques. The first is the magic ring, a foundational skill that allows you to begin crocheting in the round without leaving a hole in the center. It’s ideal for starting heads, bodies, and limbs.
Next is working single crochet in the round. Unlike traditional crochet worked in rows, amigurumi involves spiraling continuously around your starting point. There’s no slip stitching or turning; instead, you move from one stitch to the next in a circular motion.
Increasing and decreasing are key to shaping. To increase, simply make two single crochets in one stitch. To decrease, you can use the invisible decrease method by crocheting two stitches together through the front loops only. This keeps your work neat and minimizes gaps.
Stitch count is very important. Many amigurumi patterns will list the number of stitches you should have at the end of each round. Always double-check your count to avoid lopsided shapes or errors later in the project.
Joining parts together can be tricky, but a consistent method will help. Use whip stitch or invisible stitch to connect limbs and head to the body. Pins or stitch markers can help you place pieces evenly before sewing them on permanently.
Lastly, embroidery and detailing allow you to personalize each amigurumi. Adding a stitched mouth, eyebrows, or patterns can bring a unique flair to your work. Use contrasting thread colors and take your time with this step—it makes all the difference.
4. Tips for Customizing Your Amigurumi Stitch – Pattern Projects
Once you’ve mastered the basics of the Amigurumi Stitch – Pattern, you’ll likely want to start designing your own creations or modifying existing patterns. One of the easiest ways to customize is by changing the yarn color or type. A simple shift in palette can completely transform your toy’s personality.
You can also vary the size of your project by using thicker yarn with a larger hook or thinner yarn with a smaller hook. This technique allows you to create miniature keychains or oversized cuddle toys from the same pattern foundation.
Adding surface crochet or textured stitches can elevate your design. You might use bobble stitches for tails, popcorn stitches for fluff, or loop stitches for a shaggy texture. These variations add visual interest and uniqueness to each piece.
Incorporate accessories to enhance storytelling. Tiny hats, scarves, bags, or bows can give your amigurumi a narrative. A bear becomes a ballerina, a bunny turns into a superhero—accessories open up endless creative options.
Experiment with expressions. A slight change in eye placement or the curve of a mouth can change your character’s mood completely. Try positioning features differently until you find the right “personality” for your toy.
Finally, document your customizations. Keep a notebook or digital file with notes on yarn used, hook size, modifications, and tips for future reference. This not only helps replicate successful pieces but also aids in sharing your pattern with others.
FAQ – Amigurumi Stitch – Pattern
What is the best yarn for amigurumi?
The best yarns for Amigurumi Stitch – Pattern projects are cotton and cotton-blend yarns. They provide excellent stitch definition, are less stretchy, and help maintain the shape of your creation.
Do I need a special hook for amigurumi?
Not necessarily. A standard crochet hook works, but choose a size smaller than the yarn label recommends. This keeps stitches tight and prevents stuffing from showing through.
How do I stop my amigurumi from having gaps?
Use tight tension, a smaller hook, and avoid overstuffing. Also, ensure you are crocheting correctly in the round and maintaining a consistent stitch count.
What is an invisible decrease in amigurumi?
An invisible decrease involves crocheting two stitches together using only the front loops. It creates a seamless, less noticeable reduction in stitch count.
Can beginners try the Amigurumi Stitch – Pattern?
Absolutely! Many beginner-friendly amigurumi patterns are available. Start with simple shapes and work your way up as you gain confidence.
How do I secure safety eyes?
Insert safety eyes before stuffing and closing your piece. Always use the included washers to lock them in place securely. For baby toys, embroidered eyes are a safer alternative.
The Amigurumi Stitch – Pattern opens up a world of creativity and handmade joy. From the very first magic ring to the last stitched smile, each creation carries a part of your imagination and care. We’ve covered the basic tools, essential techniques, customization ideas, and frequently asked questions to give you a solid foundation in amigurumi.
Whether you’re crafting for yourself, your loved ones, or even building a small handmade business, amigurumi offers satisfaction and artistic expression in every stitch. We hope this guide inspires you to pick up your hook and yarn and start creating today.
We’d love to hear from you! Leave a comment with your thoughts, share your own amigurumi experiences, or let us know if there’s a topic you’d like us to cover next. Your feedback helps us grow and support the crochet community better.