
How to Crochet a Flat Slip Stitch Seam is a technique that every crocheter, from beginner to advanced, should understand and master. This method creates a clean, almost invisible join that keeps your crochet projects looking professional and polished. Whether you are working on garments, blankets, or decorative pieces, knowing when and how to use this seam can make a huge difference in the final result of your work.
When learning How to Crochet a Flat Slip Stitch Seam, many crafters are surprised by how simple yet effective this technique truly is. Unlike bulky seams that add unnecessary thickness, this method lies flat and blends naturally with your stitches. This makes it especially popular for projects where comfort, flexibility, and a neat appearance are essential. With a bit of practice, it quickly becomes second nature.
Understanding How to Crochet a Flat Slip Stitch Seam also helps you gain more confidence in finishing your crochet pieces. Finishing is often the step that separates a homemade look from a handcrafted, high-quality item. By paying attention to seaming techniques and learning how to execute them correctly, you elevate your crochet skills and ensure your projects last longer and wear better over time.
What Is a Flat Slip Stitch Seam and Why It Matters
The How to Crochet a Flat Slip Stitch Seam method refers to joining two crochet pieces together using slip stitches worked through specific loops. This creates a seam that sits flat against the fabric rather than standing out or creating ridges. The result is a smooth and comfortable finish.
One of the main reasons crocheters love this seam is its subtle appearance. When done correctly, it almost disappears into the fabric, especially when you use matching yarn. This makes it ideal for visible seams on garments like sweaters, cardigans, and tops.
Another important benefit of How to Crochet a Flat Slip Stitch Seam is durability. Even though it looks delicate, the seam is surprisingly strong. It holds pieces together securely while still allowing the fabric to move naturally with the body.
This seam is also reversible, which means both sides of the project look neat. This is particularly useful for scarves, blankets, and other items where both sides are visible and equally important.
Because slip stitches are small and tight, they help maintain the original shape of your crochet pieces. This prevents stretching or distortion that can happen with other joining methods.
Finally, learning How to Crochet a Flat Slip Stitch Seam gives you more creative freedom. Once you know how and when to use it, you can confidently tackle more complex patterns and construction styles.
Materials and Preparation Before You Begin
Before practicing How to Crochet a Flat Slip Stitch Seam, it is essential to prepare your materials properly. You will need the two crochet pieces you want to join, yarn that matches your project, and a crochet hook, often the same size or slightly smaller than the one used for the project.
Using matching yarn is important for creating a seamless look. When the yarn color blends with your project, the seam becomes less noticeable and more professional-looking.
Blocking your crochet pieces before seaming is highly recommended. Blocking ensures that both pieces are the same size and shape, which makes How to Crochet a Flat Slip Stitch Seam much easier and more accurate.
Make sure the edges you are joining are aligned correctly. Whether you are joining rows to rows or rounds to rounds, consistent stitch placement helps keep the seam even and flat.
It is also helpful to identify which loops you will work into. Many patterns specify working through the back loops or specific strands, and following these instructions is key to a neat seam.
Taking a few moments to prepare before starting How to Crochet a Flat Slip Stitch Seam can save time and frustration later, leading to a cleaner and more satisfying result.
Step-by-Step Guide on How to Crochet a Flat Slip Stitch Seam
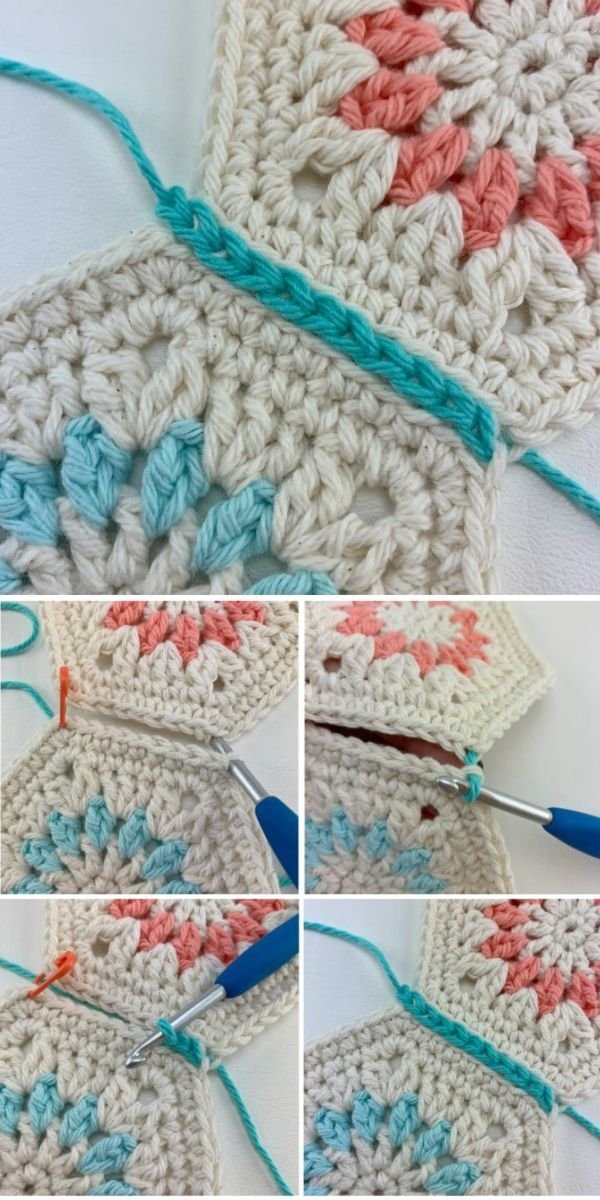
To begin How to Crochet a Flat Slip Stitch Seam, place the two crochet pieces together with the right sides facing out. Align the stitches along the edges you plan to join, ensuring they match evenly from start to finish.
Insert your hook through the designated loops of the first stitch on both pieces. Yarn over and pull through all loops on the hook to complete a slip stitch. This first stitch sets the foundation for the entire seam.
Continue working slip stitches along the edge, always inserting the hook through the corresponding loops on both pieces. Keeping consistent tension is crucial for maintaining a flat and even seam.
As you progress, periodically check that the seam is lying flat. If you notice puckering or pulling, gently adjust your tension or redo a few stitches to correct the issue.
When you reach the end of the seam, fasten off the yarn securely. Weave in the ends carefully so they do not show through the fabric, maintaining the clean look created by How to Crochet a Flat Slip Stitch Seam.
With practice, this step-by-step process becomes intuitive, allowing you to seam pieces quickly while achieving a professional finish every time.
Common Mistakes and Tips for Perfect Results
One common mistake when learning How to Crochet a Flat Slip Stitch Seam is pulling the yarn too tightly. Overly tight stitches can cause the seam to pucker and distort the fabric.
Another frequent issue is mismatched stitch counts along the edges. Always count your stitches before seaming to ensure both pieces align properly and avoid uneven seams.
Using the wrong hook size can also affect the final look. If your seam feels stiff, try using a slightly larger hook to create more flexibility while still keeping the seam flat.
Pay attention to which loops you are working into. Inconsistent loop selection can make the seam look uneven and more visible than intended.
Practicing on small swatches is an excellent way to build confidence. Before applying How to Crochet a Flat Slip Stitch Seam to a large project, test it on scrap pieces to refine your technique.
Finally, take your time. A well-executed seam enhances the entire project, and patience always pays off when aiming for a high-quality crochet finish.
Frequently Asked Questions About How to Crochet a Flat Slip Stitch Seam
What is the main advantage of How to Crochet a Flat Slip Stitch Seam?
The main advantage is that it creates a smooth, flat join that looks clean and professional while remaining strong and flexible.
Is How to Crochet a Flat Slip Stitch Seam suitable for beginners?
Yes, this technique is beginner-friendly. With basic knowledge of slip stitches and some practice, beginners can achieve excellent results.
Can this seam be used on garments?
Absolutely. How to Crochet a Flat Slip Stitch Seam is especially popular for garments because it feels comfortable against the skin and does not create bulky edges.
Does this seam work for all yarn types?
This seam works well with most yarns. However, smoother yarns tend to highlight the neatness of the seam more clearly.
How do I keep my seam from becoming too tight?
Focus on relaxed tension and avoid pulling the yarn too firmly. Practicing on swatches helps you find the right balance.
Is blocking necessary before using How to Crochet a Flat Slip Stitch Seam?
Blocking is not mandatory, but it is highly recommended to ensure even edges and a more precise seam.
Learning How to Crochet a Flat Slip Stitch Seam is a valuable skill that can significantly improve the quality and appearance of your crochet projects. Throughout this article, you discovered what this seam is, why it matters, how to prepare your materials, the step-by-step process, and common mistakes to avoid. With patience and practice, this technique becomes an essential part of your crochet toolkit, helping you achieve flat, durable, and visually appealing seams.
Now it’s your turn to put How to Crochet a Flat Slip Stitch Seam into practice. Try it on your next project and see the difference it makes. Leave your honest opinion in the comments and share any suggestions or tips from your own experience. Your feedback can help other crocheters learn and grow too.