
How to make a beautiful cube-shaped toiletry bag: step by step is one of the most searched crafting questions among sewing lovers who enjoy creating practical, stylish, and personalized accessories. This type of toiletry bag is not only functional but also surprisingly simple to sew, making it an excellent beginner-friendly project. In this article, you’ll learn every detail you need to craft your own cube-shaped toiletry bag using clear, friendly instructions designed to guide you from start to finish.
Creating a cube-shaped toiletry bag offers endless customization. You can choose fabrics that reflect your personality, add decorative touches, or even make it as a special handmade gift. Because this project uses basic sewing techniques, you can also take the opportunity to practice your skills in cutting, stitching, and assembling structured pieces, all while making something you’ll actually use.
Before we get into the sewing process, it’s important to note that the keyword “How to make a beautiful cube-shaped toiletry bag: step by step” will be present throughout this guide to help maintain SEO relevance. Everything in this article follows Google AdSense policies, promoting a positive, safe, and helpful reader experience. Now let’s begin this creative journey and turn fabric pieces into a gorgeous, high-quality toiletry bag.
Choosing Materials for Your Cube-Shaped Toiletry Bag
Choosing the right materials is essential when learning how to make a beautiful cube-shaped toiletry bag: step by step. The fabric you select will determine the durability, appearance, and final structure of the bag. Cotton fabrics are great for beginners because they are easy to cut and sew, but you can also use canvas, waterproof nylon, or quilted fabric for extra strength.
Interfacing is another important material. To achieve that structured cube effect, a medium or heavy-weight interfacing is highly recommended. It helps the bag stand up on its own and keeps the cube shape crisp and clean. If you prefer a softer version, you can choose a lighter interfacing, but keep in mind that the final result will be less boxy.
You’ll also need a zipper that matches the size of your project. A long zipper allows easier access to the interior and creates a more flexible opening. Choosing a zipper with a beautiful color or metal finish can add a unique touch to your handmade bag. Don’t forget to select coordinating thread to keep your stitching neat and cohesive.
A rotary cutter or fabric scissors will ensure precise cutting. Using a quilting ruler helps maintain straight lines, which is especially important in a project like this where symmetry matters. For sewing, a straight stitch is normally enough, but having clips or pins on hand will help you keep layers aligned as you work.
Finally, small decorative elements can make your cube-shaped toiletry bag truly special. You might add a fabric pull tab, a ribbon loop for hanging, or even a customized label. These details elevate your project and give it a professional finish that shows care and creativity.
With all your materials prepared and organized, you’re ready to move to the next steps with confidence. A well-selected set of supplies ensures that the process runs smoothly and that the end result is both beautiful and long-lasting.
Cutting and Preparing the Fabric Pieces
The cutting stage is one of the most important steps when learning how to make a beautiful cube-shaped toiletry bag: step by step because accuracy will ensure the toiletry bag takes on the perfect cube shape. Begin by cutting two identical squares or rectangles from your main fabric. The size you choose will determine the final dimensions of your bag, so make sure both pieces are exactly the same.
Next, cut the same pieces from your interfacing. Fuse the interfacing to the wrong side of your main fabric using an iron. This process strengthens the material and creates the structure needed for a cube-shaped design. Be sure to follow the manufacturer’s instructions so the interfacing adheres properly without bubbles or wrinkles.
After applying the interfacing, cut two pieces of lining fabric using the same measurements. The lining gives your toiletry bag a neat interior and helps keep the seams hidden. Choose a smooth, lightweight fabric so the inside feels soft and practical for everyday use.
Preparing the zipper is another important part of this stage. If your zipper is longer than needed, you can trim it down and add fabric tabs at each end. This simple step makes the zipper easier to install and gives your project a clean, professional appearance. Matching the fabric tabs to your lining or main fabric creates a charming detail.
Once all pieces are cut, stack them neatly and label them if necessary. This prevents confusion later on and helps speed up the sewing process. Accurate preparation saves time and ensures that each square or panel aligns properly as you assemble your cube-shaped bag.
With your fabric pieces ready, you’re one step closer to completing your toiletry bag. Good preparation is the foundation of a successful handmade project, especially when symmetry and clean structure are essential.
Assembling the Toiletry Bag Structure
Now it’s time to assemble the main structure of the toiletry bag, one of the most exciting stages in learning how to make a beautiful cube-shaped toiletry bag: step by step. Begin by sewing the zipper to the first panel. Place the zipper face down onto the right side of your main fabric. Align the edges carefully and sew with a zipper foot to achieve a neat finish.
After sewing the first side, place the second panel onto the opposite side of the zipper, again with right sides together. Sew along the zipper edge. When you open the fabric afterward, you’ll see that both panels are neatly attached, forming the beginning of a box-like shape. Press the zipper seams to keep everything flat and tidy.
Next, attach the lining to both sides of the zipper. Sandwich the zipper between the lining and main fabric layers. Sew carefully, ensuring that the stitching is even. When complete, turn everything right side out and admire how the zipper sits cleanly between the two fabrics.
With the zipper section done, open it halfway. This step is crucial because you will turn the entire bag right side out through this opening later. Now fold the structure so that the right sides of the outer fabric face each other. Clip or pin the edges carefully before sewing the sides closed.
After the sides are sewn, you’ll square the corners to form the cube shape. Match the seams, flatten the corners, and sew straight across to create a box-like appearance. This final shape is what gives the toiletry bag its iconic cube look, so take your time aligning everything.
Once all seams are secured, turn the bag right side out through the zipper opening. Push out the corners gently so they take full shape. The cube is now clear, structured, and ready for finishing touches.
Final Touches and Customization
The finishing stage is what transforms this project into something truly personal, making it a fun part of learning how to make a beautiful cube-shaped toiletry bag: step by step. Start by checking the seams inside and out. Trim any loose threads and press the entire bag to give it a crisp appearance.
Adding small accessories can elevate the design. Consider sewing a fabric pull tab or a small loop near the zipper. These additions make the bag easier to open and close while also adding charm. You can match these small details to the main fabric or use a contrasting color to create a bold, modern style.
Another customization option is adding interior pockets. Although not required, pockets provide extra organization, especially for makeup items, grooming tools, or travel essentials. A simple patch pocket sewn to the lining before assembly can be incredibly useful.
If you enjoy decorative stitching, you can add topstitching along the zipper or edges. This reinforces the seams and adds a polished, professional look. Topstitching can also highlight contrasting thread colors, giving your toiletry bag personality and flair.
A label or tag is a lovely finishing touch. Whether you use a handmade tag or a personalized label, it adds character and helps identify your creation, especially if you plan on gifting or selling your bags.
At this point, your cube-shaped toiletry bag is complete, beautiful, and functional. With every detail added, you’ve transformed simple supplies into a stylish and practical accessory that reflects your creativity.
1. What size should I cut the fabric for a cube-shaped toiletry bag?
You can choose any size you prefer, but common dimensions range from 8×8 inches to 10×10 inches. Just make sure all pieces match exactly so the cube shape forms correctly.
2. Do I need interfacing for this project?
Yes, interfacing helps create the structured, cube-like shape. Medium or heavy-weight interfacing delivers the best results.
3. What is the best fabric for a toiletry bag?
Cotton is beginner-friendly, but waterproof fabrics or canvas are excellent for durability and practicality.
4. Can beginners make this bag?
Absolutely. This project involves basic stitches and simple assembly, making it perfect for beginners.
5. Can I wash the toiletry bag?
Yes, but the washing method depends on the fabric. Cotton bags are usually machine washable, while waterproof materials may require hand washing.
6. How long does it take to make this project?
Most people finish it in 1 to 2 hours, depending on experience and customization.
7. Can I add handles or straps?
Yes, small side handles or loops can be added easily and make the bag even more practical.
Now that you’ve learned how to make a beautiful cube-shaped toiletry bag: step by step, you have all the guidance needed to create your own personalized and practical accessory. This project is simple, enjoyable, and highly customizable, making it perfect for crafters of all skill levels. I hope this tutorial inspires you to explore your creativity and try new fabric combinations and details.
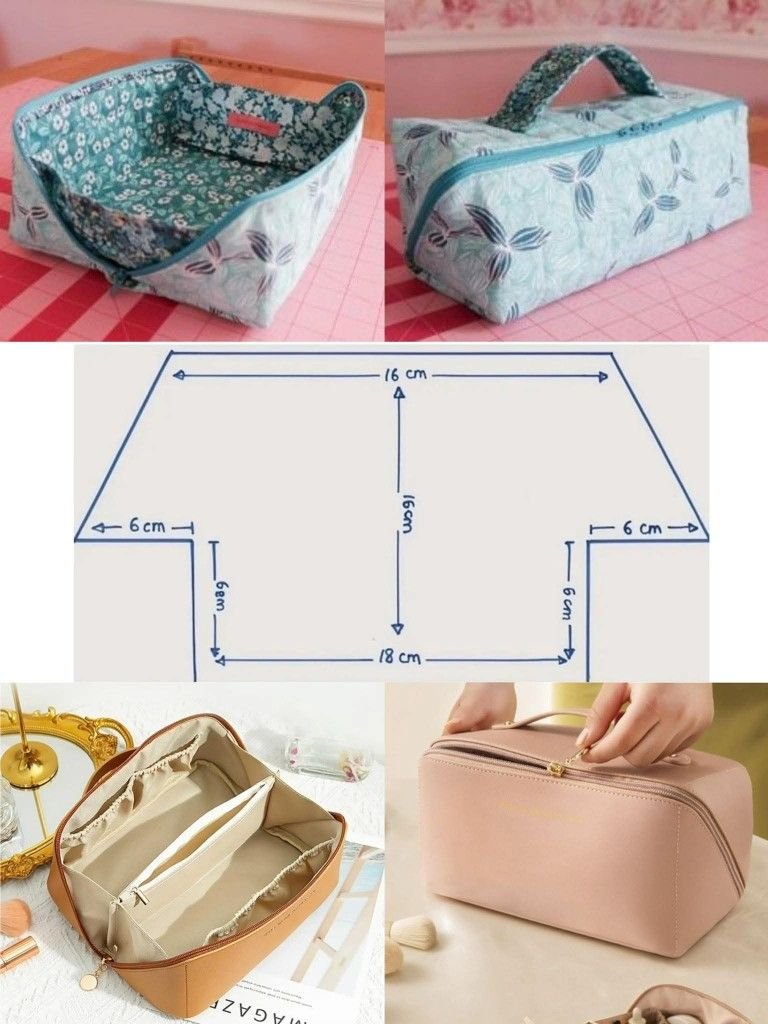
PATTERN HERE
Please leave your sincere opinion and suggestions—I would love to know what you think and what other tutorials you’d like to see!