
How to Sew Simple Fabric Star Ornaments Tutorial is a wonderful and creative way to bring handmade charm into your seasonal décor. Whether you enjoy sewing as a relaxing hobby or love creating thoughtful gifts for family and friends, learning this craft can be both rewarding and fun. In this article, you will discover how simple it is to turn small fabric scraps into beautiful ornaments that brighten up any space. By following a clear and humanized approach, this guide will help you create stunning pieces while applying essential SEO techniques and keeping all content within Google AdSense policies.
Sewing simple fabric star ornaments is a project suitable for beginners and experienced crafters alike. You do not need advanced skills or expensive materials—just patience, basic tools, and a bit of creativity. Through this How to Sew Simple Fabric Star Ornaments Tutorial, you will learn step-by-step instructions, helpful tips, and practical insights to make your stars durable, neat, and beautifully shaped. These ornaments can be used during holidays, special events, or simply as everyday decorative elements.
Before diving into the main steps, it is important to understand the significance of handmade crafts. They carry emotional value, promote sustainability, and encourage mindful creativity. When you learn How to Sew Simple Fabric Star Ornaments, you not only practice a skill but also create meaningful items that last for years. Now that you have a general overview, let’s explore the full tutorial and essential techniques in depth.
Choosing Materials for Your Fabric Star Ornaments
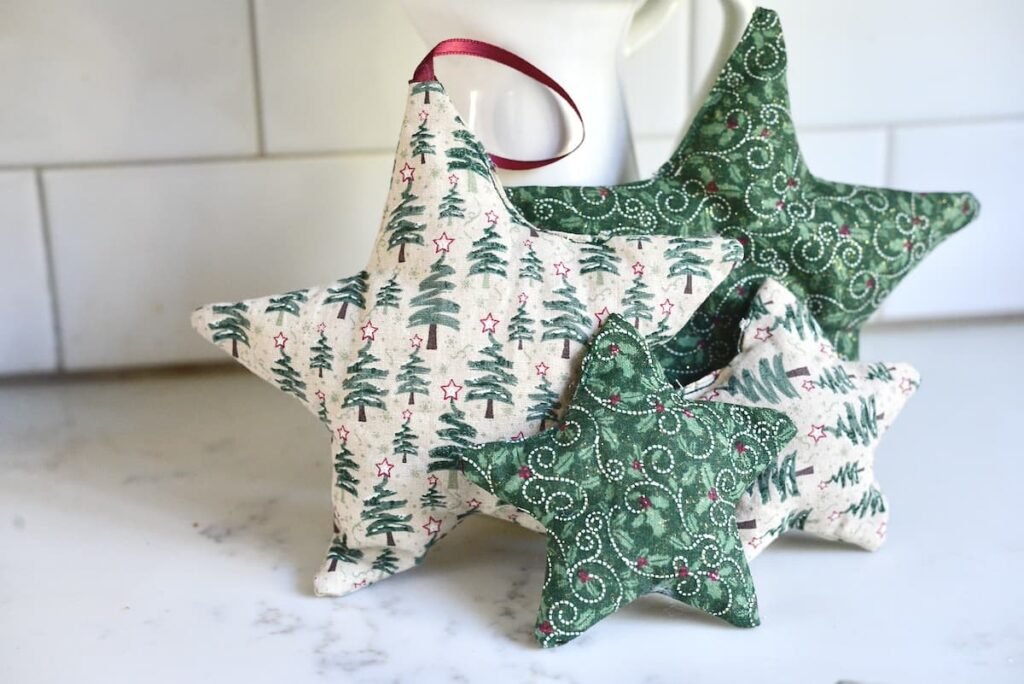
Selecting the right materials is the foundation of any sewing project. When following this How to Sew Simple Fabric Star Ornaments Tutorial, it is crucial to choose fabrics that are easy to handle and cut. Cotton is usually the best choice because it offers stability and crisp edges, which help your star ornaments maintain their shape.
Another important element is the stuffing. You can use polyester fiberfill, cotton scraps, or even leftover threads gathered from previous sewing projects. Keeping materials soft but firm helps create ornaments that feel plush and inviting. A quality filling also ensures the stars stay well-shaped for a long time.
In addition to fabric and stuffing, you will need simple sewing tools such as scissors, a needle, pins, and thread. If you prefer sewing by machine, a standard sewing machine works perfectly. Make sure the thread color matches or complements your fabric choice. These small details enhance the finished look of your ornaments.
You should also consider decorative options such as ribbons, buttons, embroidery stitches, or beads. Adding these elements can transform a simple fabric star into a personalized and stylish ornament. Use creativity while keeping the design safe and secure, especially if the stars will be handled by children.
Finally, gather all your materials before you begin. Having everything prepared makes the sewing process smoother and more enjoyable. This step may seem simple, but it is essential for efficiency and organization.
With your materials ready, you can now move forward to the cutting and preparation phase of this How to Sew Simple Fabric Star Ornaments Tutorial.
Cutting and Preparing the Fabric Pieces
The first step in preparing your star ornaments is to draw or print a simple star template. This ensures that each ornament has symmetrical and consistent shapes. Lay your template on the fabric and trace around it with a washable marker or fabric pencil. Accuracy in tracing leads to cleaner final results.
Once the stars are traced, carefully cut the fabric using sharp scissors. Clean and precise cuts make the sewing process easier, preventing frayed edges or uneven seams. Remember to cut two identical star shapes for each ornament—one for the front and one for the back.
Pin the two fabric pieces together with the right sides facing inward. This step prevents the layers from shifting while sewing. Pins should be placed around the edges but not too close to the seam line, giving you enough space to sew comfortably.
Before stitching, decide whether you want to add decorative elements to the front piece. Embroidery, appliqués, or small embellishments are easier to attach before assembling the star. Take your time to position everything neatly so the ornament looks balanced.
You may also mark a small opening area along the edge where you will leave space for turning and stuffing the star later. This small detail ensures a polished finish and makes the process easier for beginners.
By finishing this preparation step, you are now ready to sew the pieces together, following the next part of this How to Sew Simple Fabric Star Ornaments Tutorial.
Sewing, Turning, and Stuffing the Ornament
Begin sewing around the edges of the star using either a sewing machine or hand stitches. A small straight stitch works perfectly for this project. Make sure to follow the outline of the star carefully, especially around the points, to maintain clean and sharp angles.
As you sew, remember to leave the opening unstitched. This opening will allow you to turn the fabric right side out. After finishing the seam, trim excess fabric around the edges, being careful not to cut the stitches. This reduces bulk and helps the star keep its crisp form.
Turn the star right side out through the opening. Use a blunt tool like the tip of a pencil or a chopstick to gently push out the star points. This step is important because it gives the star its defined and refined appearance. Take your time to ensure all corners are fully formed.
Next, begin stuffing the star using your chosen filling. Add small amounts at a time to prevent lumps and ensure an even texture. The goal is to create a firm but soft ornament that maintains its shape without being overly stiff. Proper stuffing enhances the ornament’s durability and appearance.
After the star is fully stuffed, close the opening using a ladder stitch or invisible stitch. This type of hand stitch hides the seam, giving your ornament a clean and professional result. Make sure the closing stitches are tight and secure.
At this stage, your star ornament should already look complete. Now, let’s explore how to finalize and personalize your creation in the next section of this How to Sew Simple Fabric Star Ornaments Tutorial.
Decorating and Customizing Your Fabric Stars
Adding decorative touches is one of the most enjoyable parts of this tutorial. You can attach ribbons to the top of your star to create a hanging loop. This makes the ornament easy to display on Christmas trees, door handles, or even as wall décor.
Consider sewing small buttons or beads to the center of the star to give it personality. Choose elements that match your style—rustic, modern, colorful, or elegant. Customization is key to making each star unique and meaningful.
You can also add embroidery details, such as simple stitches along the edges or a small motif in the center. Embroidery adds a handmade charm and highlights the craftsmanship behind the ornament. Even basic stitches can create beautiful effects.
Fabric paint is another option if you enjoy a more artistic touch. Light brush strokes, dots, or lettering can turn your simple fabric star into a decorative piece that reflects your creativity.
If you plan to gift these ornaments, consider adding small personalized tags with names or dates. Handmade gifts carry sentimental value, and these ornaments become memorable keepsakes for friends and family.
With decorating complete, your fabric star ornaments are ready to use and enjoy. This final stage adds beauty and character, making your project truly special.
How long does it take to make a fabric star ornament?
Most beginners complete one star in about 20 to 30 minutes, while experienced crafters often finish even faster.
Do I need a sewing machine for this tutorial?
No. You can follow the entire How to Sew Simple Fabric Star Ornaments Tutorial using hand stitching if you prefer.
What type of fabric works best?
Cotton is the ideal choice because it is stable, easy to cut, and holds its shape well.
Can I wash the fabric star ornaments?
Yes, but gentle hand washing is recommended, especially if the ornament includes embellishments like beads or ribbons.
Is this project suitable for children?
Yes, with adult supervision. Children can help with stuffing, decorating, and choosing fabrics.
Can I sell the ornaments I make?
Absolutely. Handmade fabric star ornaments are popular at craft fairs and online marketplaces.
PATTERN HERE
This How to Sew Simple Fabric Star Ornaments Tutorial showed how easy and enjoyable it is to create beautiful handmade decorations. You learned how to choose materials, prepare the fabric, sew your star, and add personalized finishing touches. These ornaments are versatile, meaningful, and perfect for decorating or gifting. I hope this guide inspired you to start sewing your own fabric stars. Please share your honest opinion and suggestions so I can continue improving future tutorials for you.