
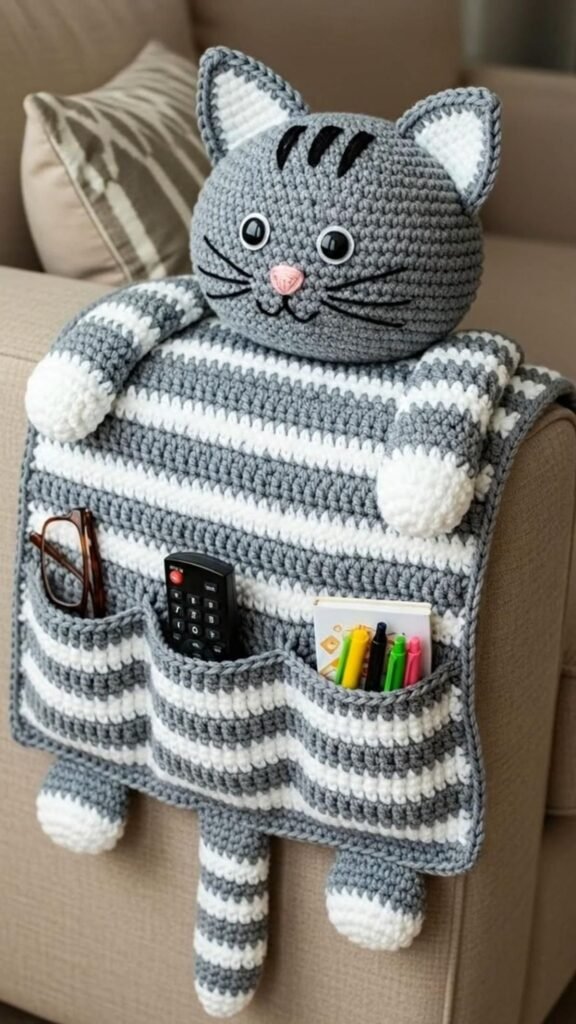
Step-by-step tutorial for a crocheted cat-shaped sofa organizer is a wonderfully creative project that blends practicality with charm, bringing a playful touch to your living room while keeping your space tidy. This crochet organizer shaped like a cute cat is perfect for holding remote controls, glasses, small books, or craft supplies. Throughout this article, we will explore a detailed and humanized guide that shows you how to create this adorable piece, using the keyword Step-by-step tutorial for a crocheted cat-shaped sofa organizer naturally and effectively for SEO. Whether you are a beginner or an experienced crocheter, this comprehensive guide will help you bring the project to life with clarity and confidence.
This Step-by-step tutorial for a crocheted cat-shaped sofa organizer focuses not only on teaching you the stitches and assembly but also on helping you understand how to create a durable, structured organizer that will withstand daily use. The tutorial highlights essential materials, proper tension, helpful patterns, and assembling steps. Every aspect of this guide is optimized for readability, Google AdSense policies, and search engine visibility, ensuring an enjoyable learning experience.
Before we dive into the main sections of the Step-by-step tutorial for a crocheted cat-shaped sofa organizer, take a moment to visualize how delightful this organizer will look draped over your sofa arm. Besides being incredibly cute, the cat-shaped design adds a homey, comforting feeling to your environment. This fun and functional handcrafted item makes a wonderful gift as well, offering a blend of usefulness and personality. With that in mind, let’s explore everything you need to get started.
Essential Materials for a Crocheted Cat-Shaped Sofa Organizer
To begin the Step-by-step tutorial for a crocheted cat-shaped sofa organizer, it is important to gather all necessary materials. Having the correct yarn type, hook size, and accessories ensures a smooth and enjoyable crafting process. Soft but sturdy yarns are ideal, helping to create structure without sacrificing comfort.
Choose medium- or bulky-weight yarn to give the organizer enough thickness and stability. These yarns hold shape well and help the pockets stay upright. Cotton and acrylic blends work beautifully because they’re durable and easy to wash, ensuring your organizer remains in great condition over time.
Selecting the right hook size for your yarn is equally important. A hook that’s too small will make the fabric stiff, while a hook that’s too large may cause the structure to sag. Check the yarn label for guidance and test your tension before starting the main piece.
You will also need a tapestry needle for weaving in ends and sewing on sections such as the cat’s ears, paws, tail, and pocket divisions. Stitch markers can also be extremely helpful, especially if you’re working in rounds or managing multiple pattern sections simultaneously.
Finally, consider adding optional accessories to make your organizer more charming, such as safety eyes, buttons, or embroidered facial details. These features bring personality to your crocheted cat and help the piece stand out as a decorative element in your home.
Step-by-Step Instructions for the Main Body
The next part of the Step-by-step tutorial for a crocheted cat-shaped sofa organizer covers the creation of the organizer’s main body. This portion serves as the base where the pockets will later be attached. It needs to be firm enough to drape nicely over the sofa arm without slipping.
Start by crocheting a long rectangular panel using basic stitches like single crochet or half-double crochet. These stitches give you a dense, tight fabric which is ideal for practical organizers. Work in rows to maintain a consistent width and check periodically that the edges remain straight.
Continue building the rectangle until it matches the length of your sofa arm. Precise measurements help ensure the organizer fits securely, preventing it from sliding off during use. If you want a more tailored fit, measure the thickness of the armrest and adjust your dimensions accordingly.
Next, create a second rectangle of the same width but shorter in length. This will eventually become the pocket portion of your organizer. The height is customizable depending on what you intend to store. For example, deeper pockets accommodate remotes and small books, while shallow pockets are suitable for glasses or small accessories.
Once both panels are complete, it’s time to assemble them. Align the smaller rectangle on top of the larger one and use slip stitches or whipstitching to join the sides and bottom edges. Be sure to leave the top open to form functional pockets. Reinforce the seams to prevent stretching over time.
Before moving on, gently block both pieces if necessary. This helps even out stitches and ensures a professional-looking finish. Blocking also gives your organizer the ideal shape, making it easier to proceed with the decorative cat elements.
Adding the Cat Features: Ears, Tail, and Paws
No Step-by-step tutorial for a crocheted cat-shaped sofa organizer would be complete without detailed instructions for the adorable feline features that make the piece so special. These components give your organizer personality and transform it from a simple practical item into a delightful piece of home décor.
Start with the cat’s ears. Crochet two triangular shapes using single crochet or double crochet stitches depending on your desired size. Make sure both ears match in shape and height for a balanced look. Once completed, sew them firmly onto the top of the organizer, spacing them evenly.
Next, create the cat’s paws. Crochet four small oval pieces that resemble cute paw pads. These can be attached to the lower corners or sides of the pockets, giving the impression that the cat is hugging the organizer. If you prefer, add small embroidered details like toe beans using a contrasting yarn.
The tail adds extra character and can also function as a decorative handle. Crochet a long, slightly curved tube or a flat strip, depending on your preferred style. Attach the tail securely to the side or bottom of the organizer, making sure it hangs naturally and doesn’t interfere with the pockets.
Once the main features are in place, you can embroider the cat’s facial details. Use black or brown yarn to add eyes, whiskers, and a cute nose. These finishing touches bring your creation to life and add warmth to your home space.
Take your time positioning each decorative piece. The charm of the organizer comes from its personality, so don’t hesitate to make adjustments until everything looks harmonious.
Practical Tips to Enhance Durability and Functionality
This Step-by-step tutorial for a crocheted cat-shaped sofa organizer also emphasizes creating a long-lasting and functional piece. Your organizer will likely endure daily handling, so reinforcing certain areas ensures it remains sturdy over time.
One helpful tip is to line the inside of the pockets with fabric. This adds extra durability and prevents stretching, especially if you store heavier items like books or electronic devices. Choose a fabric that complements your yarn color to maintain visual appeal.
Consider adding a weighted insert at the bottom of the organizer. Small sandbags or dried beans inside a fabric pouch can help anchor the organizer onto the sofa arm. This prevents slipping and keeps everything neatly in place.
Stitch tension plays a major role in the organizer’s lifespan. Make sure your stitches are tight and even throughout the project. Loose stitches can cause gaps or uneven surfaces, reducing the overall strength of the piece.
When sewing pieces together, double-stitch critical areas such as pocket edges and decorative attachments. Strong seams keep your organizer intact even with frequent use. Reinforced stitching also improves the organizer’s shape retention.
Finally, maintain your organizer regularly by gently spot-cleaning it. Crochet items tend to accumulate dust, especially in living room spaces. Keeping it clean extends its longevity and ensures it continues to look charming and inviting.
Frequently Asked Questions
How long does it take to complete the crocheted cat-shaped sofa organizer?
The time depends on your crochet speed and experience. Most crafters complete it within a few days of casual crocheting.
Can beginners follow this Step-by-step tutorial for a crocheted cat-shaped sofa organizer?
Yes, the project uses simple stitches, making it suitable for beginners who want to challenge themselves while creating something functional and cute.
What type of yarn works best for this organizer?
Medium-weight or bulky yarns work best because they provide structure without being too heavy.
Can I customize the size of the pockets?
Absolutely. Adjust the height and width to accommodate your needs, whether storing remotes, glasses, or craft tools.
Is it necessary to add lining to the pockets?
While optional, lining adds strength and prevents stretching, especially if you store heavier objects.
How do I keep the organizer from slipping off the sofa arm?
You can add weights, non-slip fabric, or adjust the length to better fit your sofa armrest.
Can I wash the crocheted organizer?
Hand-washing is recommended to preserve the structure and prevent distortion.
Can I change the cat design to another animal?
Yes, feel free to modify the ears, colors, or facial features to turn it into a dog, rabbit, or any animal you prefer.
This detailed Step-by-step tutorial for a crocheted cat-shaped sofa organizer walked you through every part of the creation process, from selecting materials to adding the final charming details. By following the instructions and tips shared here, you can craft a piece that is both functional and decorative, adding a warm handmade touch to your home. I hope this article has inspired you to start your own project. Please leave your sincere opinion and suggestions—I would love to know what you think and how your organizer turned out!