
How to make some cute little souvenir kittens step by step is a delightful and creative way to produce handmade gifts that bring warmth, charm, and personality to any occasion. Whether you are preparing small giveaways for birthdays, craft fairs, or simply want to create something adorable for friends and family, learning how to make some cute little souvenir kittens step by step can open the door to endless crafting possibilities. These tiny kittens can be made with simple materials, and their design can be easily customized to match different themes, colors, and styles. In this comprehensive guide, we will explore all the details you need to create these little treasures with confidence and creativity.
One of the most appealing aspects of learning how to make some cute little souvenir kittens step by step is that the process is accessible to beginners and enjoyable for more experienced crafters as well. With just a few tools and a bit of patience, you can create small kittens that look charming, unique, and full of personality. They can be used as keychains, decorative pieces, bag charms, or even part of a larger handmade project. As you experiment with shapes and colors, you will also develop your artistic skills and discover new ways to express creativity.
In addition to being fun, this crafting activity is also relaxing and therapeutic. Creating miniature pieces helps calm the mind while providing a sense of accomplishment with each completed kitten. This guide will walk you through each part of the process and offer tips for improving the quality of your work, ensuring that your creations are adorable and polished.
Understanding the Materials and Tools Needed
To begin how to make some cute little souvenir kittens step by step, it is essential to gather the right materials. Each item you choose plays a role in shaping the final appearance of your kittens. Soft fabrics like felt or cotton are the most popular options because they are easy to work with and offer a smooth texture that resembles real fur. Choosing quality fabrics will ensure your kittens look neat and professional.
Besides fabric, you will also need small embellishments such as beads, buttons, and tiny ribbons. These elements add personality to your miniature kittens and allow you to customize each one with unique details. Using small safety eyes or embroidery thread for the facial features will give your kittens expressive and friendly looks, making them more appealing.
Simple sewing tools like needles, threads, scissors, and fabric glue are also necessary. If you prefer a quicker crafting process, fabric glue can help attach small parts without stitching. However, thread and needle always offer a more durable finish, especially for pieces that might be handled frequently, such as keychains or bag charms. Preparing all materials before starting ensures a smooth and enjoyable crafting experience.
When choosing colors, consider soft pastels or warm natural tones. These shades often enhance the sweetness of the kitten design and make them look more charming. However, feel free to experiment with bold or themed colors depending on the occasion or target audience. Creativity is key in crafting, and exploring different color combinations will help you develop your own style.
It is also helpful to have a clean and comfortable workspace. Crafting small pieces requires concentration and good lighting. A tidy space makes it easier to handle miniature parts and reduces the chances of losing important materials. Organizing your tools in small containers can save time and keep everything within reach.
Creating the Kitten Base Shape
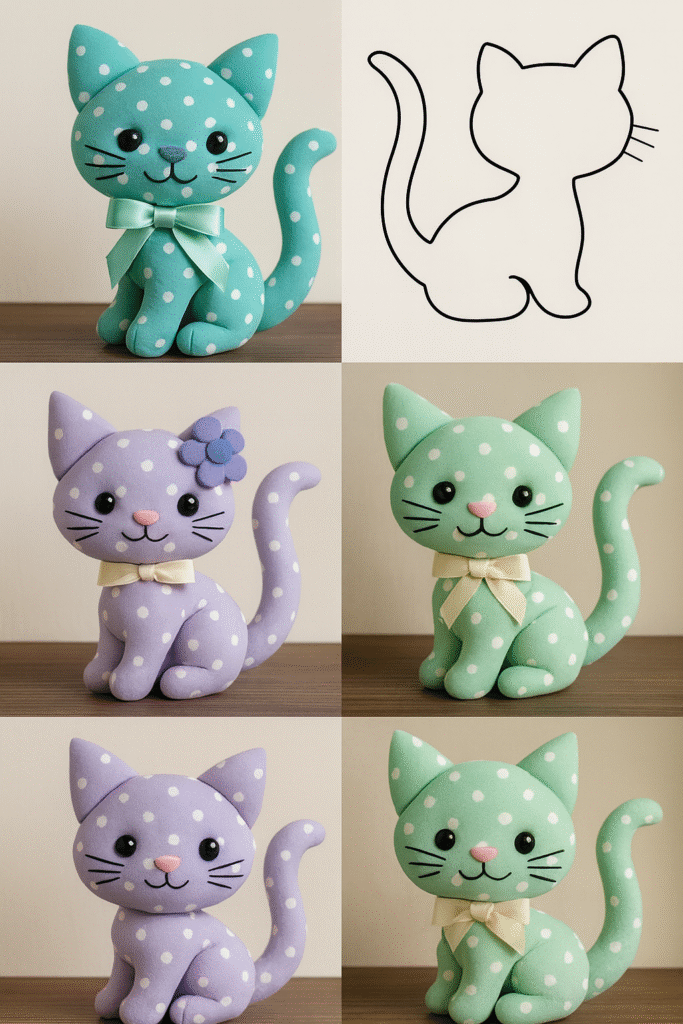
Once you have gathered all materials, the next part of learning how to make some cute little souvenir kittens step by step is shaping the base of your miniature kitten. Start by drawing a simple silhouette on paper. This template will help you cut the fabric pieces evenly and maintain consistent shapes for each kitten you create. The silhouette can be as simple as a rounded body with small ears.
After preparing the template, place it on the fabric and cut two identical pieces. These will form the front and back of your kitten. If you prefer a more rounded figure, you can add a small amount of stuffing between the two fabric layers. This gives the kitten a three-dimensional appearance and makes it more charming and realistic.
To assemble the pieces, sew around the edges using small stitches. If you are using glue instead, apply it carefully along the edges to ensure a clean finish. Leave a small opening while stitching so you can insert the stuffing. Once the kitten has the desired shape, close the opening with a few more stitches.
The ears can be cut separately and attached once the body is complete. Small triangular pieces of fabric are perfect for this detail. Sew or glue them on the top of the head, adjusting the angle to give your kitten a playful or relaxed expression. The ears play a big role in giving character to your creation.
At this stage, you will have a plain but cute kitten base. You can create multiple bases ahead of time if you intend to make several souvenir kittens. Having the bases ready makes it easier to personalize each one later with different decorative elements.
Adding Details and Personality
Details are what make these miniature kittens unique. As you continue exploring how to make some cute little souvenir kittens step by step, this phase is where your creativity truly shines. Start by adding the facial features. Use beads, safety eyes, or embroidery thread to create expressive eyes. The position of the eyes can dramatically change the kitten’s personality, from curious to sleepy.
For the nose and mouth, embroidery thread works wonderfully. A tiny stitched triangle for the nose and a soft curved line for the mouth will bring your kitten to life. Keep the lines delicate to maintain the sweet appearance of the miniature design. If you prefer, fabric paint pens can also be used for extremely fine details.
Next, consider adding accessories to enhance your kitten’s appearance. Small bows, mini bells, or tiny flowers can be glued near the neck or on one ear. Accessories help define themes, such as holiday kittens, birthday kittens, or personalized gifts for special events. This step allows you to tailor each kitten to suit different tastes or celebrations.
You may also experiment with adding small patches of fur texture using different fabrics. For example, mixing felt with plush fabric can create a fluffy effect. Patterns like stripes or spots can turn your kitten into a tabby, calico, or other playful styles. These variations are perfect for making collections of souvenir kittens that look different yet related.
Adding a small tail is another charming detail. Cut a thin strip of fabric or a tiny pom-pom and attach it to the back. This simple addition completes the look and makes the kitten more adorable when viewed from different angles.
Finally, take your time to inspect each detail and make adjustments if needed. Small pieces often require minor fixes, and a careful check ensures your final kitten looks clean and well-crafted.
Finishing and Presenting Your Souvenir Kittens
The final step in learning how to make some cute little souvenir kittens step by step involves giving your creation a polished finish. Begin by smoothing any loose threads or uneven edges. A clean finish is important, especially if the kittens will be given as gifts or sold at craft fairs. Presentation matters, and neat work always enhances perceived value.
If you are making keychains or bag charms, attach a small metal ring at the top of the kitten. You can sew a tiny fabric loop to secure the ring, ensuring it stays firmly attached even with regular use. For decorative pieces, consider mounting the kittens on small cards or adding them to themed packaging.
Another thoughtful touch is adding a light fragrance to the stuffing. Soft scents like lavender or vanilla can turn your kitten into a scented souvenir. Just be sure to keep the fragrance subtle and safe for general use. This can elevate the charm of your handmade pieces and make them more memorable.
When presenting your kittens as souvenirs, cohesive packaging strengthens the impression of care and attention. Small clear bags, decorative ribbons, or simple cardboard tags can complement the handmade aesthetic. You can also write a brief message or the kitten’s “name” to add personality.
As you grow more confident in crafting, you may explore creating full collections based on colors, themes, or special occasions. Seasonal versions are always popular and can be made with themed accessories, such as tiny scarves for winter or mini flowers for spring.
The finishing process completes the transformation from simple fabric into an adorable keepsake. Each kitten becomes a small expression of creativity, making your handmade souvenirs truly special.
How long does it take to make one souvenir kitten?
The crafting time varies depending on experience, but most people can complete one kitten in 20 to 40 minutes once they become familiar with the steps.
What materials are best for beginners?
Felt is the most beginner-friendly fabric. It is easy to cut, does not fray, and is simple to stitch, making it ideal for miniature crafts.
Can these kittens be made without sewing?
Yes, many crafters prefer using fabric glue for a quicker process. However, sewing provides a more durable and polished result.
Are these kittens safe for children?
Avoid small beads or detachable parts if the kittens are intended for young children. Embroidered features are a safer alternative.
Can I customize the kittens for events?
Absolutely. Colors, accessories, and packaging can be matched to birthdays, baby showers, holidays, or craft sales.
Is stuffing necessary?
Stuffing gives the kitten a three-dimensional and softer appearance, but you can also make flat versions if preferred.
PATTERN HERE
Learning how to make some cute little souvenir kittens step by step is a rewarding and enjoyable craft that allows endless customization and creativity. This guide covered everything from selecting materials and shaping the base to adding charming details and finishing touches. With practice, your kittens will become even more expressive and polished. I hope this article has inspired you to try creating your own miniature kittens. Please feel free to leave your honest opinion and suggestions so I can continue improving content tailored to your crafting journey.