
Christmas tree ornament tutorial – orange peel style is a delightful and creative way to add a handmade touch to your holiday décor. This technique has gained popularity among crafters because it is simple, relaxing, and produces ornaments that look elegant and festive. Throughout this article, you will learn how to create your own orange peel style ornaments step-by-step while discovering helpful tips to make your project even more enjoyable. Using a humanized and friendly tone, this guide is fully optimized for SEO and follows Google AdSense policies, ensuring safe and valuable content.
Handmade ornaments have a special charm because they carry personal meaning and creativity. The Christmas tree ornament tutorial – orange peel style offers an accessible project for beginners yet remains interesting for more experienced artisans. You can customize these ornaments with different fabrics, colors, and textures to match your holiday theme. This makes the technique incredibly versatile and perfect for gifting or selling at craft fairs.
Before diving into the steps, this guide will help you understand the foundational elements of the orange peel style, the materials needed, and methods to enhance your final piece. Whether you want a rustic look, a colorful approach, or a minimalistic style, this tutorial provides everything you need to create beautiful ornaments for your home.
Understanding the Orange Peel Style for Christmas Ornaments
The orange peel style gets its name from the curved, petal-like shapes that overlap to form a symmetrical and elegant pattern. This design creates a soft, rounded appearance that resembles traditional quilt blocks used in sewing and patchwork. When applied to a Christmas ornament, the result is a beautifully layered ball with a handmade aesthetic.
One of the reasons this style is so popular is because it doesn’t require sewing. The shapes are arranged and secured using pins, allowing anyone—regardless of sewing experience—to enjoy the craft. This no-sew approach also makes it a calming activity, perfect for relaxing during the busy holiday season.
Another benefit of the Christmas tree ornament tutorial – orange peel style is its adaptability. You can work with fabrics, ribbons, or even textured materials such as felt. These options allow you to create ornaments that fit different color schemes, whether traditional red and green, snowy winter whites, or vibrant modern palettes.
This technique also teaches fabric layering and arrangement, which can be useful in other crafting projects. Learning how to balance shades, patterns, and textures helps improve your overall crafting skills. With each ornament you create, you’ll gain more confidence and creativity.
Many crafters enjoy making these ornaments as keepsakes. You can personalize them by adding initials, dates, or symbolic colors. As the holidays come year after year, these ornaments become meaningful reminders of your creativity and memories.
Materials and Preparation for the Ornament
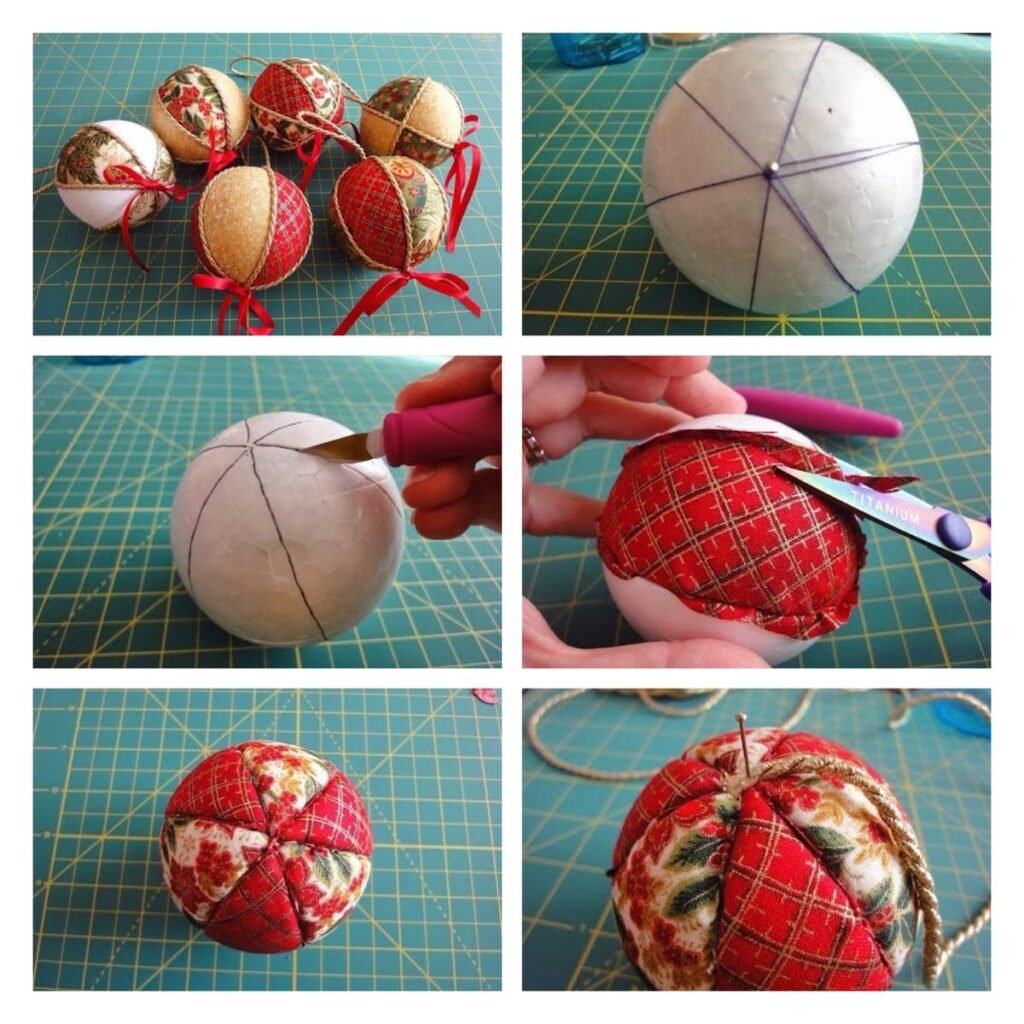
To begin the Christmas tree ornament tutorial – orange peel style, gather a few simple materials. You will need a foam ball, preferably around 7–8 cm, which serves as the base of the ornament. Foam is lightweight and easy to work with, making it ideal for pin-based projects. Choose a good-quality foam ball to ensure stability during pinning.
The second essential item is fabric. Cotton fabric is a popular choice because it is easy to fold and comes in endless patterns. You can mix solid colors with festive prints to create contrast and depth. For a classic Christmas look, choose combinations like red with gold or green with silver. For a modern touch, experiment with blues, pastels, or monochrome palettes.
Straight pins are another crucial material. They should be sharp enough to pierce the fabric without bending. Some crafters prefer using shorter pins, while others enjoy longer ones for added grip. Both options work well as long as they securely hold the fabric in place.
You will also need a ribbon to create a hanging loop for the ornament. Satin and grosgrain ribbons are excellent options for a polished finish. Choose a color that complements your fabric selection. Later, the ribbon can also be used as a decorative element around the ornament.
Before starting, cut your fabric into small squares or petal shapes. Keeping the pieces uniform will help maintain symmetry. Using a rotary cutter or fabric scissors ensures clean edges. Organize your fabric pieces in small piles to make the assembly process smoother.
Step-by-Step Guide to Creating the Ornament
To start assembling your orange peel style ornament, take your first fabric square and fold it into a petal shape. This usually involves folding the square in half and then folding the corners inward. You should end up with a soft triangular shape that resembles a petal or orange peel segment. Secure the corners with a pin at the bottom.
Next, choose a point on your foam ball to serve as the center. Pin your first folded piece to this point. This will act as the anchor and guide for the rest of the layers. Make sure it is positioned neatly because it sets the foundation for your design.
Continue placing folded petals around the center point. Arrange them symmetrically to create a balanced pattern. Each petal should slightly overlap the previous one, forming a circular pattern. This layering creates depth and enhances the aesthetic appeal of the ornament.
Once you complete the first layer, move on to the next circle, slightly below the first row. Repeat the same process, placing petals evenly around the ball. With each new layer, rotate the pattern slightly to create an alternating effect. This gives the ornament a professional and polished look.
As you complete the layers, ensure all pins are securely inserted. The overlapping technique helps hide the pins, giving the ornament a clean finish. Work your way around the entire foam ball until it is fully covered with fabric petals.
To finish the ornament, attach the ribbon loop at the top. You can also add a small fabric bow or decorative accent if you want a more festive appearance. This final touch transforms your creation into a beautiful hanging ornament ready for your Christmas tree.
Customization Ideas and Tips for Better Results
One of the most enjoyable aspects of the Christmas tree ornament tutorial – orange peel style is customizing your creation. You can mix different textures like velvet, linen, or metallic fabrics for a luxurious look. Alternating shiny and matte materials adds visual interest and dimension.
Using themed fabrics is another great idea. For example, Christmas prints such as snowflakes, stars, holly leaves, or reindeer can enhance the festive atmosphere. You can also create color-themed sets of ornaments to match specific home décor or gifting themes.
If you want to make the ornament more resistant and durable, consider using fabric glue along the edges before pinning. This prevents fraying and helps maintain the shape of each petal. Just be careful not to use too much glue, as it may show through the fabric.
Adding decorative elements such as beads, pearls, or tiny embellishments can elevate the ornament. These accents should be placed sparingly to maintain elegance. You can also use metallic pins with small decorative heads to add sparkle without overpowering the design.
Another helpful tip is to plan your pattern in advance. Lay out the fabric pieces in the order you plan to apply them. This makes it easier to visualize the final look and adjust the color distribution before pinning them to the foam ball.
Finally, try creating multiple ornaments with different styles. Each time you apply the orange peel style, you gain more experience and creativity. This technique is addictive in the best way, and soon you may find yourself making ornaments for friends, family, or even for sale.
What is the orange peel style in Christmas ornaments?
It is a technique where folded fabric pieces are layered in a circular pattern, resembling the curved segments of an orange peel.
Do I need sewing skills to make this ornament?
No. This method is completely no-sew, making it beginner-friendly.
What type of fabric works best?
Cotton is the most popular choice because it is easy to fold and comes in many patterns. However, you can also use satin, felt, or linen.
Can children participate in this craft?
Yes, but adult supervision is recommended, as the project involves sharp pins.
How long does it take to complete one ornament?
On average, a beginner may take 45 minutes to 1 hour. With practice, it becomes faster.
Are these ornaments durable?
Yes, when made with quality materials and handled with care, they can last many years.
PATTERN HERE
The Christmas tree ornament tutorial – orange peel style offers a charming, creative, and accessible crafting experience. You learned about the materials needed, the step-by-step assembly, and ways to customize your ornaments beautifully. These handmade pieces add warmth and personality to your holiday décor. I hope this guide inspires you to create your own ornaments and explore your creativity even further. Please leave your sincere opinion and suggestions—I would love to know how your ornaments turned out!