
How to make a beautiful patchwork slipper very easily. This simple yet charming project has become one of the most loved handmade items among sewing enthusiasts. Right from the beginning, understanding how to make a beautiful patchwork slipper very easily helps crafters of all skill levels feel motivated and confident. With the right combination of fabrics, a bit of patience, and basic sewing techniques, anyone can create comfortable and stylish slippers that reflect their own personality.
Learning how to make a beautiful patchwork slipper very easily also opens the door to a world of creative possibilities. These slippers are not just practical—they are a delightful way to use fabric scraps, experiment with patterns, and create thoughtful handmade gifts. Whether you prefer classic prints, modern geometric styles, or colorful patchwork, the process is surprisingly accessible and enjoyable.
In this article, you will discover a complete guide that blends simplicity, creativity, and effective techniques. By following these instructions, you can learn how to make a beautiful patchwork slipper very easily, improve your sewing abilities, and enjoy a relaxing project that results in something cozy and useful. Let’s dive into this step-by-step guide and explore all the details of this heartwarming craft.
Choosing the Right Materials for Your Patchwork Slipper
Selecting the right materials is one of the most important steps when learning how to make a beautiful patchwork slipper very easily. The fabrics you choose influence comfort, durability, and overall appearance.
Start by selecting cotton fabrics, as they are easy to work with and ideal for patchwork. Choose prints, textures, and colors that harmonize with one another. Fabrics that contrast slightly in tone or pattern create a more interesting effect.
Next, focus on the lining. A soft material such as flannel or fleece adds comfort and warmth. This step ensures your slipper is not only beautiful but enjoyable to wear.
Do not forget the inner padding. A lightweight quilt batting provides structure and softness, making the slipper feel plush under your feet.
For the sole, choose a material that offers grip and durability. Felt, suede, or non-slip fabric are great options.
Finally, gather your essential sewing tools: scissors, thread, pins, needle, and a sewing machine. With the right tools, learning how to make a beautiful patchwork slipper very easily becomes even simpler.
Preparing the Patchwork Pieces
Before assembling the slipper, you need to prepare the patchwork blocks. This step determines the final design and helps you practice essential patchwork skills.
Begin by cutting your chosen fabrics into small squares or rectangles. Keeping the pieces uniform in size ensures a neater final result. You can mix various prints to create a vibrant and charming patchwork effect.
Arrange the pieces on a flat surface before sewing. This gives you a clear view of the color balance and lets you adjust the layout. Try different combinations until you find the pattern that appeals to you most.
Sew the pieces together using a straight stitch. Press the seams open to make the patchwork lie flat. This small detail makes a big difference in the quality of the slipper.
Once your patchwork block is complete, cut the slipper pattern over the fabric. This step ensures that your design appears harmoniously on the final piece.
Finally, prepare matching pieces for both feet. Keeping symmetry in mind makes the pair look cohesive and well-crafted.
Assembling the Slipper Body
Assembling the body of the slipper is where the project begins to take shape. At this stage, you will connect the upper part, lining, and padding.
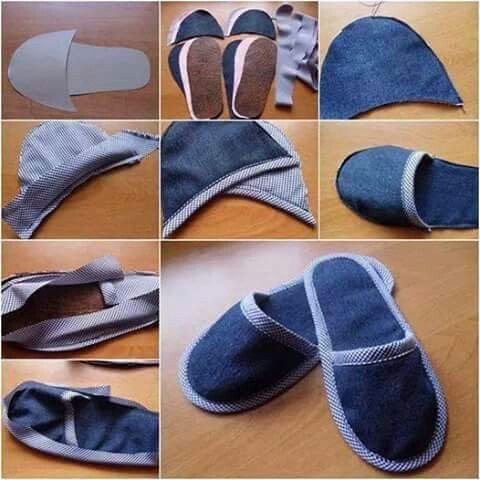
Start by placing your patchwork piece right side up, then add the padding and lining on top. Align all the edges carefully so the slipper takes shape correctly.
Sew around the edges, leaving a small opening to turn the piece inside out. Once flipped, you will see the slipper’s body beautifully formed, with clean seams and well-defined structure.
Press the edges with an iron to achieve a polished finish. This simple step gives your project a more professional appearance.
Attach the heel piece by sewing it to the back of the slipper. This adds structure and helps the slipper fit comfortably around your foot.
Test the shape by gently inserting your hand inside the slipper. If everything looks correct, you can move to the next step confidently.
Finishing this stage brings you closer to fully understanding how to make a beautiful patchwork slipper very easily, making the process both rewarding and enjoyable.
Creating and Attaching the Sole
The sole is the foundation of your slipper, providing stability, comfort, and durability. Choosing the right sole material makes a major difference.
Begin by preparing the non-slip fabric or felt. Place your slipper body on top and trace the outline carefully. Cut out the sole piece with clean, precise edges.
Add a layer of padding between the lining and the sole. This makes the slipper extra comfortable, especially for long use.
Pin the sole to the slipper body, ensuring the edges align perfectly. This step requires patience, but it guarantees an even and well-fitted result.
Sew around the edge using a strong stitch. This is one of the most important seams, as it determines the slipper’s durability over time.
After sewing, test the slipper’s shape to ensure everything fits correctly. Adjustments can still be made before finishing the pair.
Repeat the entire process for the second slipper. Once finished, you will have a perfectly matching pair that showcases your skills and creativity in how to make a beautiful patchwork slipper very easily.
How long does it take to make patchwork slippers?
The process generally takes 1 to 2 hours for beginners and less time for experienced sewists.
Do I need a sewing machine?
A sewing machine makes the project faster and neater, but the slippers can be made entirely by hand if needed.
Can I use fabric scraps?
Yes, this project is ideal for using leftover fabric pieces, making it economical and eco-friendly.
What type of padding works best?
Lightweight quilt batting or foam works well to provide comfort and structure.
Are patchwork slippers washable?
Yes, they can be hand-washed gently with mild soap and dried naturally.
Can I customize the size?
Absolutely! Adjust the pattern to fit any foot size, from child to adult.
What fabric is best for the sole?
Non-slip fabric, felt, or suede ensures good grip and durability.
Can I add decorations?
Yes, appliqués, buttons, and small bows can be added for extra charm.
Learning how to make a beautiful patchwork slipper very easily is an enjoyable and rewarding experience for anyone who loves crafting. Throughout this article, you discovered how to choose materials, prepare patchwork pieces, assemble the slipper body, and finalize the sole. With creativity and patience, you can make a unique and comfortable pair of slippers that highlight your personal style.
I hope this guide has inspired you to try this project and explore your creativity. Please leave your sincere opinion and suggestions—your feedback helps make future guides even better!