
Starting a tutorial on how to sew large fabric boxes is one of the most rewarding ways to bring organization and creativity together in a single project. Whether you want to store craft supplies, toys, linens, or seasonal decorations, handmade fabric boxes are both beautiful and practical. This article will guide you step by step through the process, while also sharing helpful tips to ensure your boxes turn out sturdy, stylish, and long-lasting.
When you learn a tutorial on how to sew large fabric boxes, you gain the ability to personalize every detail — from the fabric colors to the structure, handles, interfacing, and finishing touches. This control allows you to create pieces that match your home decor or fit specific storage needs. Plus, sewing these boxes is a great way to use leftover fabric or turn scraps into something functional and visually appealing.
This complete tutorial on how to sew large fabric boxes focuses on beginner-friendly instructions presented in a humanized and easy-to-follow format. With the right materials and a bit of patience, you can create high-quality storage boxes that look professionally made. Let’s dive into the essential steps, techniques, and insights you need before starting your project.
Understanding the Structure of Fabric Boxes
Creating a durable fabric box requires understanding how each layer works together to hold the final shape. The structure is one of the most important aspects of any tutorial on how to sew large fabric boxes, because a box that collapses or becomes misshapen will not serve its purpose. The combination of outer fabric, lining, and stabilizer defines the strength and durability of your project.
When selecting materials, sturdiness is key. Fabrics like cotton canvas, denim, duck cloth, or home-decor fabrics work very well. Lighter fabrics can still be used, but they will require a stronger stabilizer to maintain shape. Your material choices help define the look, feel, and functionality of the boxes.
Interfacing or stabilizers play a huge role in this kind of project. For example, fusible foam, heavy interfacing, or even quilt batting can strengthen the walls of the box. Each stabilizer creates a different final effect: foam makes boxes stand firm, while batting provides a softer structure that still holds shape.
Another thing to consider in this stage of the tutorial on how to sew large fabric boxes is the lining. The lining fabric keeps the interior neat and hides all seams. You can choose to match the lining to the exterior or select a contrasting tone for a personalized touch.
Choosing the right thread is also essential. Polyester thread is strong and widely recommended for sewing fabric boxes. Since this project involves sewing through multiple layers, good quality thread helps prevent breakage and ensures durability over time.
Finally, measuring correctly helps the whole project run smoother. Accurate measurements for panels, bottoms, and sides are the foundation of a professional-looking fabric box. Before cutting, always double-check your dimensions and allow for seam allowances.
Cutting and Preparing the Materials
Once you understand the structure, the next step in a tutorial on how to sew large fabric boxes is preparing your materials. This stage determines how neatly and accurately your box will come together. Preparation includes cutting the fabric, stabilizer, and lining according to the size you want.
Start by deciding the size of your box. Whether you want a wide, tall, deep, or shallow box, drawing a simple sketch can help you visualize the dimensions. This planning ensures you cut each piece with confidence and accuracy.
After deciding on the size, cut your outer fabric pieces. Typically, you will have one bottom piece and four side panels. Use a rotary cutter and a cutting mat for cleaner and more precise cuts. Accuracy here will make sewing easier later in the project.
Next, cut the lining fabric following the same measurements as the outer pieces. Make sure everything matches perfectly. If your lining fabric is thin, consider adding interfacing to give it extra structure, which is especially useful when sewing large fabric boxes.
Then, prepare your stabilizer. Depending on the material you choose — foam, heavy fusible interfacing, or batting — cut the stabilizer pieces the same size as your fabric panels. Some tutorials recommend cutting stabilizer slightly smaller to reduce bulk in the seams, which is a good technique for more polished results.
Before assembling, fuse the interfacing or foam to the wrong side of the outer fabric. This step strengthens the panels and makes the sides stand up firmly. Follow the manufacturer’s instructions for temperature and pressing time to avoid damaging the materials.
Finally, organize all the pieces by stacking them in order: outer fabric, stabilizer, and lining. This simple step keeps your workspace tidy and prepares you for the next part of the tutorial on how to sew large fabric boxes.
Sewing the Panels and Assembling the Box
With everything cut and stabilized, it is time to move to the sewing phase of this tutorial on how to sew large fabric boxes. This stage brings your project to life as the pieces begin to form the structure of the box. Sewing neatly is important to achieve a professional appearance and ensure the box will last.
Begin by sewing the side panels together. Place two pieces right sides facing and sew along the edge using the seam allowance you planned. Repeat this until all four sides are connected. You will form a loop or ring that represents the walls of the box.
After sewing the sides, attach the bottom panel. Pin the bottom piece to the loop, aligning each side carefully. This part requires patience, especially when working with thicker materials. Sew slowly around the edges, pivoting at each corner for a clean finish.
Once the outer shell is complete, repeat the same process with the lining fabric. Create a lining box by sewing the sides and the bottom together. Remember to leave a small opening in the lining, which you will use later to turn the box right side out.
Now comes one of the most important steps in any tutorial on how to sew large fabric boxes: joining the lining with the outer shell. Place the outer box inside the lining, with right sides facing each other. Align the seams and edges, then sew around the top edge to connect the two layers.
After sewing, turn the box right side out through the opening you left in the lining. Once everything is in place, sew the opening closed, either by hand or with a machine. Smooth out the corners and shapes by pressing gently with an iron if needed.
Finish this step by topstitching around the upper edge of the box. This gives the box a polished look and helps both layers stay in place, adding strength and visual appeal.
Adding Finishing Touches and Personalization
The last part of this tutorial on how to sew large fabric boxes focuses on finishing touches that elevate your project. Personalization makes your box unique and enhances both functionality and aesthetics.
Handles are one of the most useful additions. You can create fabric handles, use cotton webbing, faux leather strips, or even rope. Sew them securely onto the sides before attaching the lining, or topstitch them afterward depending on the style you prefer.
Adding decorative stitching is another great option. Quilting lines, straight stitches, or geometric patterns strengthen the fabric and improve structure. Many people enjoy adding topstitching because it gives a handcrafted, sophisticated look.
You can also incorporate pockets inside or outside the box. Small mesh pockets, fabric slip pockets, or elastic bands help organize small tools or accessories. This is especially useful when making boxes for sewing supplies or craft rooms.
Another idea in this tutorial on how to sew large fabric boxes is adding labels. You can make your own tags with fabric scraps, use embroidered labels, or print small tags and sew them inside. Labels are helpful for identifying the contents of each box, especially when storing items in closets or shelves.
Decorative elements such as buttons, bows, felt shapes, patches, or appliqués can transform a simple fabric box into a charming and personalized item. Choose elements that match your space or the theme of the room.
Finally, consider reinforcing the base for extra strength. A removable cardboard or plastic insert covered with fabric can be placed at the bottom. This helps the box stay stable, especially when storing heavier items.
What materials do I need for this tutorial on how to sew large fabric boxes?
You will need outer fabric, lining fabric, stabilizer or interfacing, thread, scissors or rotary cutter, pins or clips, sewing machine, and an iron.
What type of stabilizer works best for large fabric boxes?
Fusible foam offers the firmest structure, but heavy interfacing or quilt batting can also work depending on the desired stiffness.
Can I sew large fabric boxes without a sewing machine?
It is possible but very time-consuming. A sewing machine is strongly recommended for clean seams and durability.
How do I keep my fabric box from collapsing?
Use strong stabilizers, topstitch the edges, and reinforce the base with a removable insert for better structure.
Can I wash fabric storage boxes?
Yes, but only if all materials used are washable. Air-drying is recommended to avoid deforming the stabilizer.
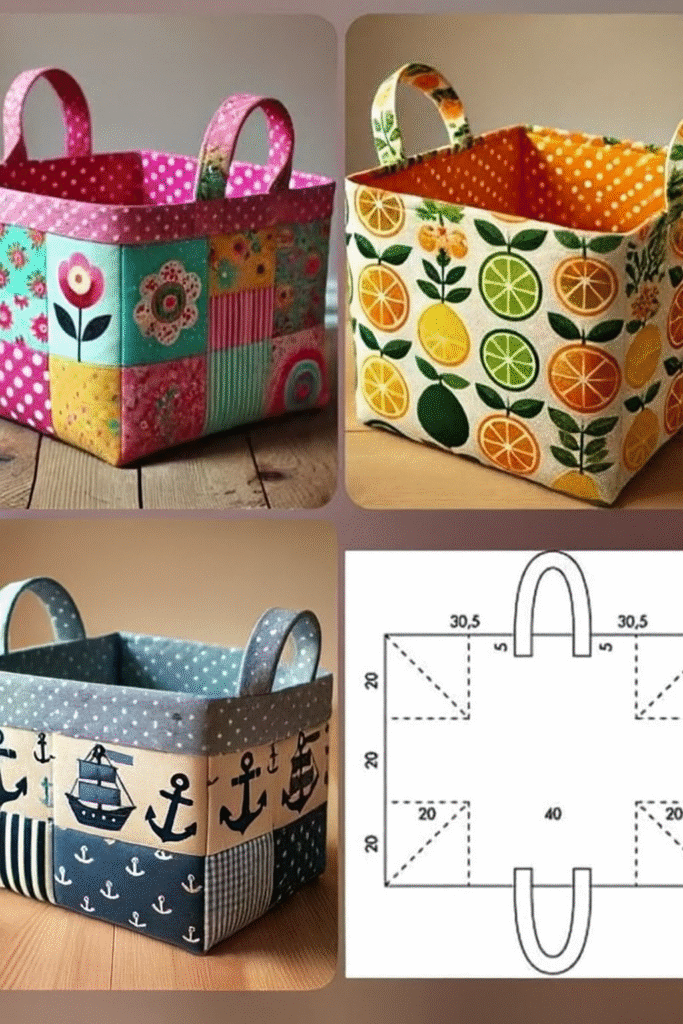
PATTERN HERE
This complete tutorial on how to sew large fabric boxes showed you how to choose materials, cut and prepare the pieces, sew the panels, assemble the structure, and add personalized finishing touches. With patience and the right techniques, you can create beautiful and functional storage solutions for any room in your home. I hope you enjoyed this guide! Please leave your honest opinion and share suggestions so I can continue creating content that helps and inspires you.