
Starting a project based on How to make a crocheted pinecone bag pendant is a wonderful way to dive into creative crochet work while making something small, charming, and deeply personal. This type of accessory has become extremely popular because it combines a touch of nature-inspired style with the practicality of a tiny bag charm. Whether you want to make a pendant for yourself, use it as a decoration, or gift it to someone you care about, learning How to make a crocheted pinecone bag pendant is both enjoyable and rewarding.
Many crafters appreciate this project because it allows them to explore texture, color, and shape on a very small scale. Pinecones offer a natural, rustic aesthetic that pairs beautifully with crochet stitches, making the final result eye-catching but still soft and delicate. While the idea might seem intricate, the steps involved in How to make a crocheted pinecone bag pendant are clear, beginner-friendly, and incredibly satisfying once completed.
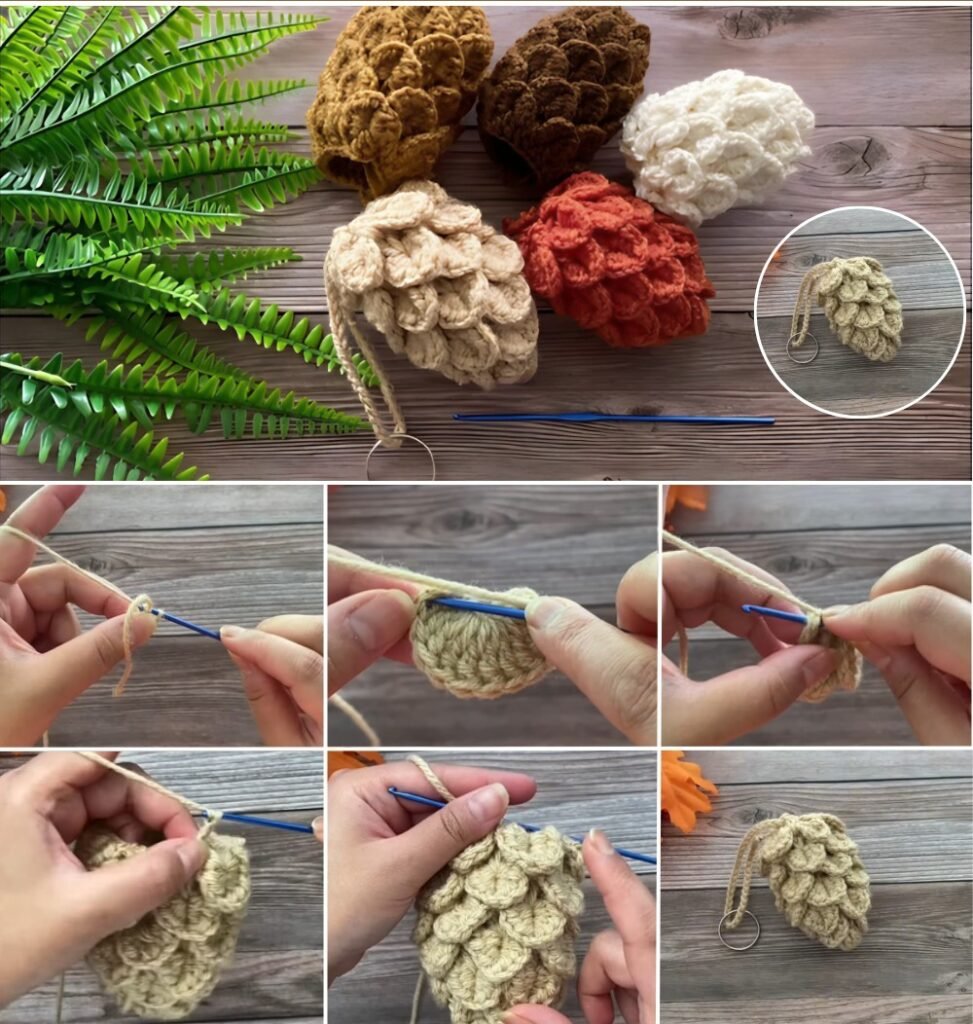
Before diving into the structured steps, it’s helpful to understand the overall approach. The pendant usually consists of a textured layered base shaped like a pinecone and attached to a small string or keychain ring. By focusing on good stitch definition and color choices, anyone can learn How to make a crocheted pinecone bag pendant regardless of experience level. Now, let’s explore the process with clarity and structure.
Choosing the Right Materials for Your Pinecone Pendant
Selecting the ideal materials is the first important step when exploring How to make a crocheted pinecone bag pendant. Yarn type plays a major role in how the texture of the pinecone will appear, and different fibers will create different effects. Many crocheters prefer cotton yarn because it provides excellent stitch definition, which is essential for pinecone scales.
Another important consideration is color. A natural brown or beige shade is the most common choice because it enhances the realism of the pinecone design, but crafters who want a more playful touch can explore greens, oranges, or even pastel tones. Choosing a color that resonates with your personal style makes the experience of learning How to make a crocheted pinecone bag pendant even more enjoyable.
You will also need the right hook size. A smaller hook helps maintain tight, firm scales that maintain the pinecone’s shape, preventing the pendant from appearing loose or floppy. If you are unsure, experiment with a hook slightly smaller than the one recommended on your yarn label to see what looks best for your pendant.
In addition to yarn and hook, you’ll want to gather small accessories such as metal rings, wooden beads, or keychain attachments. These extras allow you to turn your pinecone into a functional pendant that can be used on bags, backpacks, or key sets. Many who look up How to make a crocheted pinecone bag pendant want the final result to be both decorative and practical.
Stitch markers are another useful tool for maintaining uniform rows. Since the pinecone shape is built through repetitive structured layers, markers can help ensure consistency. Overall, choosing the right materials from the start sets you up for a successful experience in How to make a crocheted pinecone bag pendant.
Understanding the Basic Structure of the Pinecone Design
A big part of mastering How to make a crocheted pinecone bag pendant is knowing how the shape is constructed. Most designs begin with a small round base that gradually expands before transitioning into layered scales. This gives the pendant the volume and texture that make it resemble a real pinecone.
The base typically uses simple stitches like single crochet or half double crochet. Even beginners will find these stitches manageable. This foundational circle is essential, as it anchors the entire pinecone. Anyone researching How to make a crocheted pinecone bag pendant will notice that nearly all tutorials begin with this simple round.
The next part of the design involves creating small loops or clusters that will later fold into scales. These loops are usually made in rows around the base. By repeating the same sequence, each row of scales becomes neatly aligned. This is the step where the pinecone starts to take shape and gain complexity.
As you build the layers upward, the pinecone grows visually fuller. Each row of scales slightly overlaps the one below, giving the design a natural, organic look. This method is what makes How to make a crocheted pinecone bag pendant so visually interesting and textured.
Because the piece is small, adjustments can be made easily. You can add more rows for a larger, more dramatic pinecone or fewer rows for a minimalist design. This flexibility is one of the reasons many crafters love learning How to make a crocheted pinecone bag pendant.
Finally, once the structure is complete, the top is closed and the attachment point—such as a string or keychain ring—is secured. This finishing touch turns your crocheted pinecone into a functional pendant ready for everyday use.
Step-by-Step Tips to Crochet a Pinecone Pendant
To understand How to make a crocheted pinecone bag pendant, it’s helpful to break the process into simple, digestible steps. Start by forming a magic ring or small chain circle, then work several rounds of single crochet to build the core. The key is to keep your stitches tight and consistent.
Once the base is complete, begin forming the loops that will turn into pinecone scales. These are usually made by chaining a small number of stitches and securing them across the row. Repeat the same process around the piece to create the first layer of loops. As you learn How to make a crocheted pinecone bag pendant, you’ll see how repetitive yet calming this process can be.
After completing one row of loops, move upward and create new rows of loops, slightly staggering them so they don’t line up directly with the previous row. This overlapping placement is essential for achieving an authentic pinecone look. Patience is key at this stage.
Once all loop rows are complete, go back to the bottom and carefully fold or twist each loop into a scale. This is the moment where your piece transforms from simple loops to a realistic pinecone. Many people who practice How to make a crocheted pinecone bag pendant find this step especially satisfying.
Next, secure the top with simple crochet rounds to close the pinecone. Make sure the opening is neatly finished so the pendant looks polished from any angle. This finishing gives your work a professional appearance.
Lastly, attach a keyring, cord, or decorative bead to turn your pinecone into a wearable or usable charm. With this final step, you’ve fully learned How to make a crocheted pinecone bag pendant in a complete and practical way.
Creative Ways to Personalize Your Pinecone Bag Pendant
A beautiful aspect of exploring How to make a crocheted pinecone bag pendant is the freedom to personalize your piece. One way to do this is by experimenting with various yarn textures. For instance, soft velvet yarn can make the pinecone look plush and luxurious, while rustic cotton gives it a natural woodland feel.
You can also play with color combinations. Creating a gradient effect using different shades of brown adds depth and dimension. Some crafters enjoy using bright colors for a more playful, whimsical pinecone. Incorporating your personality into the colors is a fun part of the process.
Adding embellishments can transform the appearance of the pendant. Small beads, charms, or tiny bells can be sewn between the scales for delicate detail. While optional, these additions provide charm and uniqueness that make your creation stand out.
Another idea is to adjust the scale size. Larger loops create big, dramatic scales, while smaller loops produce a tighter, more realistic pinecone. Understanding how to customize these elements helps expand your creative vision when practicing How to make a crocheted pinecone bag pendant.
You can also integrate natural materials like wooden beads or leather cords into the hanging mechanism. These additions tie beautifully into the pinecone’s forest-inspired theme.
Finally, you may personalize the pendant’s purpose. Use it as a bag charm, a keychain, a gift accessory, or even holiday décor. With creativity, How to make a crocheted pinecone bag pendant becomes a versatile project suitable for countless uses.
About How to Make a Crocheted Pinecone Bag Pendant
What skill level is required to make a crocheted pinecone pendant?
Beginners can definitely attempt this project. The stitches involved are simple, and the steps can be followed at a comfortable pace.
How long does it take to crochet a pinecone bag pendant?
Most pendants take between 1 to 2 hours, depending on your experience and the size of the pinecone you want to make.
What yarn is best for this project?
Cotton yarn is preferred for clear stitch definition, but you can use any yarn that holds its shape well.
Can I make the pinecone bigger or smaller?
Yes! Simply add or remove rows of scales or use thicker yarn to adjust the size.
How do I attach the pinecone to a bag or keychain?
You can use a metal keyring, lobster clasp, or a crocheted loop to securely attach your finished pinecone.
Do I need stuffing inside the pinecone?
Most small pendants do not require stuffing, but you can add a tiny amount if you want the pinecone to feel firmer.
PATTERN HERE
Learning How to make a crocheted pinecone bag pendant is a creative, enjoyable, and rewarding experience for crafters of any skill level. Throughout this article, you discovered how to choose the right materials, build the pinecone structure, follow the step-by-step process, and personalize your final piece. Now that you understand the entire method, I would love to hear your honest opinion and suggestions. What did you think of this guide, and how can it be even more helpful?