
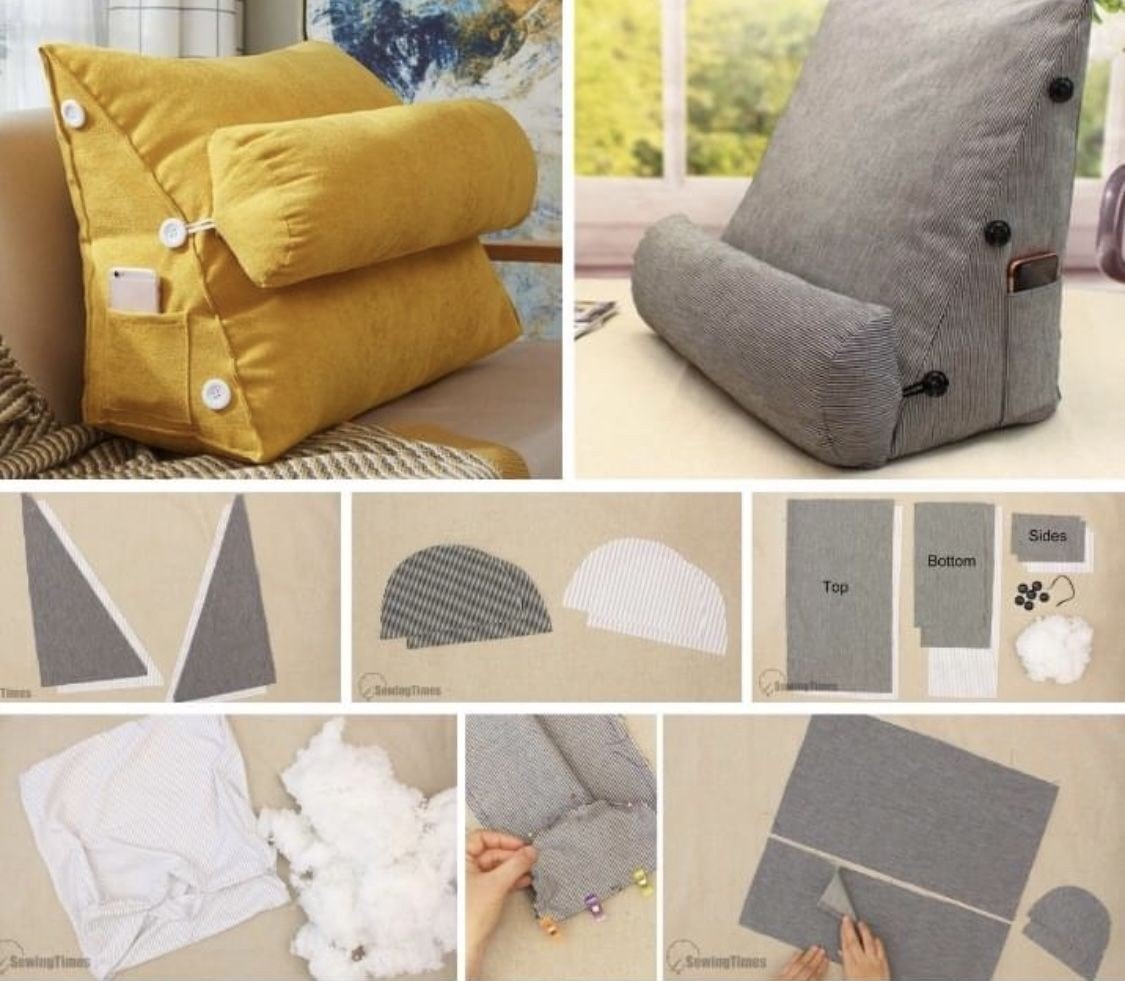
Triangular cushion step by step | Backrest cushion projects have become increasingly popular among people who love comfort, practicality, and a touch of handmade charm in their homes. Right in the first lines of this article, it is important to highlight how a triangular cushion step by step tutorial can transform your space, offering style and support for seating areas, reading corners, bedrooms, and relaxation environments. A backrest cushion is not only functional but also adds personality and coziness to any room, making it a perfect option for those who enjoy creating their own home accessories.
Crafting a triangular cushion is a delightful experience, even for beginners who are still gaining confidence in sewing. Because this project follows a clear step by step, you can enjoy the process and learn new techniques while producing something truly useful. These cushions are known for offering excellent back support, especially for reading or using mobile devices, making them an ideal combination of comfort and practicality. The geometric design also gives them a modern and minimalist look, perfect for contemporary décor styles.
By following the triangular cushion step by step instructions, you can personalize the entire piece, from the fabric choice to the firmness of the filling. This DIY craft is flexible, allowing different sizes depending on the area where the backrest cushion will be used. Whether you prefer neutral tones for a subtle decoration or vibrant patterns for a bold effect, this type of cushion brings beauty and purpose to your environment. Now let’s explore each stage to create your own cushion.
Understanding the Triangular Cushion Structure
A triangular cushion step by step project starts with understanding the overall shape and purpose of the design. Unlike traditional square cushions, this piece is built with angles that help maintain structure and provide support. This unique form makes it ideal as a backrest cushion, especially for people who use beds or sofas frequently for reading or working.
The first thing to consider is the type of fabric you’ll use. Fabric choice will influence not just appearance but also comfort and durability. Cotton, canvas, and upholstery fabrics are popular options because they are resistant and maintain shape well. These characteristics are essential when creating a cushion designed for daily back support.
Another important detail is the firmness of the filling. Polyester fiber, shredded foam, or even pillow stuffing can work, depending on your preference. A firmer filling is often ideal for a backrest cushion, as it helps maintain a straight and comfortable posture. However, a softer filling can make the cushion cozier.
Before starting to sew, preparing the pieces by measuring and cutting accurately is crucial. Precision ensures that the triangular shape forms correctly and the final product maintains symmetry. This is especially important when following a triangular cushion step by step, since the pattern depends heavily on accuracy.
You should also consider adding a zipper or buttons for easy cleaning. Cushions used for backrest support tend to accumulate dust and oils, so removable covers allow for maintenance and durability. This small detail makes a big difference in long-term convenience.
Finally, visualize where the cushion will be placed. Planning its position helps determine size and firmness. A cushion used on the bed, for example, may be larger than one used on the sofa. The flexibility of the triangular cushion format makes it adaptable to different needs.
Step-by-Step Guide for Sewing the Triangular Cushion
To begin the triangular cushion step by step, you’ll start by cutting three identical fabric pieces that will form the sides of the cushion. These pieces must be triangular, and you can adjust their size based on your desired final shape. A good standard size for a backrest cushion usually ranges between 40 to 60 cm per side.
Once the fabric pieces are ready, the next step is to pin them together. Pinning helps you visualize the structure before sewing and ensures that the edges remain straight. This prevents misalignment, which can distort the triangular form and affect comfort and appearance.
With the pieces pinned, begin sewing along the edges while leaving a small opening. This opening will later allow you to insert the filling. Try to maintain consistent stitching so the seams stay strong and the cushion remains durable, especially since a backrest cushion receives constant pressure.
After sewing the edges, turn the cushion cover inside out to hide the seams. This finishing gives the cushion a clean and professional appearance. It also helps distribute the pressure evenly once filled, ensuring the triangular structure holds its shape.
Now it’s time to fill the cushion. Insert as much stuffing as needed to reach your preferred firmness. A triangular cushion step by step tutorial always emphasizes testing firmness before closing the cushion completely. Press the sides with your hands and see if the cushion supports your back comfortably.
Finally, close the opening carefully with a hidden stitch or by attaching a zipper. If you choose a zipper, remember that it provides long-term maintainability, allowing you to wash or replace the filling whenever needed. This is particularly useful for cushions that will be used frequently.
Customizing Your Triangular Backrest Cushion
One of the joys of making a triangular cushion step by step is customizing it to your taste. You can personalize the fabric, color, patterns, and even add decorative details that enhance its style and functionality. The geometric shape makes this type of cushion visually appealing on its own, but personalization adds an extra touch of charm.
Choosing the right fabric print can transform the cushion into a centerpiece. Floral prints create a cozy and delicate ambiance, while geometric or abstract designs give a modern and artistic touch. Solid tones work beautifully when you want the backrest cushion to blend naturally with the rest of the décor.
Another customization option is adding piping to the edges. Piping is a decorative trim sewn around the seams that adds elegance and reinforces the structure. When working with a triangular cushion, piping highlights its shape and makes it look professionally tailored.
You can also experiment with different sizes. Smaller triangular cushions can be used as travel pillows, decorative pieces, or even as support for children’s reading areas. Larger cushions, however, make excellent backrests for adults, especially when placed on beds or long sofas.
If you prefer functional customization, consider adding pockets to the sides. These pockets can hold remote controls, glasses, or small accessories, making the backrest cushion even more practical. This is a great idea for those who enjoy reading or watching TV comfortably.
Finally, think about creating matching accessories. You can sew smaller triangular pillows, rectangular cushions, or even a matching throw blanket. When everything coordinates, the space feels harmonious and thoughtfully designed.
Best Uses and Benefits of a Triangular Backrest Cushion
A triangular cushion step by step project results in more than just a decorative item—it creates a functional piece that enhances comfort. One of the main benefits of this cushion style is the ergonomic support it provides, especially for lower and upper back areas. It helps maintain a comfortable posture while reading, watching TV, or working.
For people who spend long hours sitting, the backrest cushion becomes an essential household item. It reduces discomfort and alleviates pressure on the spine, making rest periods more enjoyable and healthier. Many users even report improved relaxation and less tension after incorporating this type of cushion into their routine.
Another advantage is versatility. A triangular cushion fits well in bedrooms, living rooms, offices, kids’ rooms, and reading corners. Its shape adapts easily to beds, sofas, futons, and even floor seating arrangements. Because of this flexibility, it can enhance different types of environments with both function and beauty.
The cushion is also a great gift option. Since it can be personalized, you can create a unique piece for family and friends. Handmade gifts tend to carry emotional value, making them meaningful and appreciated. A triangular cushion step by step tutorial makes it possible even for beginners to craft something thoughtful.
In interior decoration, these cushions also shine. They add depth and dimension to the space, enhancing the room’s aesthetic. Whether used as a centerpiece or as part of a cozy reading nook, a backrest cushion is a simple yet impactful addition.
Finally, producing your own cushion teaches valuable crafting skills. You learn sewing techniques, practice precision, and strengthen your creativity. Completing the project brings a sense of accomplishment and encourages you to explore even more DIY projects.
What is a triangular backrest cushion used for?
It is commonly used to provide support while sitting or reclining. Its angled shape helps maintain good posture, making it ideal for reading, watching TV, or working from bed or a sofa.
Is the triangular cushion step by step beginner-friendly?
Yes. The process involves basic sewing techniques, making it accessible even for those new to sewing. The structure is simple, and the steps are easy to follow.
What is the best filling for a backrest cushion?
Firm polyester fiber or shredded foam works best, as these materials provide strong back support. Softer fillings can be used for decorative cushions but are less suitable for ergonomic use.
Can I wash a triangular cushion?
If the cushion has a removable cover with a zipper, you can wash the fabric easily. The inner filling should be cleaned according to the manufacturer’s recommendations.
What fabric is recommended for this cushion?
Cotton, canvas, and upholstery fabrics are excellent choices because they are durable and maintain their shape well. Avoid very thin or stretchy fabrics for this project.
Can I customize the size?
Absolutely. The triangular cushion can be made in different dimensions to fit various furniture types or personal preferences.
Is it possible to add details like pockets or piping?
Yes. These custom features enhance both the look and practicality of the cushion.
Creating your own triangular cushion step by step is a rewarding and creative project that allows you to design a beautiful and functional backrest cushion tailored to your needs. Throughout this article, you learned about structure, sewing techniques, customization ideas, and the best uses for this type of cushion. If you’re looking to add comfort and style to your home, this DIY project is an excellent place to start. I hope this guide has inspired you—please leave your honest opinion and share suggestions for future tutorials!