
Learning how to make a baking tray carrier for transport is a wonderful way to ensure your homemade dishes stay safe and warm while you travel. Whether you’re heading to a family gathering, a picnic, or a bake sale, a carrier provides an easy and secure way to move your baked goods. This project is simple enough for beginner sewists yet customizable enough for those who love crafting practical and beautiful items. By following this tutorial, you’ll create a functional, stylish, and reusable carrier that keeps your food protected on the go.
When transporting food, keeping it stable and maintaining the right temperature is essential. A baking tray carrier for transport does exactly that—it supports the tray, keeps it from sliding, and even helps retain warmth. Instead of struggling with towels, boxes, or unsteady bags, this handmade carrier offers a safe and convenient solution. The best part is that you can tailor it to fit your favorite baking tray perfectly, using fabrics and designs that suit your personal taste.
This guide on how to make a baking tray carrier for transport will take you through every step of the process, from choosing materials to sewing and assembling the final piece. You don’t need advanced sewing skills—just a bit of patience, basic supplies, and creativity. The end result will be a durable, washable, and eco-friendly carrier that you can use for years. Let’s get started with what you’ll need to make your own.
Materials and Tools You’ll Need
Before diving into the sewing process, it’s important to gather the right materials. Having everything prepared in advance makes it easier to follow each step smoothly when learning how to make a baking tray carrier for transport.
You will need fabric for both the outer and inner layers. Cotton, canvas, or quilted fabric are excellent choices because they are sturdy and easy to clean. Choose patterns or colors that reflect your personality or match your kitchen theme. The inner fabric can be a contrasting color to make the design pop.
To give your carrier structure and insulation, use batting or thermal lining between the layers. This will help maintain the food’s temperature, whether you’re carrying a hot casserole or a chilled dessert. Batting also provides padding to protect the tray during transport.
You’ll also need strong handles, which can be made from fabric straps, webbing, or thick cotton tape. Make sure the handles are long enough for easy carrying but not so long that the tray becomes unstable. Reinforcing them with extra stitching is a good idea for durability.
A sewing machine is ideal for this project, though you can hand-stitch if necessary. Use matching thread, sharp scissors, pins, and a measuring tape. A fabric marker or chalk will help you mark your cutting lines accurately.
Finally, having an iron and ironing board nearby will help you press seams flat, ensuring a neat and professional finish. Preparing these materials before you begin will make the process of learning how to make a baking tray carrier for transport more enjoyable and efficient.
Step-by-Step Guide on How to Make a Baking Tray Carrier for Transport
Once you’ve gathered your supplies, it’s time to start creating. This section breaks down the process so you can easily follow along and understand exactly how to make a baking tray carrier for transport from start to finish.
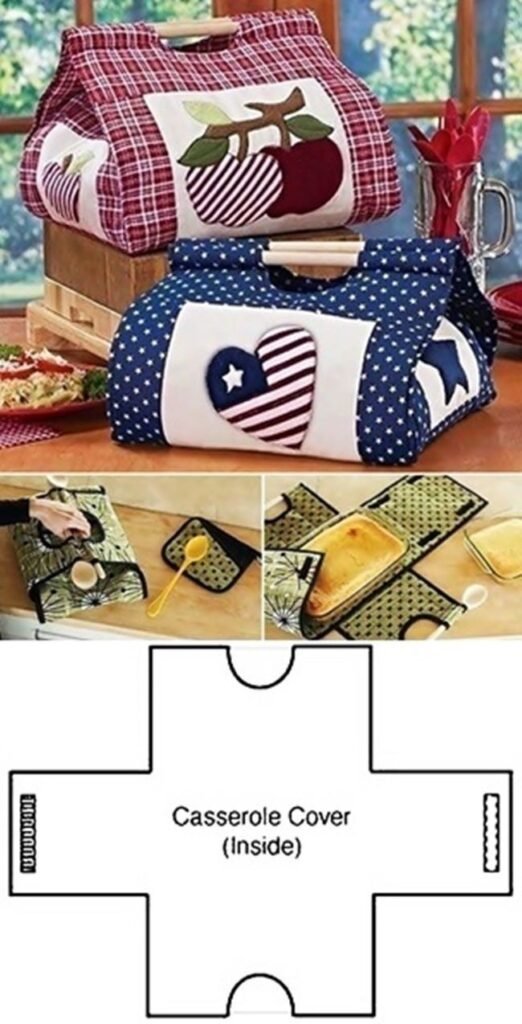
Start by measuring your baking tray. You’ll need to measure the length, width, and height, then add a few inches on each side for seams and ease. It’s important that the carrier fits snugly without being too tight.
Next, cut your fabric according to the measurements. You should have two pieces for the outer layer, two for the lining, and two pieces of batting or thermal padding. Stack them in this order: outer fabric, batting, then lining fabric. Pin them securely to prevent shifting.
Now, sew around the edges, leaving a small opening on one side to turn the fabric right-side out later. Trim the corners to reduce bulk and turn the piece inside out. Press it flat with an iron to create crisp edges.
After pressing, topstitch around the entire piece about half an inch from the edge. This step not only gives your project a finished look but also helps secure the layers in place. You can quilt additional lines through all layers to add structure and design.
Next, you’ll make the handles. Cut two fabric strips or webbing pieces of equal length, typically 16 to 18 inches long. Attach them securely to each end of the carrier, ensuring they are evenly spaced and strongly stitched. Double or triple-stitch for added strength.
Finally, test your carrier by placing your baking tray inside. The fit should be comfortable and stable. You can adjust the handle length or width next time if needed. Once you complete these steps, you’ll fully understand how to make a baking tray carrier for transport that’s both practical and attractive.
Design and Personalization Ideas
One of the best parts about learning how to make a baking tray carrier for transport is the ability to customize your project. You can create something that truly reflects your personality while serving a useful purpose.
If you love a cozy, homemade look, try using patchwork or quilted fabric. This not only adds texture but also gives the carrier a warm, handcrafted appearance. Mixing patterns like florals and stripes can create a charming, rustic effect.
For a modern touch, go with neutral colors or minimalist prints. Add contrast stitching in a bright color to give your carrier a stylish accent. This makes your piece look professionally made and visually appealing.
If you often transport hot dishes, consider adding insulating material such as heat-resistant batting. This will help retain warmth and protect your hands from heat. You can even include a small pocket for utensils or napkins, making the carrier even more functional.
Another fun option is to add embroidery or appliqué designs. Stitch your name, initials, or a small pattern onto the top. This personal touch makes your carrier unique and recognizable at gatherings or potlucks.
Lastly, for gift-giving, wrap a homemade pie or casserole inside your handmade carrier. It’s a thoughtful present that combines practicality and creativity, showing the recipient how much care you put into learning how to make a baking tray carrier for transport.
Maintenance and Care Tips
Once you’ve mastered how to make a baking tray carrier for transport, it’s essential to know how to care for it properly. Regular maintenance ensures that your carrier stays clean, strong, and ready for many uses.
After each use, wipe the inside with a damp cloth to remove food spills or crumbs. This quick step keeps the fabric fresh and prevents stains from setting.
For deeper cleaning, machine wash the carrier on a gentle cycle using mild detergent. If you used insulated or quilted fabric, air drying is best to maintain the material’s shape and padding. Avoid high heat, which could damage the batting or shrink the fabric.
If your handles or seams begin to show wear, reinforce them with extra stitching. This small repair can greatly extend the life of your carrier and keep it looking neat.
When not in use, store your baking tray carrier flat in a cool, dry place. Avoid folding it too tightly, as that can cause creases or damage the padding.
To keep your carrier looking new, iron it lightly after washing. A quick press smooths out wrinkles and restores its shape, making it ready for your next baking adventure. Proper care guarantees that all your effort in learning how to make a baking tray carrier for transport will continue to pay off for years.
How to Make a Baking Tray Carrier for Transport
1. What type of fabric works best for a baking tray carrier?
Cotton, canvas, or quilted fabric are great choices because they are durable and washable.
2. Can I make this carrier without a sewing machine?
Yes, hand-stitching is possible, but it will take longer. Use strong thread and small, tight stitches for durability.
3. What size should I make my carrier?
Measure your baking tray and add a few inches for seams and ease. The carrier should fit snugly but not tightly.
4. Can I make it heat-resistant?
Absolutely! Use insulated batting or thermal fabric to keep dishes warm during transport.
5. How do I wash my baking tray carrier?
Machine wash on a gentle cycle and air dry. Avoid bleach or harsh detergents that can weaken the fabric.
6. Is it possible to make a carrier for multiple trays?
Yes, you can adjust the size and add dividers or extra layers to hold two trays securely.
Now that you know how to make a baking tray carrier for transport, you have a practical, beautiful, and reusable way to carry your baked goods wherever you go. From selecting materials to sewing and personalizing your design, each step helps you create something unique and functional.
This DIY project is simple yet rewarding, perfect for gifting or enhancing your kitchen collection. It combines creativity, sustainability, and usefulness in one satisfying craft.
If you’ve followed this tutorial, share your honest opinion and suggestions. What fabric did you choose? How did your carrier turn out? Your feedback can inspire others who want to learn how to make a baking tray carrier for transport and make their own custom creations too!