
Creating a quilted seat belt cover is not only a fun and creative sewing project but also a practical one. In this tutorial for a quilted seat belt cover, you will learn step-by-step how to make a soft, comfortable, and stylish cover that protects your neck and shoulders from the harsh edges of a seat belt. This DIY accessory adds a touch of personalization to your car while improving comfort on long drives. Whether you’re a beginner or an experienced crafter, this guide will help you design and sew your own unique piece.
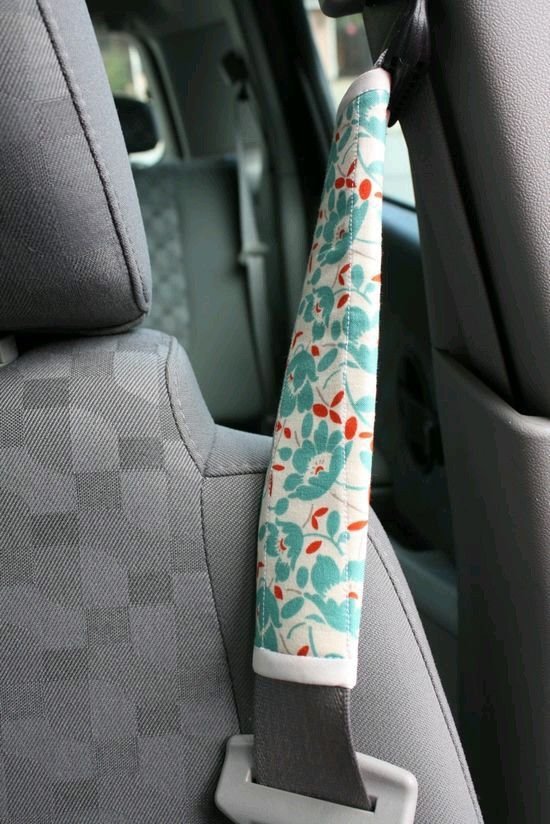
A quilted seat belt cover serves both functional and aesthetic purposes. It cushions the strap to prevent irritation and discomfort, especially during long trips or in hot weather when the seat belt can stick to your skin. Moreover, it can be customized to match your vehicle’s interior, reflect your personal taste, or even make the car more appealing to kids who dislike wearing seat belts. Following this tutorial for a quilted seat belt cover will help you create something useful, durable, and visually appealing.
The beauty of making a quilted seat belt cover yourself is that it’s simple enough for beginners yet offers endless creative possibilities. You can experiment with fabrics, colors, and patterns to make each piece unique. You don’t need a large amount of material—scraps from previous projects work perfectly. With some basic sewing supplies and a bit of patience, you’ll soon have a beautiful quilted cover that enhances both comfort and style in your car.
Materials Needed for a Quilted Seat Belt Cover
Before diving into the actual sewing process, it’s important to gather all the materials. Having everything ready ensures a smoother crafting experience. For this tutorial for a quilted seat belt cover, you’ll need a few basic sewing tools and materials that can easily be found at home or in any craft store.
You’ll need fabric for both the outer layer and the lining. Cotton fabric is a great choice because it’s breathable and easy to work with. Choose two different prints for a stylish contrast. You’ll also need some batting, which gives the quilted cover its soft and padded texture. Batting adds comfort and gives the project a professional look.
Another essential is Velcro or snap fasteners. These allow you to open and close the seat belt cover easily around the belt. Velcro is ideal for beginners since it’s simple to sew and adjust. Make sure it’s strong enough to stay closed during use.
You’ll also need a sewing machine, though hand-sewing is an option if you prefer a more traditional approach. Thread that matches your fabric, pins or clips to hold the layers together, and a fabric marker or chalk to mark your measurements will also come in handy.
A ruler or measuring tape is crucial to ensure precision, as a well-fitted seat belt cover should wrap neatly around the belt without being too tight or too loose. Don’t forget scissors or a rotary cutter for clean fabric cuts.
Finally, have your iron and ironing board ready. Pressing your fabric and seams will give the cover a crisp and polished finish, making it look professionally done. Taking the time to prepare your materials will make the rest of this tutorial for a quilted seat belt cover much more enjoyable.
Step-by-Step Instructions to Make a Quilted Seat Belt Cover
Now that you have your materials, let’s get started with the step-by-step process. The beauty of this tutorial for a quilted seat belt cover is that it breaks down the project into manageable stages, perfect for beginners and seasoned crafters alike.
First, measure your seat belt. A standard seat belt cover is about 6 inches wide and 10 to 12 inches long, but you can adjust these dimensions based on personal preference. Use your measuring tape and fabric marker to draw these measurements on your chosen fabric pieces.
Next, cut your fabric and batting. You’ll need two rectangles of fabric and one of batting, all the same size. Layer them in this order: one piece of fabric facing down, batting in the middle, and the second fabric facing up. Pin or clip the edges together to keep them aligned.
Now it’s time to quilt the fabric layers. You can sew straight lines across the fabric to create a simple quilted pattern, or get creative with diagonal or diamond designs. Quilting not only adds visual interest but also helps keep the batting in place.
After quilting, trim any uneven edges and prepare to attach the Velcro. Place one strip on each end of the cover, one on the inside and one on the outside, ensuring they align when wrapped around the seat belt. Sew them securely using a straight stitch.
Finally, fold the cover lengthwise with the right sides facing each other and stitch along the edges, leaving the short ends open. Turn it right-side out and press with an iron for a neat finish. You now have your own handmade quilted seat belt cover ready to use!
Creative Design Ideas for Your Quilted Seat Belt Cover
One of the most enjoyable parts of this tutorial for a quilted seat belt cover is adding your own creative flair. Since you’re making it from scratch, you have complete control over the design and style.
For a cozy and charming look, consider using patchwork quilting. Combine small fabric pieces in complementary colors and patterns. This not only reduces fabric waste but also adds a unique handmade touch that stands out.
If you prefer something elegant, opt for monochrome tones or soft pastels. Adding decorative stitching or embroidery can make your quilted seat belt cover look refined and custom-made.
Another idea is to use themed fabrics—for instance, floral prints, geometric patterns, or even character designs for kids. This makes wearing a seat belt more enjoyable for little passengers.
To enhance comfort, you can also add a thin layer of memory foam instead of regular batting. It provides superior cushioning, especially for long road trips.
For a finishing touch, consider adding labels or initials to personalize your seat belt cover. Embroidering your name or a short message gives it a warm, personal feel.
Care and Maintenance Tips for a Quilted Seat Belt Cover
Once you’ve finished this tutorial for a quilted seat belt cover, it’s essential to know how to care for your creation so it stays clean and durable for years to come. Proper maintenance ensures the fabric remains soft and the Velcro retains its strength.
Start by removing the cover regularly for cleaning. Since it’s attached with Velcro, it’s easy to take off. You can hand-wash or machine-wash it depending on the type of fabric you used.
If you machine-wash, use cold water and a gentle cycle to prevent color fading or fabric shrinkage. Avoid harsh detergents that may weaken the threads or batting.
After washing, air-dry your seat belt cover rather than using a dryer. High heat can damage the fabric or the Velcro’s adhesive, reducing its longevity.
For quick refreshes, you can spot-clean small stains with a damp cloth and mild soap. This helps maintain its cleanliness without needing frequent full washes.
Lastly, store any extra quilted covers in a dry place. If you have multiple covers, rotate them occasionally to extend their life and keep your car’s interior looking fresh.
Quilted Seat Belt Cover
1. What materials are best for making a quilted seat belt cover?
Cotton is ideal because it’s soft, breathable, and easy to quilt. You can also use flannel for extra comfort or denim for durability.
2. Can I make a quilted seat belt cover without a sewing machine?
Yes, you can hand-sew it using a backstitch. It takes longer, but the result can be just as sturdy if done carefully.
3. How do I make sure the cover fits properly?
Measure your seat belt’s width and add half an inch for seam allowance. The cover should wrap around snugly but not too tight.
4. Is the batting necessary?
Batting adds cushioning and gives the cover a quilted look. Without it, the cover might feel flat and less comfortable.
5. How often should I wash my quilted seat belt cover?
It depends on usage. Washing once every few weeks or after long trips keeps it clean and fresh.
6. Can I make a matching set for my car?
Absolutely! You can create matching quilted seat belt covers for all the seat belts in your vehicle for a cohesive and stylish interior.
This tutorial for a quilted seat belt cover has shown how easy and rewarding it is to create your own car accessory that combines comfort, style, and functionality. From choosing materials to sewing and personalizing your design, every step allows for creativity and craftsmanship.
By following these instructions, you can make a quilted seat belt cover that reflects your personal style while adding comfort to every drive. Whether it’s for yourself, your family, or as a thoughtful handmade gift, it’s a project worth trying.
If you followed this tutorial, share your thoughts and experiences. What colors or patterns did you choose? Your honest opinion and suggestions can inspire others who want to create their own quilted seat belt covers too!
