
Mitered Corners – Quilt Pattern is one of the most elegant and timeless techniques in quilting, admired for its seamless finish and polished appearance. This method allows quilters to create clean, sharp corners that give quilts a professional touch. Whether you’re a beginner or an experienced quilter, mastering mitered corners will elevate your work and enhance the overall aesthetic of your projects. In this guide, we’ll explore what mitered corners are, how they’re used in quilting, and practical tips to help you create your own mitered corners quilt pattern with confidence.
Learning how to make mitered corners is a key milestone in developing quilting skills. This technique not only improves the visual balance of your quilt but also ensures durability, since neatly joined corners prevent fraying and wear over time. A quilt pattern that features mitered corners exudes craftsmanship, attention to detail, and artistic precision. When combined with beautiful fabrics and thoughtful design, this technique can make your quilts stand out as true works of art.
Many quilters initially find mitered corners intimidating, but with patience and practice, they become one of the most satisfying techniques to master. The process involves aligning fabric edges at a perfect 45-degree angle, folding and joining them in a way that creates a crisp, unified edge. Once you understand the structure of the mitered corners quilt pattern, it becomes an enjoyable and creative step in your quilting journey.
Understanding Mitered Corners in Quilting
At its core, a mitered corner is a way to join two edges of fabric so that they meet at a perfect diagonal, forming a clean 90-degree angle. This technique is commonly used when adding borders or bindings to a quilt. Unlike traditional corners, where edges overlap, mitered corners give a continuous frame-like appearance. The result is smooth, symmetrical, and visually appealing.
When using mitered corners in a quilt pattern, precision is everything. Accurate cutting, careful folding, and consistent seam allowances are essential. Even a small deviation can affect the alignment, causing uneven or puckered corners. That’s why quilters often use tools like a rotary cutter, ruler, and marking pencil to ensure exact 45-degree angles.
The beauty of a mitered corners quilt pattern lies in its versatility. You can use this method for modern geometric designs, classic patchwork styles, or even intricate art quilts. It works beautifully on small wall hangings as well as large bed quilts. Because it creates a natural frame effect, mitered corners help draw attention to the quilt’s center design.
Another advantage of mitered corners is that they reduce bulk in the corners of the quilt. This makes quilting and binding smoother, particularly when sewing through multiple layers. It also enhances the longevity of your quilt since neatly folded corners are less likely to fray or separate with time.
Many quilting traditions around the world have incorporated mitered corners for centuries. The method reflects both artistry and technical precision, blending aesthetics with structure. As you develop your own quilt pattern, learning how to execute mitered corners properly will give you a strong foundation for more complex projects.
Finally, the technique aligns perfectly with the principles of modern quilting — clean lines, precise edges, and balanced symmetry. When you master mitered corners, you’ll not only improve your craftsmanship but also unlock endless creative possibilities in your quilting practice.
Step-by-Step Guide to Creating Mitered Corners
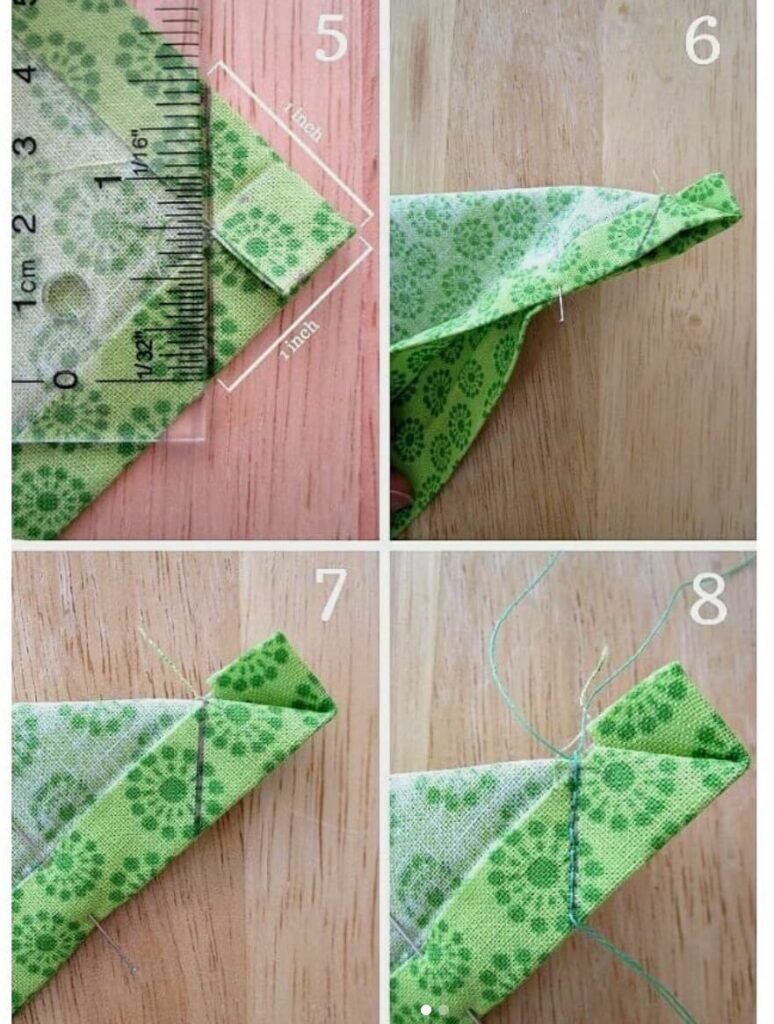
Before starting your mitered corners quilt pattern, prepare your materials: fabric borders, pins, sewing machine, rotary cutter, ruler, and iron. Begin by attaching one border strip to the quilt top, stopping a quarter inch before the end. Repeat this step for all four sides, leaving space at each corner for folding.
Next, fold the quilt so that two adjacent borders lay on top of each other, right sides facing. Use your ruler to draw a 45-degree line from the corner where the seams meet, extending outward. This line represents your mitered seam. Stitch along the line, then trim away the excess fabric, leaving a small seam allowance.
Open the corner and press it flat. You should see a perfectly aligned mitered corner forming a continuous line around the quilt’s edge. If any misalignment appears, adjust and press again. Consistency in pressing ensures that your corners remain crisp and professional-looking.
As you repeat this process for each corner, take your time aligning edges and seams. The beauty of a mitered corners quilt pattern depends heavily on precision. Slow, deliberate movements often produce better results than rushing through the steps.
Once all corners are mitered and pressed, sew around the entire border to secure the edges. You can then proceed to bind your quilt, following the same mitered corner principle for the binding as well. This creates harmony between the quilt’s inner and outer design elements.
Remember that practice is essential. The more mitered corners you create, the more confident you’ll become in aligning seams and achieving perfect symmetry. Eventually, this process will feel natural, and your quilts will gain a more polished finish.
Design Ideas Using Mitered Corners Quilt Patterns
There are countless creative ways to use mitered corners quilt patterns in your designs. For example, you can incorporate them into border frames that highlight a central motif or use contrasting fabrics to make the mitered edges pop visually. The clean lines of mitered corners pair beautifully with both traditional and modern quilt aesthetics.
One popular design approach is using wide borders with bold prints. The 45-degree mitered corners allow the pattern to flow continuously, creating a cohesive look. This method works especially well with stripes, florals, or geometric designs that benefit from uninterrupted symmetry.
For a modern twist, combine mitered corners with minimalist color palettes and negative space. The precise corners enhance the simplicity and structure of the design, creating a quilt that feels contemporary and refined.
You can also experiment with layering multiple borders, each featuring mitered corners. By using different fabrics and widths, you can build a framed effect that adds depth and dimension to your quilt. This technique is particularly striking in heirloom or display pieces.
Quilters who enjoy hand quilting can use mitered corners to emphasize their stitch work. The smooth edges provide an ideal canvas for decorative stitches or embroidery accents that follow the natural flow of the fabric.
Whether you prefer bold statements or subtle details, mitered corners quilt patterns offer flexibility and elegance. With thoughtful design choices, you can transform even a simple quilt into a masterpiece that reflects your personal style and craftsmanship.
Common Mistakes and How to Avoid Them
Even experienced quilters can encounter challenges when working with mitered corners. One of the most common mistakes is incorrect angle alignment. If the 45-degree line isn’t accurate, your corners will not meet cleanly. Always double-check your measurements before stitching.
Another frequent issue is fabric stretching. Pulling or tugging on the fabric while sewing can distort the corners. To prevent this, handle the fabric gently and use pins or clips to secure it in place before stitching.
Improper pressing can also lead to uneven corners. Always press seams carefully after each step to set them in place. Using a steam iron helps create sharp, professional mitered corners that maintain their shape.
When cutting the fabric, make sure to leave a consistent seam allowance. Cutting too close can cause fraying, while leaving too much fabric can create bulky corners. Precision cutting ensures that your mitered corners quilt pattern remains smooth and even.
Avoid using fabrics that stretch excessively or have loose weaves when first learning the technique. Sturdier fabrics are easier to control and produce cleaner results. Once you’re comfortable, you can experiment with more delicate materials.
Finally, remember to take your time. Rushing through mitered corners often results in crooked seams or uneven edges. Quilting is an art that rewards patience and attention to detail. Slow, consistent work will yield beautiful and lasting results.
About Mitered Corners Quilt Pattern
1. What are mitered corners in quilting?
Mitered corners are a method of joining two fabric edges at a 45-degree angle to form a smooth 90-degree corner, commonly used in quilt borders and bindings.
2. Why should I use mitered corners instead of square corners?
Mitered corners provide a more polished, professional look and reduce bulk in the corners, allowing the quilt to lay flatter and last longer.
3. Are mitered corners difficult to make?
They can be challenging at first, but with careful measuring, marking, and pressing, most quilters master the technique quickly.
4. What tools do I need for mitered corners?
A rotary cutter, ruler, marking pencil, sewing machine, and iron are the main tools you’ll need to create precise mitered corners.
5. Can I use mitered corners with any quilt pattern?
Yes. Mitered corners can be incorporated into nearly all quilt styles, from traditional patchwork to modern minimalist designs.
6. How do I fix a crooked mitered corner?
Unpick the seam carefully, realign the edges, redraw the 45-degree line, and resew. Press again to secure the correct angle.
7. Do I need to pin my fabric before sewing?
Yes. Pinning or clipping helps keep your fabric stable and prevents slipping while you sew the corners.
8. What fabric works best for mitered corners?
Medium-weight cotton fabrics are ideal for learning, as they maintain structure and are easy to handle during sewing and pressing.
9. Should I press the corners open or to one side?
Pressing them open usually gives a flatter finish, but you can experiment to see which method works best for your specific quilt pattern.
10. How do I make mitered corners on quilt binding?
The process is similar to borders: fold the binding strip at a 45-degree angle at each corner, align, and stitch carefully for a perfect finish.
Mastering mitered corners is one of the best ways to take your quilting skills to the next level. This elegant technique not only enhances the visual beauty of your quilts but also improves their structure and durability. A well-executed mitered corners quilt pattern showcases precision, artistry, and craftsmanship in every stitch.
With practice, patience, and attention to detail, any quilter can learn to create perfect mitered corners that bring their projects to life. Now that you’ve learned the essentials, try incorporating this technique into your next quilting project and experience the satisfaction of clean, flawless edges.
What do you think about this guide? Share your honest opinion and suggestions — your feedback helps inspire new ideas and keeps the quilting community growing!