
If you’ve been searching for a Crochet bunny hat tutorial, you’ve come to the right place! Creating a soft and adorable bunny hat is one of the most enjoyable crochet projects for both beginners and experienced crafters. This cozy accessory is perfect for Easter photoshoots, baby showers, or simply to add a touch of handmade charm to your wardrobe. In this guide, we’ll explore everything you need to know—from choosing the right materials to mastering the stitches that bring your bunny hat to life.
Crocheting a bunny hat combines creativity and practicality, allowing you to make something truly personal. With the right crochet pattern and a bit of patience, you can craft a cute hat complete with floppy ears, soft textures, and even custom colors. The beauty of following a Crochet bunny hat tutorial is that you can adapt it for any age group, from newborns to adults, simply by adjusting your hook size or yarn weight.
In this comprehensive tutorial, we’ll go step by step through the process, ensuring your project stays enjoyable and easy to follow. Whether you’re new to crochet or have been crafting for years, this guide will help you create a high-quality bunny hat that looks professional and feels incredibly soft. Let’s dive in and start your crochet journey!
Choosing the Right Materials for Your Crochet Bunny Hat
Before beginning your Crochet bunny hat tutorial, it’s essential to gather the right supplies. The materials you choose will greatly influence the final look, feel, and comfort of your hat. Starting with the proper yarn and hook ensures your stitches are even and your hat has the perfect amount of stretch.
First, focus on selecting the right yarn. Soft, lightweight yarns like acrylic or cotton blends are ideal because they are gentle on the skin and easy to wash. If the hat is for a baby, make sure to choose a hypoallergenic yarn labeled “baby safe.” This ensures the hat is not only cute but also comfortable and safe for sensitive skin.
Next, choose a crochet hook that matches your yarn’s thickness. Most bunny hat patterns use sizes ranging from 4 mm to 5.5 mm. Using a smaller hook will create a tighter stitch, while a larger hook will produce a looser, more flexible hat. The hook size also affects the hat’s size, so follow your pattern’s recommendations carefully.
You’ll also need scissors, a tapestry needle, and stitch markers. Stitch markers are especially helpful if you’re working in the round, as they help keep track of your rows and prevent mistakes. Having these tools on hand will make your crocheting experience smoother and more organized.
Finally, think about embellishments. Adding a little personality to your bunny hat—such as a pom-pom tail, embroidered nose, or cute button eyes—can make it even more charming. Be sure to attach these securely, especially if the hat will be worn by a child.
Once you have all your materials ready, you’re well-prepared to start crocheting. Having the right supplies makes all the difference in creating a beautiful, long-lasting bunny hat that you’ll be proud to show off.
Step-by-Step Crochet Bunny Hat Tutorial
Now that you have your materials, it’s time to begin the fun part: crafting your Crochet bunny hat! The steps below will guide you through each stage, ensuring your stitches come together neatly and your bunny hat takes shape beautifully.
Start by creating a magic ring—this will form the center of your hat. Work several single crochets into the ring, then pull it tight to close. This technique ensures there’s no hole at the top of your hat, giving it a professional and polished appearance.
Next, continue crocheting in rounds, increasing stitches evenly to form the crown. It’s important to count your stitches as you go; missing or adding one can affect the hat’s fit. Use your stitch marker at the beginning of each round to stay on track.
Once the crown reaches your desired width, it’s time to work on the body of the hat. Continue crocheting without increasing stitches to maintain the circumference. You can use single crochet (sc), half-double crochet (hdc), or double crochet (dc) depending on the texture you prefer. For a baby hat, lighter stitches like hdc often give a soft and stretchy finish.
After the body is complete, move to the ear flaps. These are optional but add both style and functionality, keeping ears warm and enhancing the hat’s bunny look. You can crochet them directly onto the hat or create them separately and sew them on later.
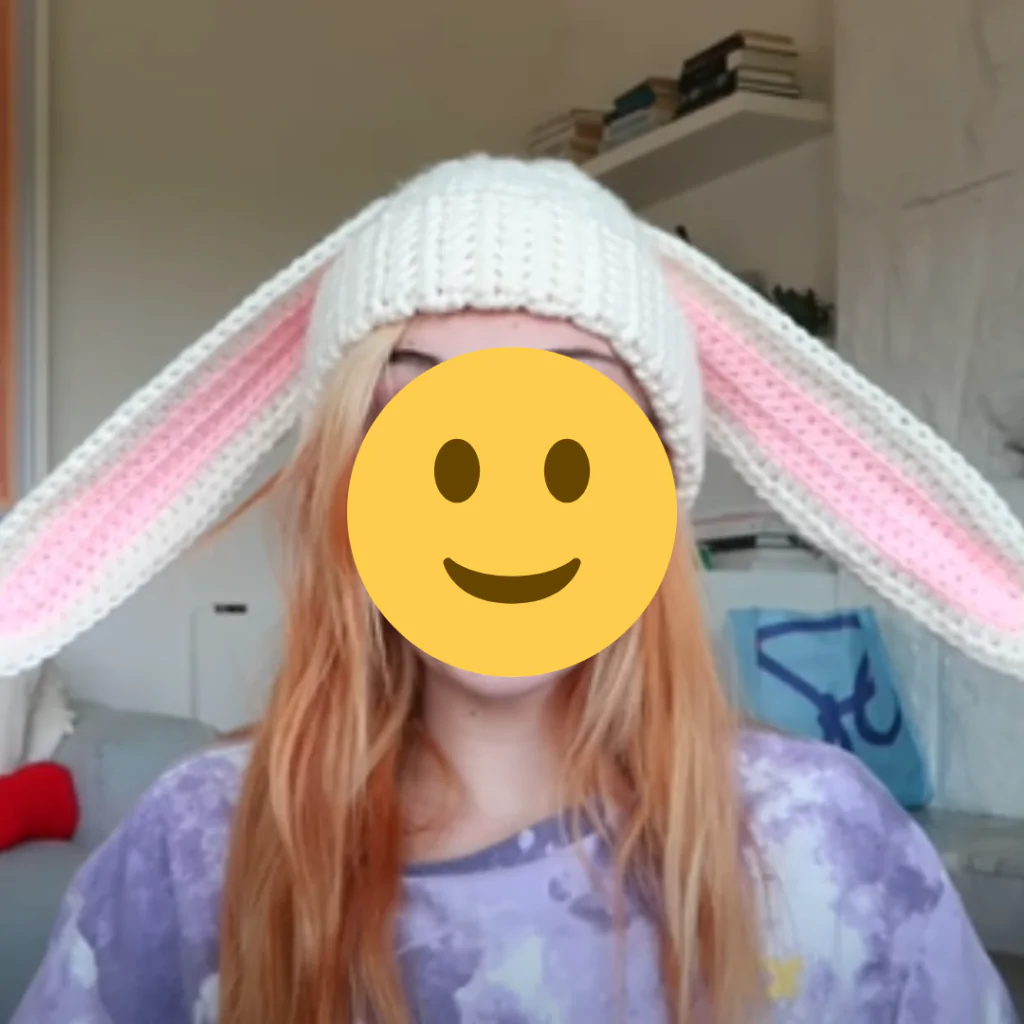
Now for the most iconic feature—the bunny ears. Crochet two long ear shapes using white yarn for the outer part and pink yarn for the inner part. Sew or crochet them together for a layered effect, then attach them securely to the top of your hat. Adjust the position so they stand up or flop slightly for extra cuteness.
Once everything is assembled, weave in all loose ends with your tapestry needle. Your Crochet bunny hat is now ready! Give it a gentle wash and let it air dry to help it hold its shape.
Tips for Customizing Your Crochet Bunny Hat
One of the most exciting aspects of following a Crochet bunny hat tutorial is the freedom to customize your creation. Whether you’re making it for yourself, a friend, or a little one, personalization adds charm and meaning.
Start by experimenting with colors. While traditional bunny hats often feature white or cream yarn, you can get creative with pastel tones like lavender, baby blue, or soft pink. For a more playful twist, try variegated yarns that naturally blend multiple shades.
You can also adjust the size to fit any age group. Use a smaller hook for infants and a larger one for adults. Some crafters prefer to add a ribbed edge to the hat for better elasticity and fit. This small change gives the hat a polished, professional look.
Add details such as whiskers, a tiny embroidered nose, or safety eyes to bring your bunny to life. If you’re making the hat for a baby, opt for embroidered or crocheted features instead of plastic ones for safety reasons.
Consider making matching accessories. A pair of crocheted booties, mittens, or even a bunny tail blanket can complete the look. These coordinated pieces make perfect baby shower gifts or photo props.
If you want your bunny hat to have a seasonal flair, you can adapt it for Easter themes by adding small crocheted flowers, eggs, or bows. These creative touches make your project even more festive and eye-catching.
Finally, remember that no two handmade items are exactly alike—and that’s what makes them special. Each Crochet bunny hat carries a bit of your personality and care, making it a true work of art.
Caring for Your Crochet Bunny Hat
After putting time and love into your Crochet bunny hat, you’ll want to ensure it stays in perfect condition for years. Proper care helps maintain the hat’s softness, color, and shape.
First, check the yarn label for washing instructions. Most baby-friendly and acrylic yarns can be machine washed on a gentle cycle, but handmade items often last longer when hand-washed in cool water. Use mild detergent and avoid bleach to preserve the yarn’s fibers.
When washing, be gentle—do not wring or twist your hat, as this can stretch the stitches. Instead, press out excess water with a towel and reshape the hat while damp. This step is crucial for keeping the bunny ears perky and in the right shape.
Allow your hat to air dry flat on a clean surface. Avoid hanging it, as this can cause stretching. Once dry, lightly fluff it to restore its original texture.
If your bunny hat develops fuzz or pilling over time, gently remove it using a fabric shaver or small scissors. Always handle it carefully to avoid cutting the yarn itself.
Store your Crochet bunny hat in a cool, dry place away from direct sunlight to prevent fading. Placing it in a breathable fabric bag helps keep it dust-free.
With proper care, your handmade bunny hat will remain soft, cozy, and adorable—ready to be worn or gifted again and again.
Crochet Bunny Hat Tutorial
1. How long does it take to make a crochet bunny hat?
Depending on your skill level, it usually takes between 2 to 5 hours to complete. Beginners might take longer, especially when learning to shape the ears.
2. What type of yarn is best for a bunny hat?
Soft acrylic or cotton blend yarns work best. Choose lightweight yarns labeled as baby-safe if the hat is for children or infants.
3. Can I make the bunny hat without ears?
Absolutely! If you prefer a simpler design, you can skip the ears and just crochet a basic beanie.
4. How can I adjust the size for adults or babies?
To resize, use a smaller hook and fewer rounds for babies, or a larger hook and more rounds for adults.
5. Is this crochet project beginner-friendly?
Yes, this Crochet bunny hat tutorial is suitable for beginners. The stitches used are simple, and the pattern is easy to follow.
6. How do I keep the bunny ears from flopping too much?
You can insert a thin wire or pipe cleaner inside the ears for structure, or use a tighter stitch to help them stand up.
Creating your own Crochet bunny hat is a rewarding and joyful experience. This project blends creativity, craftsmanship, and comfort, resulting in a handmade piece that’s both adorable and functional. By following this Crochet bunny hat tutorial, you’ve learned how to select materials, crochet each part step by step, customize your design, and care for your finished hat.
Now that you’ve mastered the basics, it’s time to let your creativity run wild—try new colors, add decorations, or make matching sets for loved ones. I hope this guide helped you feel confident and inspired to start your next crochet project.
What did you think of this tutorial? Share your honest opinion and suggestions—I’d love to hear how your Crochet bunny hat turned out!