
How to Make a Scandinavian Star Ornament – Quilt Pattern is a creative and charming project that combines the beauty of quilting with the timeless appeal of Scandinavian design. These ornaments have become increasingly popular in modern crafting because they are not only decorative but also symbolic of warmth, coziness, and tradition. Whether you are a beginner or an experienced quilter, learning this technique offers you the chance to create something meaningful while exploring your love for fabric and design.
The Scandinavian star has a fascinating history rooted in Nordic traditions. For centuries, artisans have created stars from paper, fabric, or wood to celebrate winter holidays. When adapted into a quilt pattern, the star ornament becomes more than a seasonal decoration—it transforms into a keepsake that can be passed down through generations. This is why many crafters are searching for how to make a Scandinavian star ornament – quilt pattern tutorials that allow them to connect with tradition while expressing their creativity.
What makes this project special is its versatility. You can make a single star ornament to hang on your tree, or create a series of stars to form garlands, wall hangings, or even incorporate them into larger quilting projects. The key lies in selecting fabrics, cutting with precision, and assembling the star with care. With a little patience and practice, you will master the technique and enjoy the process of turning simple fabric strips into beautiful quilted stars.
Understanding the Scandinavian Star Ornament
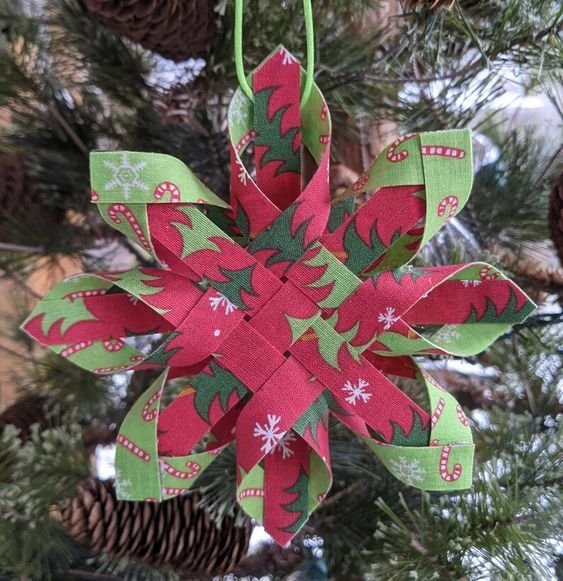
The first step in how to make a Scandinavian star ornament – quilt pattern is understanding what this ornament represents. At its core, the Scandinavian star is a folded design that creates dimension and symmetry. Unlike flat quilt blocks, this star has a three-dimensional effect that makes it stand out among other quilting projects.
Crafters often choose fabrics that highlight the Scandinavian aesthetic, which is known for minimalism, clean lines, and natural tones. You might select muted shades of white, gray, blue, or red to give your ornament a traditional feel. However, modern quilters sometimes use bold prints and bright colors to add a unique twist to the design. The beauty of quilting is that it allows you to adapt any pattern to your personal style.
One of the most appealing aspects of this project is that it requires minimal fabric. Small strips or even leftover pieces from other quilting projects can be repurposed to make the stars. This makes the craft economical, sustainable, and beginner-friendly. You can experiment without the pressure of wasting valuable materials, which makes it easier to perfect your technique.
Another important factor to consider is size. While most Scandinavian star ornaments are small enough to hang on a Christmas tree, you can scale the pattern up or down depending on your purpose. Larger stars can serve as festive wall decorations, while smaller ones can be used as gift toppers or embellishments on quilts. This adaptability is what makes the project suitable for so many creative applications.
Learning how to fold and assemble the strips properly is essential. Unlike flat quilt blocks, this ornament relies heavily on precision in folding and layering. If the fabric strips are not uniform, the star may lose its shape. That is why quilters often use cutting tools like rotary cutters and quilting rulers to ensure accuracy.
In the end, the Scandinavian star ornament captures the perfect balance between tradition and creativity. It allows you to explore quilting techniques while producing a piece that brings joy, whether used for decoration or gifted to a loved one.
Materials and Preparation
When diving into how to make a Scandinavian star ornament – quilt pattern, preparation is just as important as sewing. Having the right tools and materials will ensure that your ornament comes out neat and durable.
The primary material you will need is fabric. Cotton quilting fabric is the most recommended choice because it is easy to handle and folds neatly without slipping. Choose fabrics that complement each other, whether in matching tones or contrasting colors, to highlight the star design.
You will also need basic quilting tools. A rotary cutter, self-healing cutting mat, and quilting ruler are essential for cutting straight, even strips. Sharp scissors are also useful for trimming. These tools help you maintain consistency, which is crucial for achieving the star’s symmetry.
Thread is another key component. It should match or complement your fabric, ensuring the stitches blend seamlessly. Some crafters prefer invisible thread for a clean finish, while others use contrasting thread to add a decorative touch.
In addition to fabric and thread, you may want to use fusible interfacing. This gives extra structure to your strips, making it easier to fold and assemble the star. Interfacing is especially helpful if your chosen fabric is lightweight or prone to fraying.
Other items that can make the process smoother include fabric clips or pins to hold pieces in place, and an iron to press folds sharply. Pressing is often overlooked but plays a big role in how crisp and professional the finished ornament looks.
By preparing your materials in advance, you set yourself up for success. Crafting should be enjoyable, not stressful, and having everything ready before you start will allow you to focus on the creative aspects of making your Scandinavian star ornament.
Step-by-Step Instructions
Once you have gathered your materials, it is time to begin the exciting process of how to make a Scandinavian star ornament – quilt pattern. Follow these steps carefully to achieve the best results.
Start by cutting your fabric into strips of equal length and width. Precision here is key because uneven strips will lead to an unbalanced star. Beginners may want to start with wider strips, as they are easier to fold and handle.
Next, fold each strip lengthwise, pressing with an iron to create a sharp crease. Some crafters prefer to fold the raw edges inward first to prevent fraying. If you use fusible interfacing, this is the step where it becomes helpful, giving stability to the strips.
Arrange four strips horizontally and four vertically, weaving them together to form a square at the center. This interlocking base is the foundation of the Scandinavian star. Ensure the strips are aligned neatly and that the square is tight and secure.
From this base, you will fold and loop each strip outward, creating the star’s points. This step requires patience and careful folding to maintain symmetry. Clip or pin each point temporarily until all sides are complete.
Once all the points are folded, secure them with small stitches or a dab of fabric glue. Sewing ensures durability, especially if the ornament will be handled frequently. Press the final piece lightly with an iron to smooth out any wrinkles.
Finish your ornament by adding a ribbon or loop for hanging. You can sew or glue the ribbon to the back of the star, depending on your preference. Now your Scandinavian star is ready to be displayed or gifted as a handmade treasure.
Creative Variations and Uses
After mastering how to make a Scandinavian star ornament – quilt pattern, you can experiment with different creative variations. The basic technique remains the same, but the possibilities for customization are endless.
One option is to play with color schemes. Traditional Scandinavian colors like red, white, and blue are timeless, but you can also try festive holiday palettes such as green and gold, or even modern metallic fabrics for a contemporary look.
Another variation is to use patterned fabrics. Stripes, polka dots, or floral prints can add depth and texture to your star. Mixing solids with patterns creates contrast that makes the design more eye-catching.
You can also explore size variations. Smaller stars make excellent gift toppers, while larger ones can serve as centerpieces for holiday décor. By experimenting with proportions, you can create a collection of stars that serve multiple purposes.
Adding embellishments is another creative option. Beads, sequins, or embroidery stitches can enhance your star and give it a unique touch. This is particularly fun for crafters who enjoy blending quilting with other needlework techniques.
Beyond ornaments, the Scandinavian star can be incorporated into larger quilting projects. Imagine a quilt made of multiple stars, each representing a season or memory. This allows you to take a small decorative idea and expand it into a larger artistic piece.
Ultimately, the Scandinavian star ornament is as versatile as your imagination. Once you learn the basic pattern, you can make it truly your own, adapting it to your style, fabric stash, and creative vision.
What is a Scandinavian star ornament?
A Scandinavian star ornament is a folded design, often made from fabric or paper, that creates a symmetrical star shape. In quilting, it becomes a three-dimensional piece made with fabric strips.
Can I make this ornament as a beginner?
Yes, this project is beginner-friendly. With basic quilting tools and clear instructions, even new crafters can successfully create a Scandinavian star ornament.
What fabrics work best for this quilt pattern?
Cotton quilting fabric is the most recommended because it is sturdy, easy to handle, and folds neatly. However, other fabrics can be used if stabilized with interfacing.
Do I need a sewing machine?
Not necessarily. While sewing adds durability, you can also assemble the ornament with fabric glue if you prefer a no-sew method.
How long does it take to make one ornament?
On average, it takes about 30 to 60 minutes, depending on your experience and preparation. Beginners may take longer on their first attempt.
Can I wash the Scandinavian star ornament?
It is best to avoid machine washing, as the folds may lose shape. Instead, spot clean gently if needed.
Learning how to make a Scandinavian star ornament – quilt pattern is both rewarding and inspiring. This project combines tradition, creativity, and functionality in a way that few crafts can. With simple materials and clear steps, you can create ornaments that brighten your home, serve as heartfelt gifts, or become part of larger quilting projects.
Now that you have explored the history, materials, step-by-step instructions, and creative variations, you are ready to try making your own Scandinavian star. I would love to hear your thoughts: What did you think of this tutorial? Do you have suggestions, ideas, or personal experiences to share? Please leave your honest opinion and feedback so we can continue to inspire each other in the world of quilting.