
The Robin scarf, a granny square scarf pattern, is a timeless and versatile crochet project that blends tradition with creativity. For decades, crochet enthusiasts have cherished the charm of granny squares, and the idea of transforming them into a scarf makes the project both stylish and practical. Whether you are a beginner just learning how to join motifs or an experienced crocheter looking for a relaxing project, this scarf offers the perfect balance of skill and enjoyment.
Crocheting a granny square scarf is more than just creating an accessory; it is about embracing the heritage of crochet. Each square tells a story, and when joined together, they form a piece that is warm, colorful, and full of character. The Robin scarf highlights this tradition while giving you room to experiment with yarn types, color palettes, and textures that match your personal taste.
In addition, working on the Robin scarf, a granny square scarf pattern, is an excellent way to use leftover yarn, making it an eco-friendly project. The repetitive stitches provide a sense of mindfulness and relaxation, while the final product becomes a functional piece of art. Before diving into the steps and variations, let’s explore the reasons why this pattern remains one of the most loved crochet projects.
The Appeal of the Robin Scarf
The Robin scarf stands out because it combines simplicity and beauty. Granny squares are usually made up of double crochet stitches arranged in rounds, which makes them easy to learn and repeat. Even those who are new to crochet can quickly understand the pattern and produce a square that feels rewarding. When these squares are stitched together into a scarf, the result is both striking and wearable.
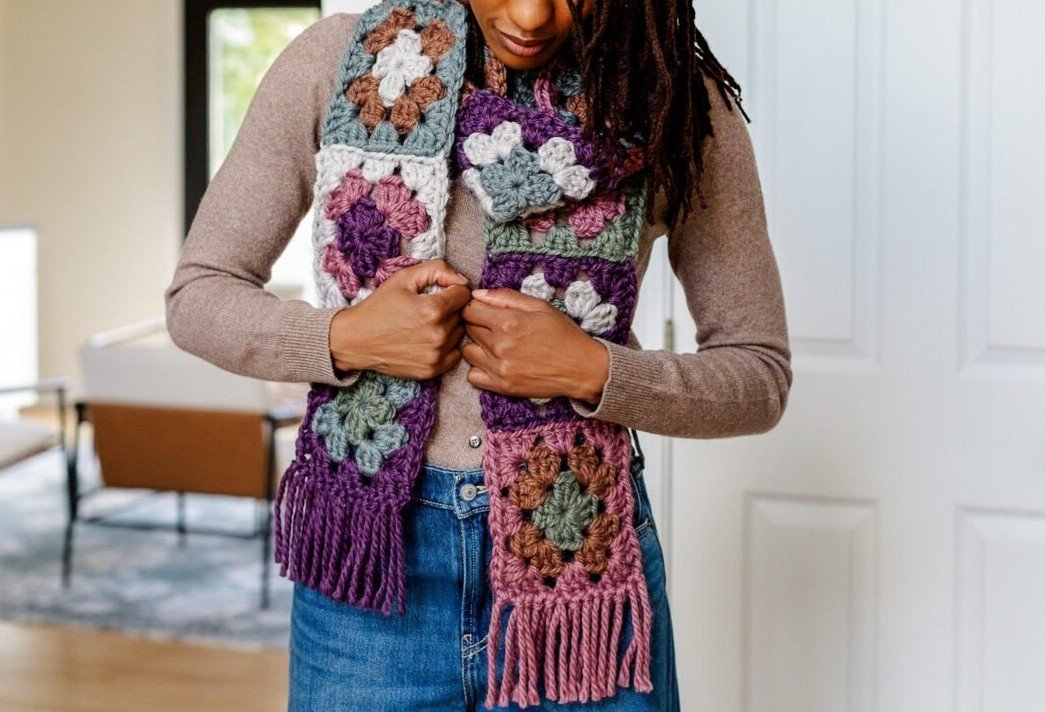
One of the main appeals of this pattern is its versatility. You can make your Robin scarf with a bold, vibrant color scheme for a modern look or choose muted, earthy tones for something classic and understated. This flexibility makes the scarf suitable for different ages, styles, and occasions. It can be a thoughtful handmade gift or a personal wardrobe staple.
Another reason the Robin scarf, a granny square scarf pattern, is so popular is its portability. Each square is small enough to carry around, meaning you can work on your scarf while traveling, during breaks, or in cozy moments at home. Unlike large crochet projects that demand space and time, granny squares allow you to enjoy short bursts of creativity.
The scarf also invites customization. Some crafters enjoy adding tassels or fringes to the ends, while others prefer a neat, simple finish. You can choose yarns with different textures, such as cotton for a lightweight summer scarf or wool for extra warmth in the winter. The freedom to adapt the Robin scarf to different needs keeps it fresh and exciting.
From a fashion perspective, this scarf can be styled in multiple ways. Wrap it around your neck for a cozy look, drape it loosely for elegance, or tie it in unique knots for a playful twist. Its handmade charm makes it stand out from mass-produced accessories.
Ultimately, the Robin scarf is more than just a crochet item. It represents creativity, tradition, and a sense of accomplishment. Whether you are making it for yourself or for someone special, the scarf becomes a treasured piece that reflects your effort and artistry.
How to Make the Granny Squares
To create the Robin scarf, a granny square scarf pattern, the first step is mastering the basic granny square. This iconic motif is formed by working stitches in the round, starting from the center and gradually expanding outward. Typically, a combination of chain stitches and double crochet stitches creates the square’s distinctive shape.
You will need a crochet hook that matches your chosen yarn and a comfortable workspace with good lighting. Start with a slip knot and chain four, then join into a ring. This tiny circle becomes the foundation of your granny square. From here, you will build clusters of double crochets separated by chains, which give the square its structure.
Most traditional granny squares are made with four rounds, but you can adjust the size depending on how bold or delicate you want the Robin scarf to appear. Some crocheters prefer smaller squares for a more intricate design, while others enjoy larger squares that create a bold statement.
Choosing colors is one of the most enjoyable parts of this process. Many people like to switch yarn colors in each round to create a vibrant, patchwork-style scarf. Others may prefer a monochrome approach, where each square is identical, creating a sleek and uniform accessory. Whatever you choose, the colors bring personality to your Robin scarf.
After completing your squares, weave in the yarn ends to keep your work neat and polished. This step might seem tedious, but it ensures that your scarf looks professional and lasts for years. Remember that attention to detail makes a big difference in handmade items.
Once your squares are finished, it’s time to think about assembly. You can join the squares using whip stitch, slip stitch, or crochet join techniques, depending on the look you want. Each method adds its own charm, so take time to experiment before finalizing your approach.
Assembling and Finishing the Robin Scarf
When it comes to joining granny squares, the method you choose will define the overall look of your Robin scarf. A whip stitch seam provides a clean finish, while a slip stitch join adds texture and definition. Crocheted joins can even become decorative elements that enhance the design.
Lay out your squares before joining to decide on the arrangement. You might prefer a random color placement for a playful look, or a symmetrical pattern for a balanced design. Planning ahead helps ensure your scarf turns out exactly as you envision.
As you assemble the scarf, make sure your stitches are consistent and even. This step requires patience, but it pays off in the final product. A well-joined Robin scarf will not only look beautiful but will also be durable enough for daily wear.
Adding finishing touches makes the scarf uniquely yours. Consider crocheting a border around the entire piece for a polished look. Borders can be simple, such as a single row of single crochet stitches, or more elaborate with scallops or picot designs.
Tassels, pom-poms, or fringes can be added to the ends of your Robin scarf for extra flair. These details transform the accessory from a simple scarf into a statement piece. They also give you a chance to use up small amounts of leftover yarn in creative ways.
Finally, block your scarf to ensure it lays flat and looks its best. Blocking involves gently washing and shaping the crochet fabric, allowing the stitches to settle evenly. This last step brings out the beauty of your work and ensures that your Robin scarf is ready to wear or gift.
Tips for Styling and Caring for Your Robin Scarf
Once your Robin scarf, a granny square scarf pattern, is complete, the fun continues as you learn how to style and care for it. Because granny square scarves are full of texture and color, they can easily become the focal point of an outfit. Pair them with neutral clothing to let the scarf shine, or mix them with other patterns for a bold and eclectic look.
When styling, experiment with different ways of draping the scarf. A single wrap around the neck adds warmth and coziness, while letting it hang loose adds elegance. For a bohemian vibe, tie it casually or layer it with other accessories. The Robin scarf adapts effortlessly to different outfits and occasions.
Caring for your handmade scarf is essential to maintain its beauty. Most yarns benefit from gentle hand washing in cool water with mild detergent. Avoid wringing the fabric, as it can distort the stitches. Instead, press gently with a towel to remove excess water.
Dry your scarf flat to preserve its shape. Hanging it might stretch the fabric, especially if it’s made from heavy yarn. Once dry, fold it carefully and store it in a cool, dry place. This will keep your Robin scarf looking fresh for many years.
If your scarf develops loose ends or snags, repair them promptly. Using a crochet hook to pull the yarn back into place prevents further unraveling. Taking care of small details ensures that your scarf stays as beautiful as the day you made it.
Lastly, remember that handmade items carry sentimental value. The Robin scarf is not just an accessory but a piece of your creativity and effort. Wearing it with pride or gifting it to someone special adds emotional significance to its charm.
What is the Robin scarf?
The Robin scarf is a crochet accessory made using the classic granny square pattern, where small motifs are joined together to form a unique and stylish scarf.
Is the Robin scarf beginner-friendly?
Yes, the Robin scarf, a granny square scarf pattern, is perfect for beginners because it uses basic stitches and allows practice in making and joining squares.
What materials do I need to make a Robin scarf?
You will need yarn, a crochet hook suitable for the yarn weight, scissors, a yarn needle for weaving ends, and optionally blocking tools for finishing.
How long does it take to make the Robin scarf?
The time depends on your speed and the number of squares needed, but many crocheters can complete the project in a few days to a couple of weeks.
Can I customize the Robin scarf?
Absolutely. You can adjust colors, square sizes, yarn textures, and even add fringes or borders to personalize your scarf.
How do I wash my Robin scarf?
Hand wash in cool water with mild detergent, gently press out water, and dry flat to maintain shape and quality.
The Robin scarf, a granny square scarf pattern, is a project that blends tradition, creativity, and practicality. From making individual squares to assembling and styling, every step allows you to express your unique taste while enjoying the meditative rhythm of crochet. This accessory not only warms the body but also carries the heartfelt charm of handmade craftsmanship.
I hope this article has inspired you to create your own Robin scarf and explore the beauty of granny square projects. What are your thoughts on this timeless pattern? I’d love to hear your honest opinion and suggestions to make this guide even more helpful.