
A quilted sleeping bag tutorial is one of the most practical and creative guides for anyone who loves sewing, quilting, or simply enjoys making their own outdoor gear. Learning how to create a quilted sleeping bag at home not only saves money but also gives you the opportunity to personalize the design, materials, and warmth level according to your preferences. Whether you are preparing for a camping trip, a cozy night at home, or crafting a gift for a loved one, this tutorial will walk you through the essentials of quilting a sleeping bag from scratch.
The process of making a quilted sleeping bag combines the comfort of traditional quilts with the functionality of portable bedding. By following a quilted sleeping bag tutorial, you gain valuable sewing skills and a unique piece that reflects your personality. Unlike store-bought sleeping bags, handmade quilted versions allow for creative fabric choices, custom sizing, and the use of eco-friendly materials. This is especially appealing for people who want to ensure their outdoor gear is both stylish and practical.
In this detailed article, you will learn everything from choosing the right fabrics and batting to assembling layers, sewing techniques, and finishing touches. We will explore the tools you need, the step-by-step method to assemble your quilted sleeping bag, and the best tips to ensure durability. You will also find answers to the most frequently asked questions and a helpful conclusion to inspire your next project.
Choosing Fabrics and Materials
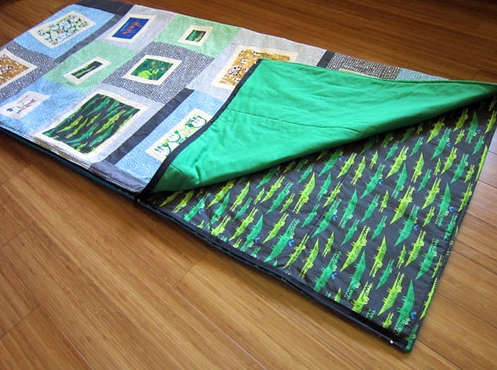
When starting your quilted sleeping bag tutorial, the first step is to carefully choose the fabrics. Selecting durable and comfortable materials makes all the difference in creating a sleeping bag that is both practical and long-lasting. Natural fibers such as cotton are breathable and easy to quilt, while synthetic options provide extra insulation and water resistance.
The inner lining of your quilted sleeping bag should feel soft against the skin. Lightweight flannel, brushed cotton, or soft microfiber fabrics work very well for comfort. For the outer shell, consider using water-resistant nylon or polyester to protect against damp ground or moisture during outdoor use. Balancing softness inside with durability outside ensures the sleeping bag meets multiple needs.
Batting is another essential component. This insulating layer determines how warm your quilted sleeping bag will be. Thicker batting provides excellent insulation for colder weather, while lighter options are better for summer use. Always consider the climate and purpose of your sleeping bag when choosing batting.
In addition to fabric and batting, gather strong polyester thread, a reliable sewing machine, and quilting pins or clips. These tools help ensure smooth stitching and secure layers. Choosing high-quality thread prevents breakage during sewing and ensures the seams remain intact even after multiple washes.
Zippers are another crucial material. A long zipper along the side and bottom allows the sleeping bag to be fully opened into a flat quilt or closed tightly for warmth. Select a heavy-duty zipper that can withstand repeated use without breaking. Some makers even add snaps or Velcro for extra security.
Lastly, do not forget optional extras such as a drawstring hood, storage bag, or patch pockets. These details can make your project more functional and personalized. Taking time in this stage sets the foundation for a beautiful and useful quilted sleeping bag.
Step-by-Step Sewing Process
After gathering your materials, the next stage of the quilted sleeping bag tutorial is the sewing process. This step requires patience and attention to detail, but it is also the most rewarding part where your materials come together.
Start by cutting your chosen fabrics and batting to the desired size. Most adult sleeping bags measure around 75 inches long and 30 inches wide, but you can adjust these dimensions depending on your needs. Always add extra fabric for seam allowances when cutting.
Layering comes next. Place the outer fabric right side down, followed by the batting, and then the inner lining right side up. Pin or clip the layers together securely to prevent shifting while sewing. A walking foot attachment on your sewing machine can help keep the layers aligned.
Begin quilting the layers together. You can use straight-line quilting, diagonal patterns, or free-motion quilting depending on your preference and skill level. Quilting not only secures the batting but also adds texture and design to your sleeping bag. Even simple quilting lines can make the finished product look professional.
Once the quilting is complete, it’s time to sew the edges. Leave one long side open for the zipper installation. Carefully sew the zipper along the side and bottom, ensuring it functions smoothly without catching fabric. Take your time with this step, as the zipper is one of the most important features of your sleeping bag.
Finally, finish the raw edges with bias tape or by folding and stitching them neatly. This prevents fraying and gives the sleeping bag a polished appearance. With this step done, your handmade quilted sleeping bag is nearly complete.
Customization and Design Ideas
One of the best aspects of following a quilted sleeping bag tutorial is the freedom to customize your project. Unlike store-bought sleeping bags, homemade versions allow you to experiment with patterns, colors, and creative details.
Fabric selection is the first area where customization shines. You can choose playful prints for children, elegant patterns for adults, or even patchwork designs that reuse leftover fabric. Quilters often enjoy combining traditional quilting blocks with modern colors to create unique pieces.
Adding appliqué designs or embroidery is another way to personalize your sleeping bag. Whether it’s a name, initials, or decorative motif, these small details make your project feel truly one-of-a-kind. Embellishments also transform a practical item into a meaningful gift.
The quilting pattern itself can also serve as a design element. Straight-line quilting gives a clean and modern look, while more intricate stitching creates texture and visual interest. Experimenting with different quilting styles adds character to the final product.
You can further customize the functionality by adding pockets to hold small items, or a drawstring hood to keep warmth in during cold nights. Some makers even sew in lightweight straps for easy carrying when traveling. These small upgrades enhance usability.
Finally, consider color coordination for zippers and bindings. Matching or contrasting colors give your sleeping bag a professional touch. Even a small detail, such as a bright zipper against neutral fabric, can make your design stand out. Customization is where creativity meets functionality, and it’s what makes handmade projects so enjoyable.
Care and Maintenance Tips
Completing your quilted sleeping bag tutorial is exciting, but knowing how to care for it ensures it lasts for years. Handmade sleeping bags require gentle maintenance to preserve fabric, stitching, and insulation.
Start by always reading the fabric care instructions before washing. Most quilted sleeping bags can be machine washed on a gentle cycle with mild detergent. Avoid bleach or harsh chemicals that can damage fibers and weaken stitching.
Drying your sleeping bag properly is equally important. Air drying is the best method, as it prevents shrinking and keeps the batting evenly distributed. If you must use a dryer, choose a low heat setting and add clean tennis balls to help fluff the batting.
Storing your quilted sleeping bag correctly also extends its life. Avoid compressing it tightly for long periods, as this can flatten the insulation. Instead, store it in a breathable cotton bag or hang it in a dry place. Proper storage keeps it fresh and ready for the next use.
If your sleeping bag develops minor tears or loose threads, repair them promptly. Simple stitches or fabric patches can prevent damage from spreading. Maintaining the zipper by occasionally applying zipper wax or graphite also ensures smooth operation.
Regular inspections are helpful, especially if you use the sleeping bag outdoors. Check for signs of moisture, mold, or insect damage. A little care and attention go a long way in keeping your handmade project in excellent condition.
By following these maintenance tips, your quilted sleeping bag will stay comfortable, warm, and beautiful for many years. This makes the time and effort you invested in making it even more worthwhile.
What materials do I need for a quilted sleeping bag tutorial?
You will need outer fabric, inner lining, batting for insulation, strong thread, a zipper, and basic sewing tools such as pins, scissors, and a sewing machine.
Can beginners follow a quilted sleeping bag tutorial?
Yes, beginners can successfully complete this project by starting with simple quilting techniques and carefully following each step. Patience and practice are key.
How long does it take to make a quilted sleeping bag?
Depending on your sewing skills and design complexity, it may take anywhere from a weekend to a full week to complete the project.
What is the best batting for a quilted sleeping bag?
Polyester batting is lightweight and insulating, making it great for camping. Cotton batting is breathable and soft, better for indoor use.
Can I wash a quilted sleeping bag in a machine?
Yes, most can be machine washed on a gentle cycle with mild detergent. Always air dry or tumble dry on low heat to protect the batting.
Is it possible to make a quilted sleeping bag for children?
Absolutely. You can adjust the size, choose fun fabrics, and even add extra features like pockets or hoods to make it more appealing for kids.
This quilted sleeping bag tutorial has shown you how to choose the right fabrics, assemble layers, customize designs, and care for your finished project. Creating a quilted sleeping bag is not only practical but also deeply rewarding, giving you a chance to combine creativity with functionality.
Now that you’ve learned the process step by step, we’d love to hear your opinion. What did you think of this tutorial, and what suggestions do you have for future projects? Share your thoughts and inspire others who are ready to begin their own quilting journey.