
Creating a CROCHET TEDDY BEAR SCARF FOR CHILDREN (STEP BY STEP) is a wonderful project that blends creativity, warmth, and fun into one piece. This adorable scarf is not only practical for keeping children cozy during chilly days but also adds a playful touch that kids will love. The design combines the softness of yarn with the charm of a teddy bear, making it an accessory children are excited to wear.
When you choose to make a crochet teddy bear scarf, you are working on more than just a piece of clothing; you are crafting a memory. Handmade items carry a personal touch that mass-produced clothing simply cannot replicate. This project is perfect for parents, grandparents, or anyone who loves to crochet and wants to gift something meaningful and unique to a child.
Another great aspect of learning how to make a CROCHET TEDDY BEAR SCARF FOR CHILDREN (STEP BY STEP) is that it can be tailored to any child’s favorite colors or preferences. From neutral tones for a classic look to bright playful hues that match a child’s personality, the options are endless. With some patience and creativity, you can make a scarf that is not only functional but also a favorite accessory for your little one.
Choosing the Right Materials for the Crochet Teddy Bear Scarf
The success of your CROCHET TEDDY BEAR SCARF FOR CHILDREN (STEP BY STEP) begins with selecting the best yarn. A soft, hypoallergenic yarn is ideal, as children’s skin can be sensitive. Cotton and acrylic blends are usually the most comfortable choices. These materials are not only soft but also durable, making them suitable for everyday wear.
You will also need to select a crochet hook that matches the thickness of your chosen yarn. Using the correct hook size ensures that your stitches are even and the scarf feels comfortable. Typically, a 4mm to 5mm hook works well for medium-weight yarn. Always check the yarn label for recommendations to achieve the best results.
Color selection is another important step. For a child’s scarf, you might consider cheerful colors like pastel pink, baby blue, sunshine yellow, or a combination of multiple shades. These shades give the crochet teddy bear scarf a playful appearance that children adore. Neutral colors like beige, gray, or cream can create a timeless look that matches more outfits.
In addition to yarn and hooks, don’t forget the small details such as safety eyes or embroidery floss for the teddy bear’s face. These features bring the bear to life and add character to the scarf. Make sure all attachments are child-safe, avoiding small pieces that could be a choking hazard.
Finally, a pair of scissors, a yarn needle, and stitch markers will make the crafting process smoother. Having the right tools at hand ensures that you can work comfortably and efficiently while following the step by step crochet teddy bear scarf instructions.
With all your materials prepared, you’re ready to move on to the exciting part: creating the scarf base that will hold the teddy bear design.
Step by Step Guide to Crocheting the Scarf Base
The base of the CROCHET TEDDY BEAR SCARF FOR CHILDREN (STEP BY STEP) is simple yet essential. Begin by chaining enough stitches to reach the desired length of the scarf. For children, a typical scarf length is between 90 to 120 centimeters, depending on their age and height.
Once your chain is ready, work single crochet stitches along the foundation row. Continue to crochet back and forth in rows until the scarf reaches the width you want. A width of 10 to 15 centimeters is usually comfortable for children and provides enough space for the teddy bear features.
As you build the base, ensure that your stitches are tight enough to keep the scarf warm but not so tight that the fabric becomes stiff. The goal is to create a scarf that drapes nicely and feels cozy when worn.
Experimenting with stitch patterns can add variety to your design. For example, alternating between rows of single crochet and double crochet can create an interesting texture. However, if you are a beginner, sticking to simple stitches will still produce a beautiful result.
Make sure to check the scarf length as you progress. Children grow quickly, so leaving a little extra length is often a good idea. That way, the crochet teddy bear scarf can be used for more than one season.
When the scarf base is complete, fasten off your yarn neatly and prepare to add the teddy bear embellishments that will transform the scarf from plain to playful.
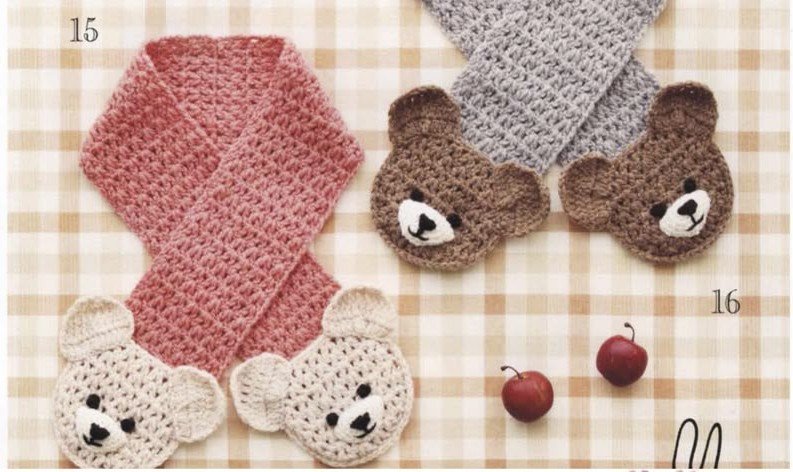
Adding the Teddy Bear Features
The most delightful part of the CROCHET TEDDY BEAR SCARF FOR CHILDREN (STEP BY STEP) is adding the teddy bear elements. These features give the scarf personality and charm, making it more than just an accessory.
Start with the teddy bear’s head, which can be crocheted separately as a round piece. Use basic amigurumi techniques to create a circular shape. Once complete, you can stitch it securely to one end of the scarf.
Next, crochet two small circles for the ears and attach them to the top of the bear’s head. Position them symmetrically to give the bear a balanced look. These small details bring the design to life and make the scarf extra adorable.
For the eyes, you can either use safety eyes or embroider them with black yarn. Embroidered eyes are recommended for young children to avoid any risk of loose parts. A small stitched nose and mouth complete the bear’s friendly expression.
Some designs also include teddy bear paws at the other end of the scarf. These can be crocheted as small oval shapes and attached to give the impression that the bear is hugging the child while wearing the scarf.
Finally, consider adding a little bow or scarf around the teddy bear’s neck for an extra cute touch. This decoration allows you to personalize the design even further and match it with the child’s favorite colors.
Once the teddy bear features are finished, your scarf is almost ready for a final review and adjustments.
Finishing Touches and Care Instructions
After completing the CROCHET TEDDY BEAR SCARF FOR CHILDREN (STEP BY STEP), it’s important to check the piece thoroughly. Look for any loose ends and weave them in securely using a yarn needle. This ensures the scarf is durable and can withstand regular use.
Give the scarf a gentle wash before gifting or using it. Hand washing with mild soap is recommended to preserve the softness of the yarn and maintain the teddy bear’s shape. Lay it flat to dry to avoid stretching.
If you plan to give the scarf as a gift, consider wrapping it in tissue paper or placing it in a gift box. A handmade crochet teddy bear scarf is not only functional but also a thoughtful present that will be cherished.
Teaching children how to care for their scarf is also important. Encourage them to keep it clean and fold it neatly after use. This helps the scarf last longer and keeps it looking fresh.
Another tip is to store the scarf in a dry place away from direct sunlight when not in use. Proper storage prevents the yarn from fading and keeps the scarf in excellent condition.
Finally, don’t be afraid to make variations in future projects. Once you’ve mastered the step by step crochet teddy bear scarf, you can experiment with different animals or characters, creating a collection of scarves that children will adore.
About Crochet Teddy Bear Scarf for Children
1. How long does it take to make a crochet teddy bear scarf for children?
It depends on your skill level and the complexity of the design. On average, it may take 6 to 10 hours spread over a few days.
2. What is the best yarn for making a crochet teddy bear scarf?
Soft, hypoallergenic yarn such as cotton or acrylic blends works best for children, ensuring comfort and durability.
3. Can beginners make a crochet teddy bear scarf?
Yes, beginners can follow a step by step crochet teddy bear scarf tutorial using basic stitches. The project is simple enough with practice.
4. How do I make the teddy bear face safe for young children?
Instead of plastic eyes or buttons, embroider the eyes and nose with yarn to avoid choking hazards.
5. What size should the scarf be for children?
A good length is between 90 to 120 centimeters, with a width of 10 to 15 centimeters, depending on the child’s age.
6. Can I customize the scarf with different animals instead of a teddy bear?
Absolutely! Once you master the technique, you can adapt the design to create scarves featuring bunnies, cats, dogs, or any animal your child loves.
The CROCHET TEDDY BEAR SCARF FOR CHILDREN (STEP BY STEP) is more than a project; it is a heartfelt gift filled with warmth, creativity, and love. By carefully selecting materials, following the step by step guide, and adding charming teddy bear details, you can create an accessory that children will treasure.
Now that you have learned how to make this adorable scarf, I’d love to hear your thoughts. What did you enjoy most about this tutorial, and what suggestions do you have for making it even better? Share your opinion and ideas—I look forward to your feedback!