
The Snow in the Forest Quilt Pattern is a timeless design that combines the serenity of winter landscapes with the warmth and creativity of quilting. This pattern is perfect for quilters who want to capture the peaceful beauty of snow falling gently across a forest backdrop. Using soft fabrics, crisp whites, and nature-inspired tones, the Snow in the Forest Quilt Pattern brings a cozy yet elegant touch to any home. It’s not only a delightful project to make but also an heirloom-quality piece you’ll treasure for years.
Quilting with the Snow in the Forest Quilt Pattern offers endless opportunities for personalization. Whether you are inspired by snowy pines, woodland cabins, or frosty mornings, this pattern lets you bring nature into your fabric art. It works well in both traditional and modern quilt styles, making it versatile for quilters of all backgrounds. Beginners may find it a wonderful way to practice piecing and color balance, while advanced quilters can experiment with detailed embellishments and advanced stitching.
As with any quilting project, planning is key. Before starting the Snow in the Forest Quilt Pattern, it’s important to select fabrics that highlight the snowy effect and forest theme. Soft whites, icy blues, deep greens, and earthy browns are excellent choices. Adding textured fabrics, such as flannels or batiks, can enhance the feeling of depth in the quilt. With the right preparation and imagination, this pattern transforms from simple pieces of fabric into a stunning quilt full of winter magic.
Understanding the Snow in the Forest Quilt Pattern
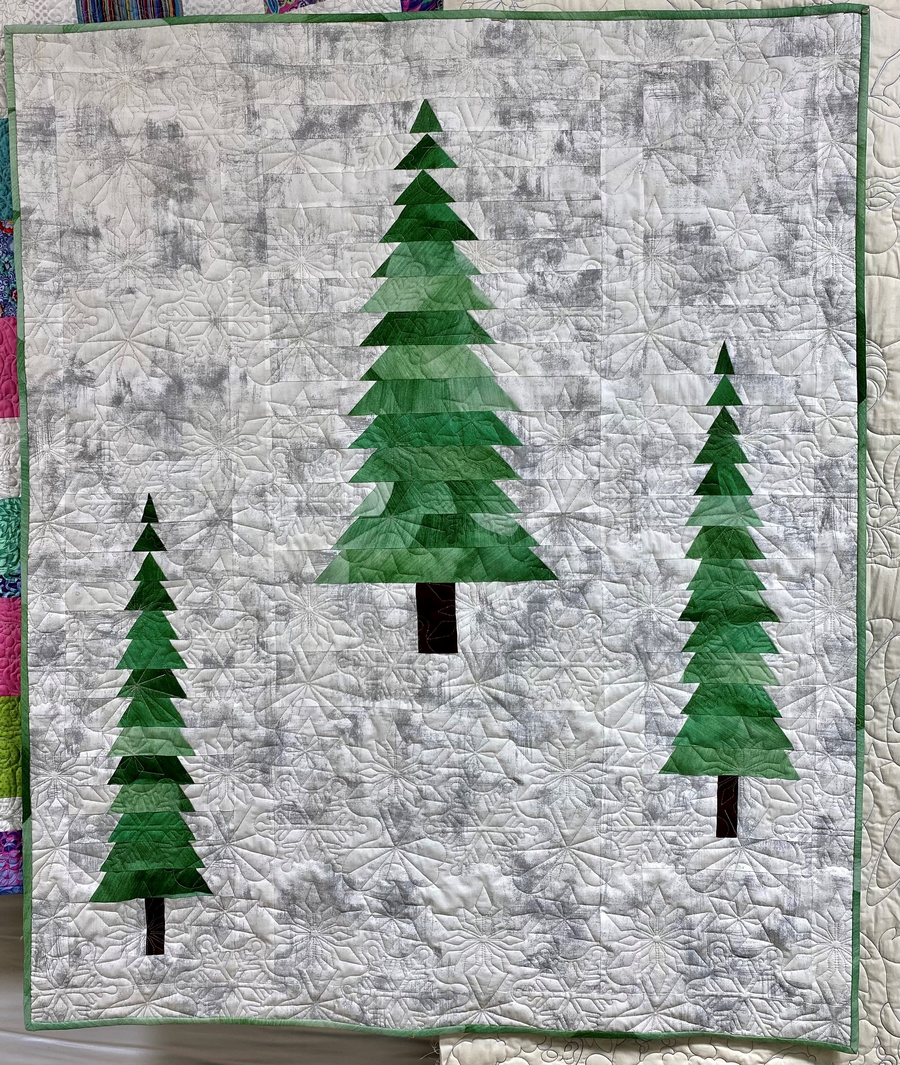
The Snow in the Forest Quilt Pattern is built around the idea of capturing a natural scene within a quilt. Unlike generic geometric patterns, this design reflects the tranquility of snow-covered landscapes. Many versions of this pattern include triangular shapes that mimic trees, while others use appliqué or embroidery to depict forest elements.
One of the most charming aspects of this pattern is its adaptability. You can create a quilt that looks realistic, resembling pine trees dusted with snow, or take a more abstract approach with geometric tree shapes. Both styles keep the spirit of the Snow in the Forest Quilt Pattern alive, offering room for creativity.
Color placement is critical in this design. White or cream fabrics are often used to represent snow, while green shades symbolize the forest. Adding subtle grays or blues creates the effect of shadows on the snow, giving your quilt depth and movement. Choosing fabric wisely ensures the quilt looks balanced and visually pleasing.
The Snow in the Forest Quilt Pattern also serves as a wonderful teaching tool for learning techniques like half-square triangles and strip piecing. These methods are commonly used to construct the trees and snowy sections. Practicing these techniques builds confidence for future quilting projects.
Beyond the technical aspects, this quilt pattern carries symbolic meaning. Forests often represent peace, growth, and natural beauty, while snow symbolizes purity and calmness. By combining these two themes, the quilt tells a story that resonates deeply with many quilters and recipients alike.
Finally, the Snow in the Forest Quilt Pattern can be tailored to different seasons. While it’s often seen as a winter quilt, using lighter fabrics in pastel greens and soft grays can create a springtime version. This flexibility makes the pattern enjoyable year-round.
Materials and Tools Needed
Before starting your Snow in the Forest Quilt Pattern, gathering the right materials and tools is essential. High-quality fabrics form the foundation of the quilt. Cotton is the most common choice because it is durable, easy to work with, and widely available in a variety of prints and shades.
Choosing fabrics in complementary colors helps bring out the snowy forest theme. For instance, pairing crisp whites with deep evergreen fabrics immediately gives the feeling of a winter forest. Adding small prints, like snowflakes or subtle textures, can also add interest without overwhelming the design.
Equally important is the batting you select. For a quilt inspired by winter, many quilters prefer a medium- to high-loft batting to create warmth and a cozy texture. The batting gives the quilt dimension, making the snow sections look puffy and soft.
Tools like rotary cutters, quilting rulers, and cutting mats are crucial for achieving precise shapes. Because this pattern often uses triangles or angular cuts to create tree-like shapes, accuracy in cutting ensures your quilt pieces align perfectly during assembly.
Thread choice should not be overlooked. Using a thread color that blends with your fabrics helps maintain a seamless look. For quilting stitches, you may choose neutral tones or go bold with contrasting threads to highlight the snowy design.
Lastly, you’ll need a reliable sewing machine and basic hand-sewing tools. While most of the quilt can be assembled by machine, hand-stitching the binding or adding decorative embroidery can provide a special, personal touch to your Snow in the Forest Quilt Pattern.
Step-by-Step Quilting Process
Starting the Snow in the Forest Quilt Pattern involves preparing your fabric. Wash, dry, and press all fabrics before cutting to prevent shrinkage and distortion later. Preparation ensures your quilt maintains its shape and durability over time.
The first step in construction is cutting your shapes. Most designs require triangles or rectangles to form tree-like patterns. Using a rotary cutter and quilting ruler helps achieve sharp, accurate edges. Keep your fabric pieces organized in labeled stacks for smooth progress.
Next, begin piecing the tree blocks. Depending on the version of the pattern, you may use half-square triangles or appliqué to create the tree shapes. Consistency in seam allowances is essential, as even slight variations can distort the final layout.
Once the tree blocks are complete, assemble the snowy background. Whites and creams should be evenly distributed to represent snow across the quilt. Adding light blues or grays at random can mimic the effect of shadows, giving the quilt depth and realism.
After assembling the blocks, sew them together row by row. Pressing each seam as you go ensures your quilt top lies flat. At this stage, you’ll see the forest design come together, with trees standing out against the snowy backdrop.
The final steps include layering the quilt top, batting, and backing fabric. Once layered, secure the quilt using basting pins or spray. Then quilt through all layers, either with straight-line stitching to keep the design clean or free-motion quilting for added texture. Finish with a binding around the edges for a polished look.
Tips for Customizing Your Quilt
One of the joys of working with the Snow in the Forest Quilt Pattern is the ability to customize it. By altering color choices, you can shift the quilt’s overall mood. For a traditional winter feel, stick with whites and greens. For a more modern look, try grays, silvers, and metallic fabrics.
Adding embellishments is another way to personalize your quilt. Small appliqué snowflakes, embroidered stars, or even beadwork can give your quilt sparkle and texture. These details transform a simple quilt into a truly unique masterpiece.
The size of your quilt is also flexible. You can create a wall hanging, a throw-size quilt, or a full bedspread. Adjusting the number of blocks or the size of the pieces allows the Snow in the Forest Quilt Pattern to fit any purpose.
Experimenting with quilting techniques can also add individuality. Straight-line quilting emphasizes simplicity, while swirly free-motion stitches can resemble falling snow or blowing wind. Each method brings a different personality to the quilt.
Consider incorporating memory fabrics into your quilt. Using scraps from old clothes, curtains, or linens can add sentimental value, turning your Snow in the Forest Quilt Pattern into a family keepsake.
Lastly, think about the quilt’s function. If it will be a gift, choose colors and textures that reflect the recipient’s taste. If it’s for holiday decor, lean into festive fabrics that bring out the warmth and joy of the season.
Q: Is the Snow in the Forest Quilt Pattern suitable for beginners?
A: Yes, beginners can attempt this pattern. While some blocks may require practice, it’s a great way to learn basic piecing and fabric coordination.
Q: What fabrics work best for this quilt?
A: High-quality cotton fabrics are ideal. Choose whites for snow, greens for trees, and complementary shades like grays or blues for shadows.
Q: Can I make this quilt in a different size?
A: Absolutely. By adjusting the block size or the number of blocks, you can create anything from a wall hanging to a king-size quilt.
Q: Do I need special tools for this quilt?
A: Standard quilting tools like rotary cutters, rulers, and a sewing machine are sufficient. Embellishments may require embroidery needles or beads.
Q: How do I quilt the layers together?
A: You can use straight-line quilting for simplicity or free-motion quilting for added texture. Both methods work well with the Snow in the Forest Quilt Pattern.
Q: What makes this quilt pattern unique?
A: Its combination of snowy whites and forest greens creates a nature-inspired design that feels peaceful, timeless, and customizable.
The Snow in the Forest Quilt Pattern is more than just a project—it’s a way to capture the beauty of nature and the serenity of winter in fabric form. From selecting fabrics and piecing tree blocks to quilting the snowy background, every step allows for creativity and skill-building. The pattern offers versatility, making it perfect for beginners and advanced quilters alike.
By following the steps outlined and experimenting with customization, you can create a quilt that reflects your personal style and tells a story through fabric. Whether displayed during the winter months or treasured year-round, this quilt becomes a symbol of warmth, creativity, and comfort.
I’d love to hear your thoughts about this project. Have you tried making the Snow in the Forest Quilt Pattern, or are you planning to start? Share your honest opinions and suggestions so we can inspire and learn from each other in the quilting community.