
The Eight-pointed Rotating Star Block Tutorial is a fantastic starting point for anyone looking to expand their quilting skills with a block that is both visually striking and versatile. This block, with its elegant geometry and dynamic appearance, has been loved by quilters for decades. Its shape instantly draws attention, creating a focal point in any quilt design.
In this tutorial, we will explore how to create this timeless block, while also sharing tips that make the process more enjoyable and efficient. Quilting is more than just piecing fabric together—it is about telling a story through shapes, colors, and stitches. By following this guide, you will gain confidence in sewing precise points, handling symmetry, and mastering an iconic design that looks advanced but is approachable with practice.
Whether you are a beginner aiming to challenge yourself with a new project or an experienced quilter searching for a block to elevate your quilt’s aesthetic, this Eight-pointed Rotating Star Block Tutorial will serve as your go-to resource. Let’s dive into the process and learn how to make this block shine in your next quilting project.
Understanding the Eight-pointed Rotating Star Block
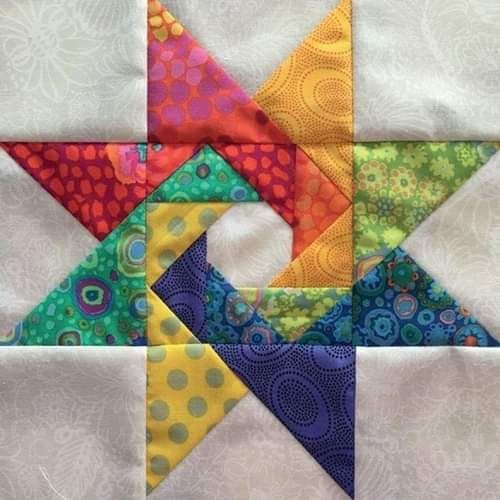
The Eight-pointed Rotating Star Block is often admired for its symmetry and the sense of movement it conveys. The eight points radiate outward, giving the impression of a star spinning in motion, making it a unique choice for traditional and modern quilts alike.
This block is built on precise angles, and attention to measurement is key. While the design may look complex, it can be broken down into manageable sections that, when assembled, create the iconic rotating effect. The careful alignment of pieces is what makes the star look sharp and professional.
One of the best aspects of this block is its flexibility. You can make it bold with contrasting fabrics or soft and subtle with tone-on-tone shades. Each fabric choice transforms the look entirely, allowing quilters to experiment endlessly.
The block has deep roots in quilting history, often appearing in heirloom quilts passed down through generations. Its timeless appeal makes it a perfect blend of tradition and creativity.
By mastering this block, you are not just learning a single design—you are unlocking a skill set that will carry into many other quilting projects. Precision, patience, and creativity all come together when making the Eight-pointed Rotating Star Block.
Above all, understanding its structure gives you the confidence to innovate, customize, and create star blocks that truly reflect your artistic vision.
Materials and Preparation
Before diving into the sewing process, it is essential to prepare your materials. The Eight-pointed Rotating Star Block Tutorial starts with choosing the right fabrics and tools, as these can make or break your experience.
Cotton fabric is the most recommended choice due to its stability and ease of handling. Select at least two or three complementary fabrics to bring out the star’s definition. A high contrast between the star and the background will help highlight the rotating effect.
Accurate cutting tools are crucial. A rotary cutter, self-healing mat, and a clear quilting ruler will help you achieve precise measurements. Precision at this stage is vital since small inaccuracies compound as you assemble the block.
Pressing is equally important. Always press your fabric before cutting and after sewing each seam. This ensures that your block lies flat and your points remain sharp. Investing time in pressing will significantly improve your results.
Templates or foundation paper piecing may be used depending on your preferred method. Some quilters like to use templates for traditional assembly, while others prefer paper piecing for exact angles. Both approaches are valid and produce excellent results.
Finally, gather thread that matches your fabric choices and prepare your sewing machine with a sharp needle. A quarter-inch presser foot is highly recommended, as it helps maintain consistent seam allowances throughout your project.
Step-by-Step Construction
Now that you have your materials ready, it is time to construct the Eight-pointed Rotating Star Block. Breaking the process into steps will make it easier to follow and less overwhelming.
Start by cutting your fabric pieces precisely according to your chosen size. Each point of the star will need to be cut at an angle, and this is where accuracy matters most. Double-check your measurements before making any cuts.
Next, arrange the pieces on your work surface to visualize the star. This helps you see the rotating effect before sewing and ensures that your fabric placement aligns with your vision. Rearranging at this stage is much easier than after stitching.
Begin sewing the smaller units together, typically starting with diamonds or triangles that form the star points. Work slowly and carefully, maintaining your seam allowance. This ensures that the points meet perfectly in the center.
As you complete each section, press your seams open or to the side depending on what lies flat. Pressing at each stage avoids bulk in the final assembly and makes it easier to match seams later on.
Once the star is complete, sew it to the background fabric, aligning edges carefully. This is where the block comes to life, with the star contrasting beautifully against the background.
Finally, square up your block to the desired size. This step ensures that your block will fit seamlessly with others in your quilt, maintaining overall balance and symmetry.
Tips for Success and Creative Variations
Making the Eight-pointed Rotating Star Block can be a rewarding challenge, but like all quilting projects, a few tips can make the process smoother. Attention to detail is the key to achieving sharp points and a clean finish.
Patience is your best tool. Rushing through seams often leads to misalignment. Take your time with cutting, pinning, and pressing. Even small adjustments can greatly improve the block’s final appearance.
Consider using starch on your fabric before cutting. This adds stability and helps prevent stretching, especially when working with angled edges cut on the bias. Starching can save frustration later during sewing.
Color choice is another area where creativity shines. A two-tone star creates a bold, graphic effect, while using multiple fabrics in the star points gives a scrappy, vibrant look. Experimenting with fabric placement allows you to personalize your block.
If you enjoy hand sewing, this block can also be made using English Paper Piecing. While slower, this method provides incredible precision and is portable, making it perfect for quilters who love sewing on the go.
For a modern twist, enlarge the block and use it as a quilt centerpiece. Alternatively, create multiple small blocks and arrange them in a repeating pattern for a dazzling quilt full of movement. The versatility of the Eight-pointed Rotating Star Block makes it a favorite among creative quilters.
about the Eight-pointed Rotating Star Block Tutorial
What size should I cut my pieces for the Eight-pointed Rotating Star Block?
The size depends on your desired block dimensions. Templates or foundation paper piecing patterns often come with specific measurements to ensure accuracy.
Is this block suitable for beginners?
Yes, but it may be challenging for complete beginners. Those with basic quilting knowledge can attempt it successfully by working carefully and following instructions step by step.
Do I need special tools for this tutorial?
Essential tools include a rotary cutter, quilting ruler, and sewing machine with a quarter-inch foot. Templates or foundation paper piecing papers can also be helpful.
What fabrics work best for this block?
Cotton is the most reliable choice. Use contrasting fabrics for the star and background to emphasize the rotating effect.
Can I hand sew the Eight-pointed Rotating Star Block?
Absolutely. English Paper Piecing is a popular hand-sewing method that works beautifully for this block, offering precision and control.
How do I keep my star points sharp?
Focus on accurate cutting, consistent seam allowances, and pressing after each step. Using pins or clips to align seams also helps maintain sharp points.
The Eight-pointed Rotating Star Block Tutorial is more than just a guide to making a quilt block—it is an invitation to explore creativity, precision, and tradition in quilting. By following the steps outlined in this article, you can create a block that is both timeless and versatile, ready to become the centerpiece of any project.
Now that you have all the tools, tips, and inspiration, it is your turn to try it out. Have you ever made an Eight-pointed Rotating Star Block before? Share your honest opinion and suggestions—we would love to hear how this tutorial helps you bring your quilting vision to life.