
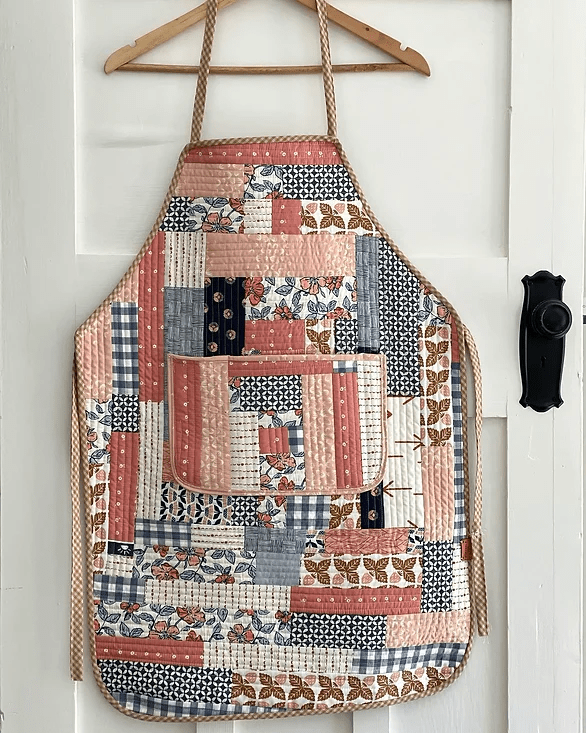
How to make: A Quilted Apron is a wonderful project for anyone who loves sewing, quilting, or simply creating handmade pieces that are both beautiful and functional. A quilted apron is not only a stylish accessory for the kitchen but also a durable garment that can withstand daily use. Whether you are a beginner or an experienced quilter, this project offers a chance to combine creativity, practicality, and craftsmanship into one rewarding activity.
The charm of a quilted apron lies in its versatility. You can choose soft florals for a vintage look, bold prints for a modern twist, or even use fabric scraps to make it eco-friendly and budget-conscious. The quilting adds texture and structure, making the apron sturdier than regular fabric aprons. Because it involves layering fabrics with batting, it also provides protection against heat, which is a plus when cooking or baking.
In this article, we will explore how to make a quilted apron step by step, while also discussing fabric choices, quilting techniques, and finishing touches. The goal is to help you create an apron that reflects your personality and serves as a practical tool in your kitchen. Let’s dive in and discover how enjoyable this process can be.
Choosing Materials for Your Quilted Apron
The first step in how to make: a quilted apron is selecting the right materials. Choosing fabrics is exciting because it gives you the freedom to personalize the project. Cotton fabrics are often recommended because they are breathable, washable, and easy to work with. For a more artistic look, you can mix and match different prints that complement one another.
When quilting, you will also need batting, which is the middle layer that adds thickness and structure to the apron. Batting comes in various weights, and for this type of project, a lightweight batting is usually sufficient. It provides comfort without making the apron too bulky.
Thread selection is another important detail. Opt for high-quality thread that matches or contrasts nicely with your chosen fabric. Strong thread ensures durability, especially since aprons go through frequent washes. Choosing colorful thread can also make the quilting stitches part of the decorative design.
In addition to fabric and thread, you will need basic sewing supplies such as scissors, pins, a rotary cutter, and a ruler. Having a good sewing machine will make the process much easier, though hand stitching is also an option if you prefer a slower, meditative approach.
Consider the purpose of your apron. If it’s meant for heavy cooking or gardening, durable fabrics and a sturdier batting are ideal. If it’s mostly decorative or a gift, you can experiment with delicate fabrics and fun prints. This decision helps guide your shopping and preparation.
Finally, think about the apron’s design. Do you want it full-length or waist-only? Will it include pockets? Having a clear vision before cutting the fabric saves time and reduces mistakes. With materials ready, you’re prepared for the next step.
Cutting and Preparing the Fabric
Once you’ve chosen your fabrics, the next stage in how to make: a quilted apron is cutting and preparing each piece. Accuracy at this stage ensures that the apron fits well and looks polished. Begin by creating or finding a simple apron pattern, or use an existing apron you love as a template.
Lay the fabric on a flat surface and cut out the main apron shape. Be sure to cut two layers: one for the outer fabric and one for the lining. These will sandwich the batting later on. Always add extra seam allowance to ensure there’s room for stitching and adjustments.
Next, cut out the straps. These can be made from the same fabric or a coordinating fabric for added contrast. Straps should be long enough to tie comfortably around the waist or neck. Many people prefer adjustable straps, which can be achieved with simple hardware or creative sewing techniques.
If you want to include pockets, cut these pieces now. Quilted pockets add charm and functionality, allowing you to keep utensils or recipe cards handy while cooking. Consider making them slightly padded by quilting them separately before attaching them to the apron.
After cutting, iron each piece to remove wrinkles. Smooth, flat fabric is much easier to quilt and sew. It also ensures that the apron pieces align correctly during assembly.
Finally, layer your fabric and batting together temporarily using pins or fabric clips. This step prepares everything for the quilting process, which gives your apron its signature texture and durability.
Quilting the Apron Layers
Quilting is the heart of how to make: a quilted apron, as it defines the texture and strengthens the layers. Start by creating a fabric “sandwich”: the outer fabric, batting in the middle, and the lining fabric at the back. Secure the layers together with safety pins or basting stitches.
Decide on the quilting design. Straight-line quilting is simple and timeless, often done in horizontal or diagonal lines. Grid quilting, with intersecting lines, adds structure and a neat appearance. If you’re more adventurous, free-motion quilting can create unique patterns and give the apron a personalized touch.
Using your sewing machine, begin quilting from the center outward to prevent fabric from bunching. Take your time, keeping the stitches even and steady. If quilting by hand, use a strong needle and small, consistent stitches. Though slower, hand quilting gives a charming handmade feel.
Remember that quilting not only enhances the apron visually but also increases its functionality. It keeps the batting in place, making the apron more durable and resistant to wear. The extra thickness also offers protection against heat when handling hot pots or pans.
If you quilt pockets separately, do this before attaching them to the apron. Quilted pockets stand out beautifully and add an extra layer of texture. Stitch them securely onto the apron front in your preferred placement.
Once the quilting is complete, trim any excess batting or fabric edges. Your apron should now have a neat, padded look and feel. This stage prepares it for finishing touches like binding and straps.
Finishing Touches and Assembly
The final stage in how to make: a quilted apron is assembling and adding finishing details. Begin by sewing the straps to the main apron body. Attach waist ties securely and ensure the neck strap sits comfortably. Double-stitch these areas for extra strength, since they endure frequent pulling and tying.
Next, finish the edges of the apron with binding. Binding is a strip of fabric folded over the raw edges and stitched in place, giving the apron a clean, professional look. You can purchase ready-made bias binding or make your own from coordinating fabric. Binding also reinforces the apron, preventing fraying over time.
If you included pockets, now is the time to reinforce them with additional stitching. Strong seams ensure that pockets can hold items without sagging or tearing. You might also consider decorative topstitching to highlight the design.
Some makers like to add embellishments such as appliqué, embroidery, or decorative trims. These details turn a practical apron into a piece of wearable art. Keep in mind that too many embellishments may reduce washability, so balance creativity with practicality.
Try on the apron during assembly to check fit and comfort. Adjust strap length or pocket placement if necessary. This step ensures that the finished apron is not only attractive but also functional for your daily needs.
Finally, give the apron a final press with an iron. A well-pressed apron looks polished and showcases the beauty of the quilting. At this point, your handmade quilted apron is ready to wear or gift.
1. What is the best fabric for a quilted apron?
The best fabric is 100% cotton because it is breathable, durable, and easy to quilt. Cotton also comes in a wide range of prints and colors, allowing for creative designs.
2. Do I need batting for a quilted apron?
Yes, batting is essential because it provides thickness and structure. A lightweight batting is ideal, as it adds comfort and heat resistance without making the apron too heavy.
3. Can I make a quilted apron without a sewing machine?
Absolutely. Hand quilting is possible and gives the apron a traditional look. However, it will take more time compared to using a sewing machine.
4. How do I wash a quilted apron?
Machine wash your quilted apron on a gentle cycle with mild detergent. Avoid bleach, and tumble dry on low or air dry to preserve the fabric and stitching.
5. Can beginners learn how to make: a quilted apron?
Yes, this project is beginner-friendly. Starting with a simple design and straight-line quilting makes it accessible for those new to sewing and quilting.
6. How long does it take to complete a quilted apron?
Depending on your skill level, it can take anywhere from a few hours to a weekend project. More detailed quilting and embellishments may extend the time.
Learning how to make: a quilted apron is a fulfilling project that combines creativity, sewing skills, and practicality. From choosing fabrics to adding finishing touches, each step allows for personalization and artistic expression. The end result is not just an apron, but a handmade piece that reflects care and individuality.
Now that you know the process, I’d love to hear from you. What fabric choices or quilting designs inspire you most? Share your honest opinion and suggestions so we can keep improving and inspiring more handmade creations.